background image

28

Using the LCD with a Personal Computer (PC)

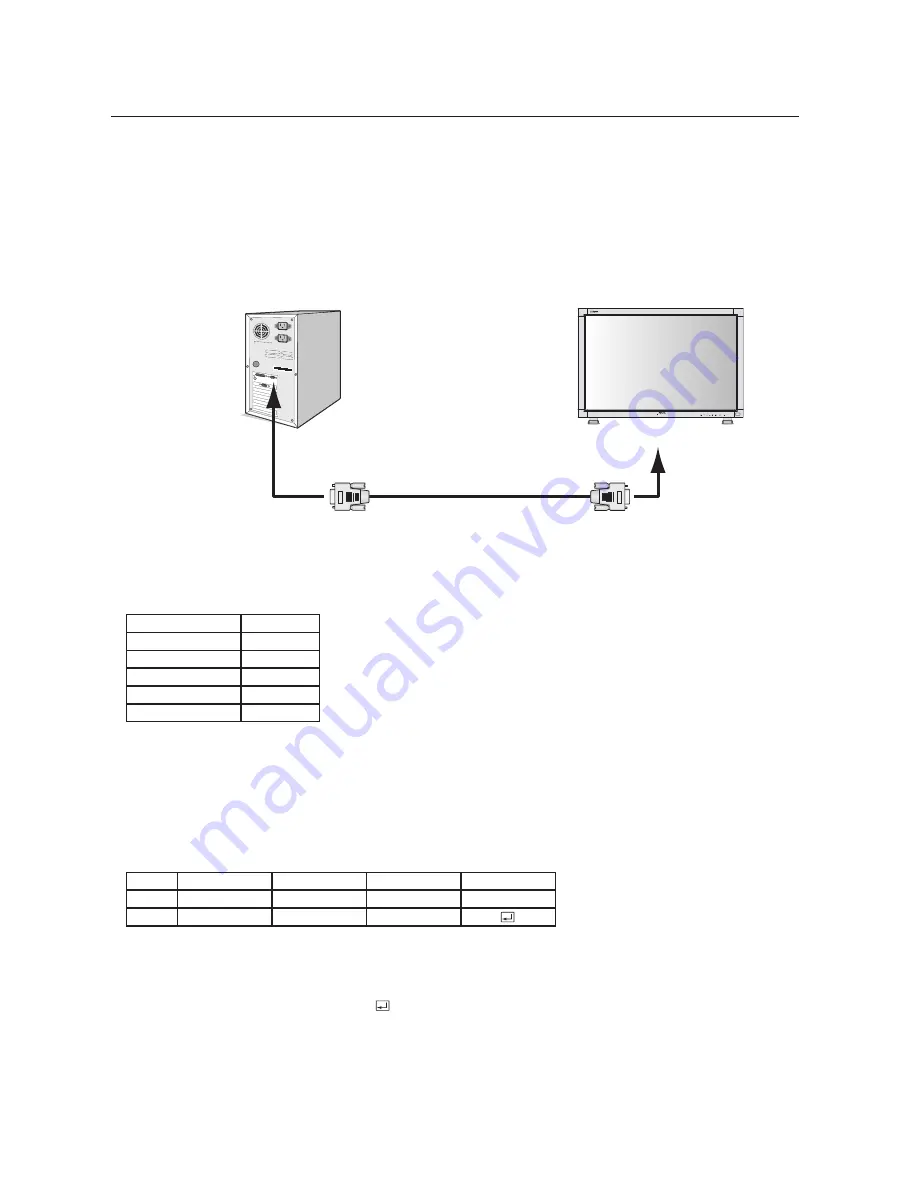
This LCD monitor can be controlled by connecting a personal computer with a RS-232C terminal. 
Functions that can be controlled by a personal computer are:
•  Power ON or OFF
•  Switching between input signals

Connection
LCD M PC

Note: If your PC (IBM or IBM compatible) is equipped only with a 25-pin serial port connector, a 25-pin serial port adapter 

is required.  Contact your dealer for details.

1) Interface

This LCD monitor uses RXD, TXD and GND lines for RS-232C control.  
For RS-232C cable, the reverse type cable should be used.

2) Control command diagram

The command is structured by the address code, function code, data code and end code.  The length of the 
command is different for each function.

PROTOCOL
BAUD RATE
DATA LENGTH
PARITY BIT
STOP BIT
FLOW CONTROL

RS-232C
9600 [bps]
8 [bits]
NONE 
1 [bits]
NONE

HEX
ASCII

Address code

30h 30h

'0' '0'

Function code

Function
Function

Data code

Data 
Data

End code

0Dh

30h 30h (In ASCII code, '0' '0') fixed.
A code of each fixed control move.
A code of each fixed control data (number) and not always indicated.
0Dh (In ASCII code, '      ' ) fixed.

[Address code] 
[Function code] 
[Data code]  
[End code]

PC

to RS-232C terminal

RS-232C Cable

Содержание AccuSync LCD4000

Страница 1: ...LCD4000 TM ...

Страница 2: ...intosh Computer 12 Connecting to a Computer with a Digital Output 13 Connecting to a VCR or Laser Disc Player 14 Connecting to a DVD Player 15 Connecting to a Stereo Amplifier 16 Basic Operation Power On and Off modes 17 Power Indicator 18 When Using Power Management Function 18 Selecting a video source 18 Picture Size 18 Picture Mode 18 OSM Information 18 OSM On Screen Manager Controls Computer 1...

Страница 3: ...se the separation between the equipment and receiver Connect the equipment into an outlet on a circuit different from that to which the receiver is connected Consult your dealer or an experienced radio TV technician for help If necessary the user should contact the dealer or an experienced radio television technician for additional suggestions The user may find the following booklet prepared by th...

Страница 4: ... place any heavy objects on the power cord Damage to the cord may cause shock or fire Do not place this product on a sloping or unstable cart stand or table as the monitor may fall causing serious damage to the monitor When operating the LCD4000 monitor with its AC 220 240V power supply use a power supply cord that matches the power supply voltage of the AC power outlet being used The power supply...

Страница 5: ...e Control and AA Batteries Clamper x 2 Screw M4 x 10 x 2 CD ROM Power Cord User s Manual Video Signal Cable D SUB to D SUB Cable Wireless Remote Control and AA Batteries The following components are available to use with the LCD4000 To obtain the optional components and additional information contact Customer Service at 800 632 4662 Macintosh Cable Adapter External Speakers Screw M4 x 10 x 2 Band ...

Страница 6: ... result in damage to the equipment or injury to the user or installer Prod uct warranty does not cover damage caused by improper instal lation Failure to follow these recommendations could result in voiding your warranty When using mounting accessories other than NEC compliant and approved they must be VESA compatible mounting method NEC strongly recommends using screws M6 size and 8mm in length I...

Страница 7: ...activate the control key lock function press both of and and hold down simultaneously To resume back to user mode press both and and hold simultaneously for three 3 seconds POWER button Switches the power on off See also page 17 MUTE button Switches the audio mute ON OFF INPUT button Acts as SET button with OSM menu Selects the signal connected with the RGB input connector Toggle switches between ...

Страница 8: ... EXTERNAL SPEAKER TERMINAL To output the audio signal from AUDIO 1 2 or 3 jack AC IN connector Connects with the supplied power cord RGB 1 IN DVI D To input digital RGB signals from a computer having a digital RGB output This connector does not support analog input RGB 2 IN mini D Sub 15 pin To input a analog RGB signals from a personal computer or other RGB equipment RGB 3 DVD HD R Cr Pr G Y B Cb...

Страница 9: ...OSM information See page 18 AUTO SETUP button To enter the auto setup menu See page 21 MENU button To on off the menu mode UP button Acts as button to move the highlighted area up to select the adjustment with OSM menu Small screen which adjusted PIP mode moves up DOWN button Acts as button to move the highlighted area down to select the adjustment with OSM menu Small screen which adjusted PIP mod...

Страница 10: ...Other than to install the batteries do not open the remote Do not allow water or other liquid to splash onto the remote control If the remote control gets wet wipe it dry immediately Avoid exposure to heat and steam Operating Range for the Remote Control The remote control system may not function when direct sunlight or strong illumination strikes the remote control sensor of the LCD monitor or wh...

Страница 11: ...ternal equipment See page 10 16 To protect the connected equipment turn off the main power before making connections Refer to your equipment user manual 4 Connect the supplied power cord The equipment should be installed close to a power outlet and should be easily accessible Fully insert the prongs into the power outlet socket Loose con nection may cause image degradation 5 Switch on the power of...

Страница 12: ...C Audio cable Close the ferrite core Ferrite Core To AUDIO 1 of monitor To connector of PC Ferrite Core 1 2 Attach the Ferrite Core to PC Audio Cable and S VIDEO Cable Use of the cable without mounting the ferrite core will result in the occurrence of noise Attach the Ferrite Core to the end of PC Audio Cable Only AUDIO 1 side of monitor Open the ferrite core and clamp it on the S VIDEO Cable Clos...

Страница 13: ... DVD HD IN connector BNC on the LCD monitor use a signal cable mini D sub 15 pin to BNC x 5 Select RGB 3 from the INPUT button When connecting one or more LCD monitors use the RGB OUT connector BNC The AUDIO IN 1 2 and 3 can be used for audio input For connection select AUDIO 1 2 or 3 from the AUDIO INPUT button Connecting the LCD Monitor to a PC LCD monitor second monitor To RGB3 DVD HD IN Mini D...

Страница 14: ... 800 632 4662 To connect the RGB 3 DVD HD IN connector BNC on the LCD monitor use the signal cable available separately mini D sub 15 pin to BNC x 5 If you use with a Macintosh PowerBook set Mirroring to off Refer to your Macintosh s owner s manual for more information about your computer s video output requirements and any special identification or configuring your monitor s image and monitor may...

Страница 15: ... DVI D connector DVI D connector To DVI output To audio output LCD monitor Connecting to a Computer with a Digital Output The RGB 1 IN connector also accepts a DVI D cable Input TMDS signals conforming to DVI standards To maintain display quality use a cable recommended by DVI standards The AUDIO IN 1 2 and 3 can be used for audio input For connection select AUDIO 1 2 or 3 from the AUDIO INPUT but...

Страница 16: ...ft output LCD monitor second monitor LCD monitor Connecting to a VCR or Laser Disc Player Video signals can be connected to either the VIDEO IN RCA or BNC or the S VIDEO IN connector NOTE If S VIDEO and RCA are both connected S VIDEO will have priority Video output will be from the OUT connector that has been set here When connecting one or more LCD monitors use the VIDEO OUT connectors BNC The AU...

Страница 17: ...he RGB 3 DVD HD In connector BNC on the LCD monitor use a separately available BNC connector cable You will need a BNC to RCA adapter to connect a DVD player with an RCA pin jack to the BNC connector cable not provided Some DVD players may have different connectors such as Cr Pr Y and Cb Pb Select DVD HD input mode from the INPUT button When connecting one or more LCD monitors use the RGB 3 OUT co...

Страница 18: ...fie External speaker External speaker LCD monitor Connecting to a Stereo Amplifier Turn on the LCD monitor and the amplifier only after all hookups have been made Use an RCA cable to connect the AUDIO OUT connector RCA on the LCD monitor and the audio input on the amplifier Do not reverse the audio left and right jacks The AUDIO IN 3 used for audio input The AUDIO OUT jack outputs sound for the AU...

Страница 19: ...h on the LCD monitor 3 Pressing the Main Power Switch NOTE When the Main Power Switch is used to power off the LCD the remote control and the power switch will not activate the on mode Be sure to turn the Main Power Switch to the on mode before using these two options Main Power Switch The LCD monitor power indicator will turn green while powered on or red in off mode The monitor can be powered on...

Страница 20: ...ndby Red and Green Picture Size Picture Mode OSM Information RGB 1 2 3 DVD HD VIDEO NOTE FULL only in W XGA 1280 x 768 in RGB 1 2 3 FULL NORMAL WIDE FULL NORMAL FULL NORMAL WIDE RGB 1 2 3 DVD HD VIDEO HIBRIGHT sRGB STANDARD HIBRIGHT CINEMA STANDARD RGB1 2 3 DVD HD VIDEO PIP or POP Main RGB2 Sub VIDEO S Video Input mode Input signal Information Audio input mode Picture Size mode Video Input mode Au...

Страница 21: ...y timings It is adjustable to get a distinct image or a soft one as you prefer and set independently for each timing Press button to increase sharpness Press button to decrease sharpness BRIGHTNESS CONTRAST SHARPNESS BLACK LEVEL COLOR CONTROL COLOR TEMPERATURE PICTURE RESET BLACK LEVEL Press button to increase black level Press button to decrease black level SELEXIT PRESET NEXTMENU END SEL EXIT PR...

Страница 22: ...ge on the screen Adjusts the vertical size by increasing or decreasing the setting Press button to expand the height of the image on the screen Press button to narrow the height of the image on the screen V RESOLUTION SCREEN RESET NO YES Selecting Picture reset allow you to reset all OSM settings from SCREEN setting Select Yes and press SET button to decide to restore to factory preset SELEXIT PRE...

Страница 23: ...e black level Selecting the auto adjust ON OFF When selecting ON the clock phase will adjust automatically CONFIGURATION 1 TREBLE BASS AUDIO RESET SELEXIT PRESET NEXTMENU END SEL EXIT PRE MENU END SELEXIT PRESET NEXTMENU END SEL EXIT PRE MENU END SELEXIT PRESET NEXTMENU END SEL EXIT PRE MENU END SELEXIT PRESET NEXTMENU END SEL EXIT PRE MENU END SELEXIT PRESET NEXTMENU END AUTO SETUP AUTO ADJUST AU...

Страница 24: ...CREEN SAVER FACTORY PRESET AUTO SETUP AUTO ADJUST AUTO BRIGHTNESS POWER SAVE LANGUAGE OSM TIME OFF TIMER SCREEN SAVER FACTORY PRESET AUTO SETUP AUTO ADJUST AUTO BRIGHTNESS POWER SAVE LANGUAGE OSM TIME OFF TIMER SCREEN SAVER FACTORY PRESET FACTORY PRESET NO YES Selecting YES allows you to reset all OSM control settings back to the factory settings SELEXIT PRESET NEXTMENU END SEL EXIT PRE MENU END A...

Страница 25: ... PICTURE RESET BRIGHTNESS CONTRAST SHARPNESS COLOR BLACK LEVEL PICTURE RESET BRIGHTNESS CONTRAST SHARPNESS COLOR BLACK LEVEL PICTURE RESET TREBLE BASS AUDIO RESET To accentuate or quiet the high frequency sound Press button to increase TREBLE sound Press button to decrease TREBLE sound PICTURE AUDIO PICTURE IN PICTURE CONFIGURATION AUDIO RESET NO YES Selecting Picture Reset allow you to reset all ...

Страница 26: ...TION LANGUAGE ENGLISH DEUTSCH ESPAÑOL FRANÇAIS ITALIANO SVENSKA JAPAN SEL EXIT PRE MENU END PICTURE AUDIO PICTURE IN PICTURE CONFIGURATION SELEXIT PRESET NEXTMENU END OSM TIME To select OFF TIMER mode ON OFF In the OFF TIMER menu you can preset the monitor to automatically power down A time between 1 to 24 hours is available In the OSM Time menu you can select how long the OSM information disappea...

Страница 27: ...de to restore to factory preset BRIGHTNESS CONTRAST SHARPNESS TINT COLOR BLACK LEVEL NOISE REDUCTION PICTURE RESET BRIGHTNESS CONTRAST SHARPNESS TINT COLOR BLACK LEVEL NOISE REDUCTION PICTURE RESET BRIGHTNESS CONTRAST SHARPNESS TINT COLOR BLACK LEVEL NOISE REDUCTION PICTURE RESET BRIGHTNESS CONTRAST SHARPNESS TINT COLOR BLACK LEVEL NOISE REDUCTION PICTURE RESET BRIGHTNESS CONTRAST SHARPNESS TINT C...

Страница 28: ...LIANO SVENSKA JAPAN TREBLE BASS AUDIO RESET SELEXIT PRESET NEXTMENU END TREBLE BASS AUDIO RESET SELEXIT PRESET NEXTMENU END SEL EXIT PRE MENU END SEL EXIT PRE MENU END SELEXIT PRESET NEXTMENU END SEL EXIT PRE MENU END SELEXIT PRESET NEXTMENU END SEL EXIT PRE MENU END SELEXIT PRESET NEXTMENU END SEL EXIT PRE MENU END SELEXIT PRESET NEXTMENU END LANGUAGE OSM TIME OFF TIMER SCREEN SAVER COLOR SYSTEM ...

Страница 29: ...Select Yes and press SET button to decide to restore to factory preset Selecting the Color System depends on your input video format NTSC is automatic SELEXIT PRESET NEXTMENU END LANGUAGE OSM TIME OFF TIMER SCREEN SAVER COLOR SYSTEM CONFIGURATION RESET COLOR SYSTEM PAL SECAM SEL EXIT PRE MENU END SELEXIT PRESET NEXTMENU END LANGUAGE OSM TIME OFF TIMER SCREEN SAVER COLOR SYSTEM CONFIGURATION RESET ...

Страница 30: ...nes for RS 232C control For RS 232C cable the reverse type cable should be used 2 Control command diagram The command is structured by the address code function code data code and end code The length of the command is different for each function PROTOCOL BAUD RATE DATA LENGTH PARITY BIT STOP BIT FLOW CONTROL RS 232C 9600 bps 8 bits NONE 1 bits NONE HEX ASCII Address code 30h 30h 0 0 Function code ...

Страница 31: ...nding on the condition during changing of the input signal etc Example Turn the power ON is for ASCII code 4 Operation commands The operation commands execute the basic operation setting of this LCD monitor It may not operate when changing the signal HEX 21h 22h 5Fh 72h 31h 5Fh 72h 32h 5Fh 72h 33h 5Fh 76h 31h 5Fh 76h 32h Operation POWER ON POWER OFF INPUT RGB 1 INPUT RGB 2 INPUT RGB 3 INPUT VIDEO ...

Страница 32: ...ransported easily from one location to another AccuColor Control System with sRGB allows you to change between the color settings on your display to match your personal preference Plug and Play The Microsoft solution with the Windows 95 98 ME 2000 XP operating system facilitates setup and installation by allowing the monitor to send its capabilities such as screen size and resolutions supported di...

Страница 33: ...pparent Signal cable should be completely attached to the computer Use the OSM screen controls to focus and adjust display by increasing or decreasing the clock phase total When the display mode is changed the OSM Image Adjust settings may need to be readjusted Check the monitor and your display card with respect to compatibility and recommended signal timings If your text is garbled change the vi...

Страница 34: ...www necmitsubishi com css techform htm Sales and Product Information Sales Information Line 888 NEC MITS 888 632 6487 Canadian Customers 866 771 0266 Ext 4037 Government Sales 800 284 6320 Government Sales email gov necmitsubishi com Rebate Status Information NEC Rebate Status www rebatesHQ com or 866 765 5696 Mitsubishi Rebate Status www rebatesHQ com or 877 405 4692 Electronic Channels World Wid...

Страница 35: ...H V 15pin Mini D sub Composite 1 0V p p Input Impedance 75 Ohm BNC and RCA INPUT Y C Y 0 7V p p C 0 283V p p Input Impedance 75 Ohm S TERMINAL INPUT Component 1 0 0 7V p p Input Impedance 75 Ohm BNC INPUT RCA PIN JACK L R 2INPUT STEREO Mini Jack 1INPUT 9 Pin Mini D sub RS 232C 2 5A 100 120V 1 1A 220V 240V 5 40 deg C 10 80 without condensation 20 60 deg C 10 90 without condensation below 60 over 40...

Страница 36: ...rior approval which may be obtained by calling 1 800 632 4662 The Product shall not have been previously altered repaired or serviced by anyone other than a service facility authorized by NMD A to render such service the serial number of the product shall not have been altered or removed In order to be covered by this warranty the Product shall not have been subjected to displaying of fixed images...

Страница 37: ...r monitors LCD4000 is in compliance with Council Directive 73 23 EEC EN 60950 Council Directive 89 336 EEC EN 55022 EN 61000 3 2 EN 61000 3 3 EN 55024 and marked with NEC Mitsubishi Electric Visual Systems Corporation 4 13 23 Shibaura Minato Ku Tokyo 108 0023 Japan ...

Страница 38: ... of America To allow for design and specification improvements the information in this document is subject to change at any time without notice Reproduction of this document or portions thereof without prior approval of NEC Mitsubishi Electronics Display of America is prohibited DECLARATION OF CONFORMITY This device complies with Part 15 of FCC Rules Operation is subject to the following two condi...

Отзывы: