background image

NE41 17030-02 v1.0

D-POS II

 - Technical Handbook

neat

26

9.5.1  Example: Exiting a door by pressing a PUSH

In this example the situation is quite straightforward: in a residential home a door 

needs to be monitored from a reception or similar.

Prerequisites:

•  A D-POS II and a D-POS Antenna are mounted on a door post. A PUSH is mounted 

next to the door post or in the vicinity.

•  The door is equipped with a door lock mechanism.
•  The door must be locked at all times but there must be the possibility to open 

without a key.

•  There is only one caregiver and one caretaker.
•  Caregiver and caretaker wears SMILE IDs.
•  The door unlocks automatically for the caregiver and the caretaker must press the 

PUSH for it to unlock.

•  When a care taker presses the PUSH button a lamp in the reception is lit to indi-

cate that the care taker is approaching and has pushed the red button.

Picture 17. 

Door opening with D-POS II, D-POS ANTENNA and a PUSH unit

#

Denomination

1

PUSH unit

2

D-POS II unit

3

D-POS Antenna

4

Door lock mechanism

5

Light indication

Table 11. 

Hardware used in the setup

Содержание D-POS II

Страница 1: ...Handbook for Technical Adminstrators NE41 17030 02 v1 0 D POS II Technical Handbook neat D POS II Technical Handbook...

Страница 2: ...2018 NEAT Electronics All rights reserved Document number NE41 17030 02 v1 0 Revision date 2018 04 04 Contact NEAT Electronics AB Varuv gen 2 SE246 42 L ddek pinge Sweden Phone 46 46 70 70 65 Fax 46...

Страница 3: ...7 3 6 DOOR 7 3 7 LOOP 7 3 8 U DAT S 7 4 D POS II hardware 8 4 1 Hardware overview 8 4 2 Connectors 8 4 2 1 Rotary switches S1 S3 9 4 2 2 Potentiometer P1 9 4 2 3 DIP Switches DIP1 DIP8 9 4 3 LED 10 4...

Страница 4: ...trigger SMILE ID 20 7 1 Unit appearance 20 8 Installation 21 8 1 D POS II Connections 21 8 2 Mounting options 22 8 3 Antenna installation 22 8 3 1 Ferrite antenna 22 8 3 2 Loop antenna 24 8 3 3 Synchr...

Страница 5: ...in a D SERVER system environment For more information about the D TREX and D SERVER please contact your distributor 1 3 This handbook Information notes and warnings intended for maintenance personnel...

Страница 6: ...alfunction may result in damage to a life 2 2 Use Use only original parts Do not expose to direct sunlight Keep away from dust moist and dirt Do not drop knock twist or shake the device Do not warm up...

Страница 7: ...y an electric cable conected to the D POS II as a loop This cable can be integrated into door posts or floors making the installation virtually invisible see 8 3 2 Loop antenna 3 4 SMILE ID This is th...

Страница 8: ...is easier to install 4 1 Hardware overview Denomination 1 Rotary switches S1 S3 2 Potentiometer P1 3 Connectors J2 J4 4 DIP switches DIP1 DIP8 5 Radiobutton B1 Table 1 D POS II PCB overview 4 2 Connec...

Страница 9: ...1 Setting position ID and Zone 4 2 2 Potentiometer P1 The potentionemeter P1 is used to manually adjust the power range and is within the range set by DIP7 see 5 1 3 RFID range adjustment 4 2 3 DIP S...

Страница 10: ...s off Tamper or antenna failure 3 Red Relay active due to received radio message 4 Green Normal operation RFID is emitted 5 Off Waiting for external activation 6 Table 4 LED Indications its functions...

Страница 11: ...ble to locate it The position Id code is a 4 digit hexadecimal value where the first two digits are set to 00 ZeroZero Each D POS II supports 255 posi tion Id codes and these are set with the rotary s...

Страница 12: ...the output power but also on the orientation of the field in relation to the the antenna coil in the receiver It is possible to select between two power levels with DIP7 and within each level it is p...

Страница 13: ...a wired external input on the screw terminal 6 DIP3 deter mines if the input is normally open DIP3 Off or normally closed DIP3 On If this function is active in configuration and the external input is...

Страница 14: ...e by setting DIP8 to OFF If coverage needs adjustment deactivate the walk test mode adjust RFID range and repeat steps 1 3 above 5 2 Programming with computer Programming with a computer requires a NP...

Страница 15: ...ice tab When WALL Family programmer is started a page with an array of products is dis played Click on the D POS II picture to open the RFID I O and General info tab Picture 4 WALL Family Programmer d...

Страница 16: ...potentiometers 6 2 2 RFID section Position ID code It is possible to change the position code that is sent from the antenna When the ID code is set by switches the value range is between 0001 to 00FF...

Страница 17: ...approx 1 second and is closed when the unit has booted up and runs normally Polarity Default value Normally open Pulse time s Default value 3 0 seconds 6 2 4 Tamper The unit is equipped with a tamper...

Страница 18: ...he values for radio reception ID code 1 8 These are the radio id codes of the attached radio devices Send acknowledge ACK Determine whether the unit sends acknowledges when radio messages are received...

Страница 19: ...II unit should ignore received acknowledge from other radio transmitters Default No function off i e acknowledge is NOT ignored Radio test alarm interval minutes 0 off Set the interval for radio test...

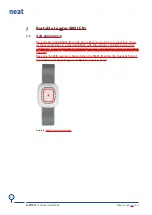
Страница 20: ...ecklace It has all the main features in a standard SMILE with the addition of a RFID receiver that enables the unit to work with D POS Antennas and loop antennas whereas the SMILE does not Basically t...

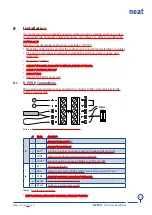
Страница 21: ...it Run and test Adjust RFID field if necessary 8 1 D POS II Connections The picture below displays how and what to connect to the screw terminal in the D POS II control unit Sync Picture 9 Screw termi...

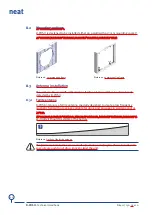
Страница 22: ...1 Ferrite antenna D POS Antenna is a ferrite antenna specially designed to create a low frequency magnetic field with a coverage suitable for doors and passages in wardens and or homes When placed ho...

Страница 23: ...r best mounting of the antenna 1 Remove the cover 2 Decide what cable outlet hole 1 3 or 6 that is most appropriate to use 3 Mark where to put the upper screw and screw it into the wall 4 Hang the cov...

Страница 24: ...nning to the control unit Twisting the cable diminishes the magnetic field to a minimum in the twisted part The entire length of the loop antenna cable must not exceed 10 meters The loop antenna can b...

Страница 25: ...s so that some persons are allowed to pass some doors but not others 9 3 Surveillance of doors in a corridor In a case with many rooms e g a corridor and when it is only required to monitor the moveme...

Страница 26: ...ust be locked at all times but there must be the possibility to open without a key There is only one caregiver and one caretaker Caregiver and caretaker wears SMILE IDs The door unlocks automatically...

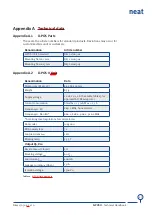
Страница 27: ...Denomination Data Dimensions W x H x D 86 x 86 x 26 mm Weight 85 g Supply voltage 12 28 VDC 1 6 A See table Table 13 for approved AC DC adaptors Current consumption Standby 25 mA Max 1 5 A FrequencyRF...

Страница 28: ...ANT technical data Appendix A 5 Loop antenna Maximum cable length 10 m Cable area 0 4 AWG 21 mm2 Table 15 LOOP antenna technical data Appendix A 6 SMILE ID Dimensions W x H x D 35 x 44 x 11 mm Weight...

Страница 29: ...NE41 17030 02 v1 0 D POS II Technical Handbook neat 29 This page is intentionally left blank...

Страница 30: ...www neat group com...

Отзывы: