iSTAR USERS MANUAL V.1.1. JANUARY 2013. © 2013 NCTECH LIMITED.
PAGE: 14
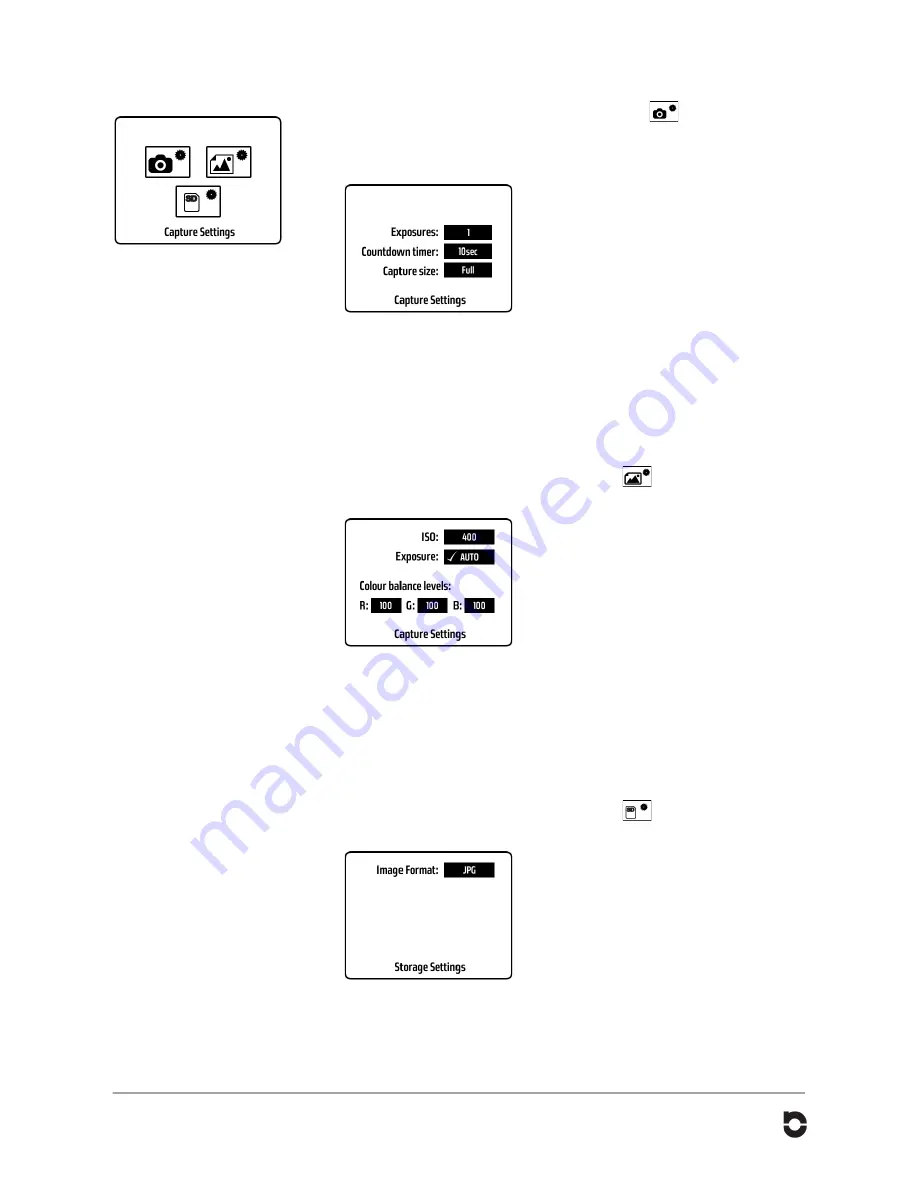
Capture Settings
From the main Capture Settings menu, press the icon
to navigate to the
“Capture Settings” screen.
Capture settings:
Exposure:
Tap the Exposure button to change the
number of exposures you want to capture.
(Options: 1 to 9 exposures)
Countdown timer:
Tap the Countdown timer button to select the
capture delay time. (Options: 5, 10, 30
seconds, 1, 5, minutes)
Capture size
The default panorama is 10,000 x 5,000
pixels which equates to 50 megapixels.
Tap the Capture size button to change the
output size of the panoramic image. (Options:
Full: 10,000 x 5,000 pixels, half, and quarter)
Image settings
From the main Capture Settings menu, press the
icon to navigate to the
“Storage Settings” screen.
ISO
By default the ISO is fixed to 400. Tap the
ISO button to change this. (Options 125 to
3,630). It is recommended that the ISO
setting remains at ISO 400.
Exposure
By default the Exposure setting is set to Auto.
This is the recommended setting. To set the
Exposure manually, tap the Exposure button.
This will display the manual settings.
Colour balance levels
By default the colour balance is set to Red:
100%, Green: 100%, and Blue:100%. Tap
the colour buttons to change the percentage
settings.
Storage settings
From the main Capture Settings menu, press the
icon to navigate to the
“Storage Settings” screen.
By default the output format is set to JPG.
This can be changed to PNG format. Tap the
Format button to change the setting.
Содержание iSTAR 360
Страница 1: ......


