background image


iSTAR USERS MANUAL V.1.1. JANUARY 2013. © 2013 NCTECH LIMITED. 

PAGE: 11 


Image capture 

Capturing an image 


From the Start Menu, press the 

 icon to navigate to the Capture/View Screen. 

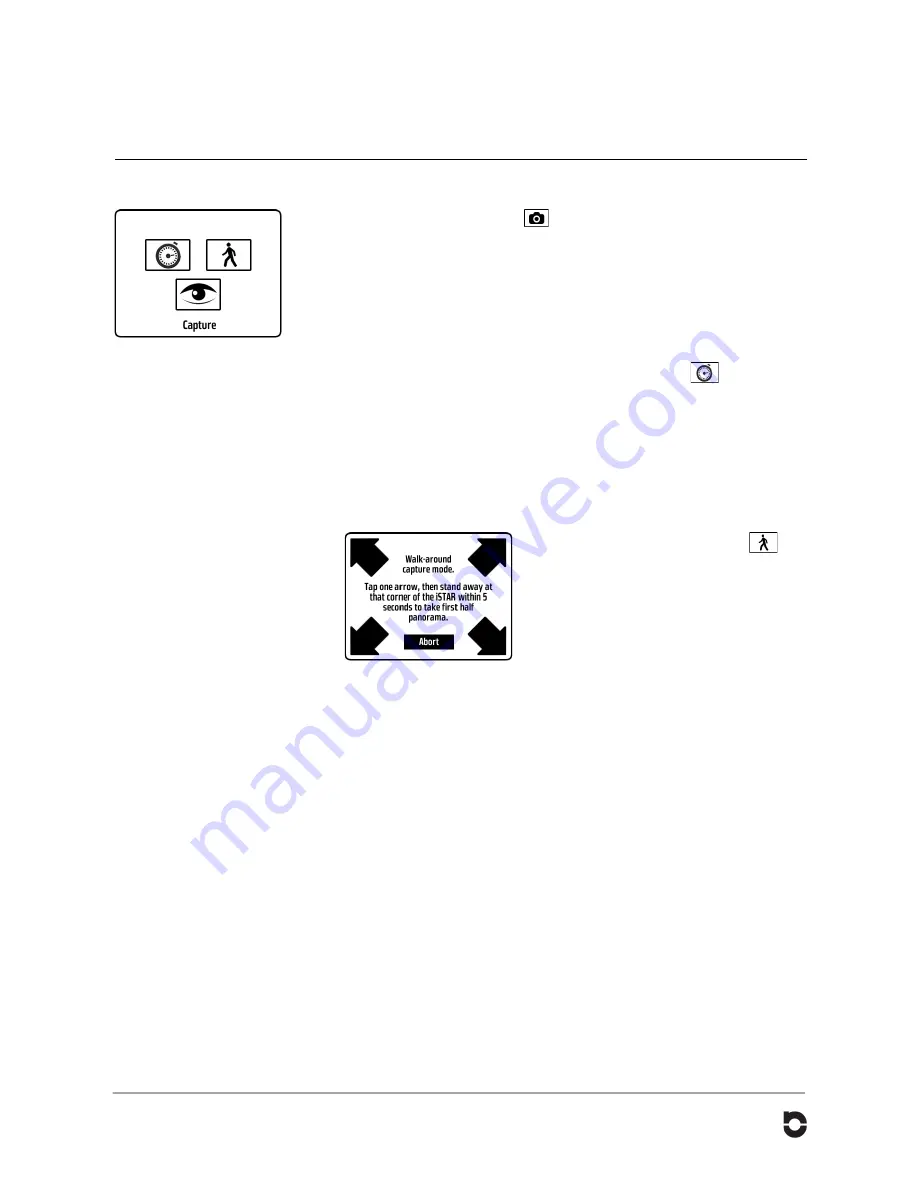
You can capture a panoramic image via two methods: Delay Capture; or in Walk 
Around Mode. 

Capture distance 

The optimal capturing distance from iSTAR is from 1.5 metres to infinity.  You can 
capture images closer than 1.5 metres, however, this may result in parallax errors 
where objects are cropped or may have ghosting. 

Delay capture   

To capture an image using the capture delay timer, press the 

 icon.  This will 

start the delay capture countdown allowing you to remove yourself from the scene 
and out of the image. (The delay time can be changed in the settings menu.)  
 
During the countdown there is an audible tone and the live panoramic view from 
the camera will be shown onscreen. 

Walk Around Mode  

Capturing in “Walk Around Mode” allows you to capture an image in two steps. 
This allows you to “walk around” the camera to avoid being in the image.  


1.

 To capture in this mode, press the 


icon and follow the onscreen instructions. 

 
2.

 Tap one arrow, then stand away at that 

corner of iSTAR.  Within 5 seconds you will 
capture half the panorama.  Press abort to 
return to the “Capture” screen. 
 

3.

 Follow the on screen instructions and 

position yourself on the other side of the 
camera to capture the other half of the 
panorama. 
 

Once the panorama has been captured, iSTAR will begin to process the image/s 
and save them to the SD Card or USB stick.  Whilst processing, it is safe to move 
the camera to the next location or to remove it from a tripod or monopod. 
IMPORTANT: whilst processing please do not switch off the camera, remove the 
battery, or power supply as this will result in your images being lost. 
 
The processing percentage time will be displayed on screen.  Once this is 
complete, the screen will automatically display the “Image Review” screen. (For 
information, see Image Review). 

Capture Time 

Assuming you are capturing a single exposure panorama in a reasonably well 
lit environment, the time to capture is approximately

 4 seconds

.  Once the 

panorama has been captured, iSTAR then processes the 4 source images and 
saves to the SD card or USB stick, whichever is being used.  The time to save will 
depend on where you are saving the file, for example if it's to the internal SD card 
then processing time will be around 30-60 seconds. 


Содержание iSTAR 360

Страница 1: ......

Страница 2: ...imits approved by the Federal Communications Commission NCTECH LIMITED MAKES NO WARRANTY EITHER EXPRESS OR IMPLIED INCLUDING BUT NOT LIMITED TO ANY IMPLIED WARRANTIES OF MERCHANTABILITY OR FITNESS FOR A PARTICULAR PURPOSE REGARDING ISTAR 360 DEGREE IMAGING DEVICE IN NO EVENT SHALL NCTECH LIMITED BE LIABLE TO ANYONE FOR SPECIAL COLLATERAL INCIDENTAL OR CONSEQUENTIAL DAMAGES IN CONNECTION WITH OR AR...

Страница 3: ...NG THE BATTERY 9 CHECKING THE BATTERY LEVEL 9 TURNING ON THE CAMERA 9 TURNING OFF THE CAMERA 10 MAIN MENU 10 IMAGE CAPTURE 11 CAPTURING AN IMAGE 11 Capture distance 11 Delay capture 11 Walk Around Mode 11 Capture Time 11 Live View Mode 12 IMAGE REVIEW 12 SETTINGS 13 NETWORK SETTINGS 13 Ethernet IP Settings 13 WiFi Settings 13 WiFi IP Settings 13 CAPTURE SETTINGS 14 Capture settings 14 Exposure 14 ...

Страница 4: ...iSTAR USERS MANUAL V 1 1 JANUARY 2013 2013 NCTECH LIMITED PAGE 4 GPS Audio and Tilt compensation 15 Format SD Card 15 TROUBLE SHOOTING 16 RESET BUTTON 16 SUPPORT PORTAL 16 ...

Страница 5: ...r plug This is to prevent electrical shock heat generation or fire Do not use the equipment when there is a flammable gas nearby This is to prevent an explosion or fire If you drop the equipment and the casing breaks open to expose the internal parts do not touch them due to the possibility of electrical shock Do not disassemble or modify the equipment High voltage internal parts can cause electri...

Страница 6: ...f the unit is suddenly brought in from the cold into a warm room condensation may form on the lenses and internal parts To prevent condensation first put the camera in a sealed plastic bag and let it adjust to the warmer temperature before taking it out of the bag If condensation forms on the camera do not use the camera This is to avoid damaging the camera If this occurs remove the SD card and ba...

Страница 7: ...AR quick start manual 8 Warranty card If you have purchased iSTAR for RGB overlay for LiDAR scanning your iSTAR will ship with the required adaptor spacer rods Recommended optional equipment Tripod Quick Release for convenient mounting of iSTAR Spare battery iSTAR Dimensions and Weight Height 110mm x Width 104mm Weight Approximately 1 4kg Power 12v mains power adapter 2 1mm jack Rechargeable batte...

Страница 8: ...C in Reset button Hand grips SD Card slot WiFI signal vent Lens Mini USB B Serial number 1 4 thread tripod mount Grip area Battery cover Slide to open Battery cover screw Safety strap pin Quick release plate pin holes LCD touchscreen GPS aerial x Side port view Top view Underside view Nomenclature ...

Страница 9: ...e battery is installed 2 Position the camera so that the NCTech logo is pointing towards you 3 To start the camera tap the four corners of the touch screen in order from 1 to 4 An audible beep will be heard 4 The iSTAR logo will appear on screen for approximately 15 seconds whilst the camera boots up The iSTAR menu screen will appear and the camera is now ready for operation Getting started Instal...

Страница 10: ...UARY 2013 2013 NCTECH LIMITED PAGE 10 Turning off the camera To turn off the camera touch the power icon You will then be asked to confirm by tapping the tick box To cancel and return to the start screen tap the X button Main menu ...

Страница 11: ...s 2 Tap one arrow then stand away at that corner of iSTAR Within 5 seconds you will capture half the panorama Press abort to return to the Capture screen 3 Follow the on screen instructions and position yourself on the other side of the camera to capture the other half of the panorama Once the panorama has been captured iSTAR will begin to process the image s and save them to the SD Card or USB st...

Страница 12: ...en captured and saved on the SD card or USB stick From the start menu press the icon to navigate to the Image Review screen The image number is displayed at the bottom of the screen The forward and back arrows can be used to cycle through the images that are saved To view an image press the button This will display an immersive view of the image Use your finger to manoeuvre the image Pressing the ...

Страница 13: ... obtain its network settings 3 To use manual network settings touch the Automatic IP button to toggle between Automatic and Manual settings WiFi Settings From the Settings Menu press the icon to navigate to the WiFi Settings screen 1 To enable WiFi on iSTAR press the WiFi enabled tick to toggle between ON or OFF 2 Press the SSID button to locate a WiFi network 3 Once selected press the Password bu...

Страница 14: ...nd quarter Image settings From the main Capture Settings menu press the icon to navigate to the Storage Settings screen ISO By default the ISO is fixed to 400 Tap the ISO button to change this Options 125 to 3 630 It is recommended that the ISO setting remains at ISO 400 Exposure By default the Exposure setting is set to Auto This is the recommended setting To set the Exposure manually tap the Exp...

Страница 15: ...e unit will power down and will require the 4 corner touch sequence to power up again Options 5 15 or 30 minutes To confirm and save your selection press the icon at the top left of the screen General Settings From the Settings Menu press the icon to navigate to the General Settings screen GPS Audio and Tilt compensation To enable or disable the GPS Tilt or Audio within the camera simply touch eac...

Страница 16: ...y tapping the four corners of the touch screen If problems persist disconnect the power cable if connected and disconnect and then reconnect the battery Support Portal For technical support please visit our support portal support nctechimaging com On the portal you can access iSTAR FAQs request technical support and much more besides NCTech Limited 20 22 Braid Road Edinburgh EH10 6AD Scotland Unit...

Отзывы: