background image


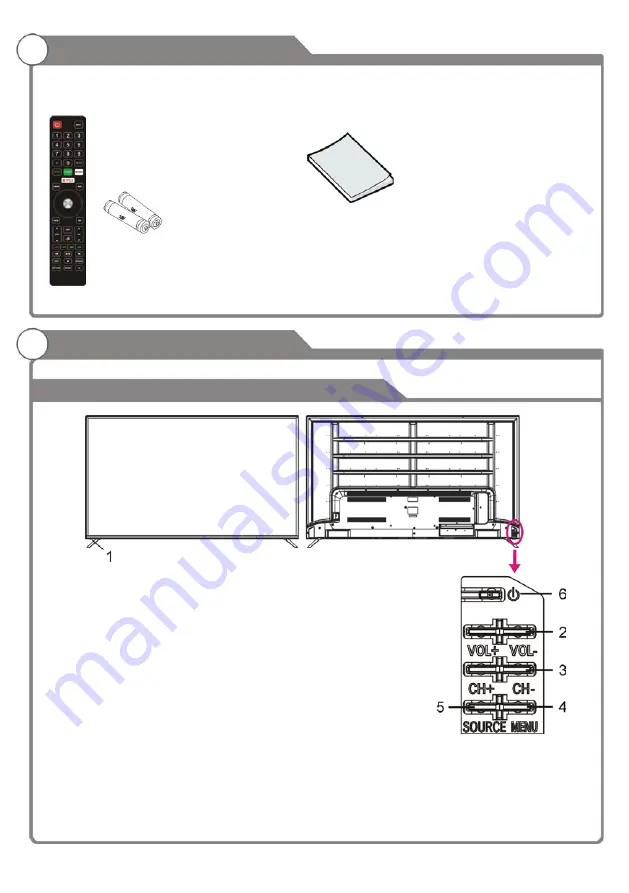
Accessories 

General Description 

Overview of front and back panel 

Remote Control & 

Batteries (AAA x2) 

Owner’s Instructions 


Please make sure that the following items are included with your LED TV. If any of the following 
items are missing, contact your dealer. 


1. Remote control sensor / power indicator. 
2. VOL+/-: Press to increase/decrease the volume. In the on-screen 
menu, use to move left/right. 
3. CH+/-: Press to change channels. In the on-screen menu, use to 
move up/down. 
4. MENU: Press to view on-screen menu of your TV. 
5. SOURCE: Toggle between all the available input sources. 
6. STANDBY: Press to toggle between normal and standby mode. 


Содержание NTS-6500K

Страница 1: ...65 CLASS LED UHD Smart TV MODEL NO NTS 6500K Instruction Manual PLEASE READ CAREFULLY BEFORE USE...

Страница 2: ...rmful interference to radio communications However there is no guarantee that interference will not occur in a particular installation If this equipment does cause harmful interference to radio or tel...

Страница 3: ...not move the TV set when the power is on Do not touch push or scratch the surface of the TV set with hard materials or items When TV surfaces are dirty please use a wet cotton cloth or soft cloth wit...

Страница 4: ...should be kept free from high temperature heating sources or direct sunlight Good ventilation is required Allow 10 cm between the LED TV and other appliances or built in cabinet walls When you wipe t...

Страница 5: ...aged by electrical surges Keep all people away from the antenna cable during electrical storms Warning only for equipment mass 7kg Never place a television set in an unstable location A television set...

Страница 6: ...p Box Connecting Digital Audio System Headphone Connecting USB Local Area Network Connecting DVD Player Set Top Box via HDMI Basic Operation Turning the TV On and Off OSD Menu Operation Input Source S...

Страница 7: ...mbo Zero X radiation complies to green environment protection requirement Advanced Chroma Processing Closed Captioning Program Control SAP STEREO MONO ATSC HDMI Input USB Input Input terminals used fo...

Страница 8: ...le 2 125 Antenna Input Impedance 75 Ohms Unbalance Sound Output 2 x 8W Power Supply Remote Control DC 3V Two AAA Batteries Power Consumption 230W Operation System Linux DDR Memory 1G Flash Storage 4G...

Страница 9: ...llowing items are missing contact your dealer 1 Remote control sensor power indicator 2 VOL Press to increase decrease the volume In the on screen menu use to move left right 3 CH Press to change chan...

Страница 10: ...to the HDMI jack of a device with a HDMI output 5 Y CVBS Pb Pr Connect to the video CVBS or Component Y Pb Pr of external devices such a camcorder or VCR 6 AUDIO L R Audio input for external devices...

Страница 11: ...ARROW buttons Use to move cursor up down left right 13 OK ENTER Validation key 14 BACK Press to go back to previous step 15 EXIT Press to exit all menu 16 LIST Press to display the TV program list 17...

Страница 12: ...he 300 Ohm 75 Ohm converter to connect the antenna cable to the antenna jack For details please refer to the following drawing Antennas with 300 Ohm Flat Twins Leads Antennas with 75 Ohm Round Leads P...

Страница 13: ...Unplug the cable or antenna from the back of the TV 2 Connect the cable or antenna to the ANT In terminal on the back of the VCR 3 Connect an RF cable between the ANT OUT terminal on the VCR and the A...

Страница 14: ...ct the audio cable to COMPONENT IN also Each DVD Player STB has a different back panel configuration When connecting a DVD players STB match the color of the connection terminal to the cable We recomm...

Страница 15: ...ables with a Ferrite Core 1 Connect a coaxial cable between the SPDIF jacks on the TV and the digital audio input jacks on the digital audio system When a digital audio system is connected to the SPDI...

Страница 16: ...SB slot only supports music MP3 and photo JPG multimedia files playback 2 This TV is compatible with most USB devices on the market However we cannot guarantee the compatibility of all USB devices due...

Страница 17: ...dia interface is a more accurate name for it especially because it allows multiple channels of digital audio 5 1 channels The difference between HDMI and DVI is that HDMI device is smaller in size has...

Страница 18: ...n the remote control or on the LED TV 5 If you want to completely turn off the TV unplug the power cord for the unit 6 After turning off the unit you should turn on the TV again at least 5 seconds lat...

Страница 19: ...urning on this TV Setup Wizard will appear on the screen Use the up and down buttons to select the preferred item Use the OK ENTER button to confirm selection Press EXIT or BACK button return to the p...

Страница 20: ...he Wi Fi account is encrypted To use Wired network please connect a network cable to LAN port of this product Select SKIP if you want to configure it next time Step 6 Input Source Use UP DOWN navigati...

Страница 21: ...ccount follow the on screen guide to open sign in or log in page vary for different apps Then you will see the on screen keyboard please use UP DOWN LEFT RIGHT and OK ENTER buttons to enter your accou...

Страница 22: ...EFT RIGHT navigation buttons to select an option Picture Mode available options Standard Movie Dynamic User Contrast Brightness Color Sharpness adjustable value 0 100 Note You can adjust Brightness Co...

Страница 23: ...en left and right speaker from 50 to 50 3 Auto Volume Limit This item is used to turn on off Auto Volume Limit 4 Surround Sound Turn on off Surround Sound for better sound experience 5 Dolby Audio Pro...

Страница 24: ...ervice5 Service6 Option Mode Available options Default Custom Font Style Available options Default Font 1 Font 2 Font 3 Font 4 Font 5 Font 6 Font 7 Font Size Available options Default Normal Large Sma...

Страница 25: ...atically when turn off this TV 5 Time Press UP DOWN navigation button to highlight it and press OK ENTER button to enter Auto Sync turn on off Auto Synchronization Clock you can adjust Year Month Day...

Страница 26: ...igation button to enter it Press UP DOWN navigation button to move the cursor Press LEFT RIGHT navigation button to lock or unblock it Available options G PG PG13 R NC 17 X NR 5 Canada English Press O...

Страница 27: ...select Air or Cable antenna type 2 Auto Tuning Press OK ENTER or RIGHT navigation button to enter it Use navigation buttons to set the Tuning Mode and Country When finished above settings highlight St...

Страница 28: ...button to select desired security type When finished the above settings highlight Connect and press OK ENTER to connect the network 2 Ethernet Press OK ENTER to enter submenu If Local Area Network is...

Страница 29: ...USB memory device 7 Internet Update Check This item is used to check if the software has any update through the network When viewing an available channel press OK ENTER button on remote control to op...

Страница 30: ...OK ENTER button to confirm Press EXIT button to return to previous page Remote operations when playing multimedia files Press the button to start or pause playback Press button on remote control to s...

Страница 31: ...nd but abnormal color or no picture Please check the antenna connection No remote control Batteries of remote control may have been exhausted if necessary please change the batteries Clean the remote...

Страница 32: ...dings Adjust the direction of the antenna or raise it Radio Wave Interference Wave patterns are moving on the screen which are usually caused by nearby radio transmitters or short wave receiving equip...

Отзывы: