
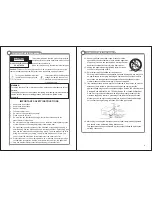
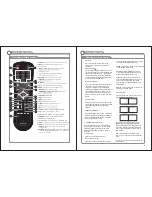


21
22
Menu system instruction
Menu system instruction
Adjust the OSD Screen
To
make
more
critical
sound
adjustments
based
on
your
own
preferences
in
Custom
:
Press
▼
button to highlight
Bsaa/ Treble/ Balance.
then press the
increase or decrease the
option
.
Press
▼
button to highlight
Surrond
, the press the ◄
/
► buttons to select it ON or OFF.
Press
▼
button to highlight
AVC
. then press the◄ /► buttons to select it ON or OFF.
Press
▼
button to highlight
Audio Language
. then press the◄ /► buttons to select the
language
you
want
.
This
is
only
available
in
digital
TV
.
NOTE
:
Balance
:
This
item
can
adjust
the
speaker
’
s
output
,
it
enables
you
to
listen
to
best
at
your
position
.
Surround
:
The
choice
of
this
item
can
suit
the
big
space
or
the
encirclement
sound
effect
pattern
,
according
toreceiveing
the
broadcast
signal
or
the
external
input
source
.
AVC
:
This
item
uses
for
reducing
the
difference
between
channel
and
program’s
volume
automatically
.
it
made
the
overall
water
to
be
even
.
This
function
will
also
reduce
the
fluctuation
of
the
sound
.
◄
/
► buttons to
SETUP
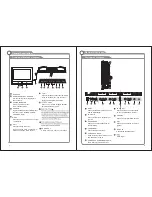
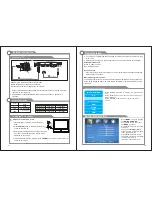
In
the
Setup
menu
you
may
change
some
preferences
that
include
Sleep
Time
,
Time
Zone
and
so
on
.
How
to
Navigate
:
Press
the
MENU
button
on
the
remote
control
.
Navigate
using ◄
/
►
buttons
to
select
Setup
.
Gain
access to
display op tionsb y
press ing
down
▼
arrow
butt
on
to
highlight
Parental
Controls
or
other
options
,
then press
◄
/
►
buttons
on
your
remote
to
select
.
Adjust the OSD Screen
Press
▼
button
to
highlight
Parental Controls.
then
press
the
buttons
to
select
Enter
Password
.
Press
▼
button to highlight
Time
. then press the◄ /► buttons to select Sleep Time,
Time, Zone, DST, clock.
Press
▼
button to highlight
Closed Caption.
then press ◄ / ► buttons
to
enter
sub
-
menu
.
Press
▼
button to highlight
Menu Settings
. then press ◄ / ► to adjust the value in
the sub menu;
Press
▼
button to highlight
VGA Settings
. This is only available in PC source.
Press
▼
button to highlight
Restore Default
. then
press
the ►
buttons
to
reset
.
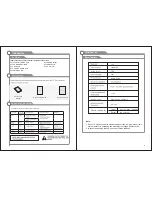
NOTE:
Enter Password: factory default code is “9999”
Sleep
Time
:
This item can close doen the TV automatically.
Time
Zone
:
This item can select the area.
Clock
:
This item will change with the area which you have selected in Time Zone.
This
is
only vailable
in
PC
source
.
Restore Default: lt will replace the picture establishment for default value.
◄ / ►
CHANNEL
How
to
Navigate
:
Press
the
MENU
button
on
the
remote
control
.
Navigate
using
buttons
to
select
Channel
.
◄ / ►
Press
▼ / ▲
button
to
select
Air
/
Cable
,
then
press
◄
/
►
button
to
select
Air
or
Cable
.
Press
▼ / ▲
button
to
select
Auto
Scan
,
then
press
ENTER
or
►
button
to
enter
sub
menu
.
Press
▼ / ▲
button
to
select
Favorite
,
then
press
ENTER
or
►
button
to
enter
sub
menu
.
Press
▼ / ▲
button
to
select
Show
/
Hide
,
then
press
ENTER
or
►
button
to
enter
sub
menu
.
Press
▼ / ▲
button
to
select
Channel
No
.,
then
press
◄
/
►
button
to
select
what
you
want
watch
.
Press
▼ / ▲
button
to
select
Channel
Label
,
then
press
ENTER
or
►
button
to
enter
sub
menu
.
You
can
input
alphabet
or
the
digital
number
to
change
the
name
of
the
channel
.
Содержание NTD-1351
Страница 15: ...27 28 8 Troubleshooting MUTE E E E E E ...
Страница 16: ...29 Picture defects and the reason ...


