background image

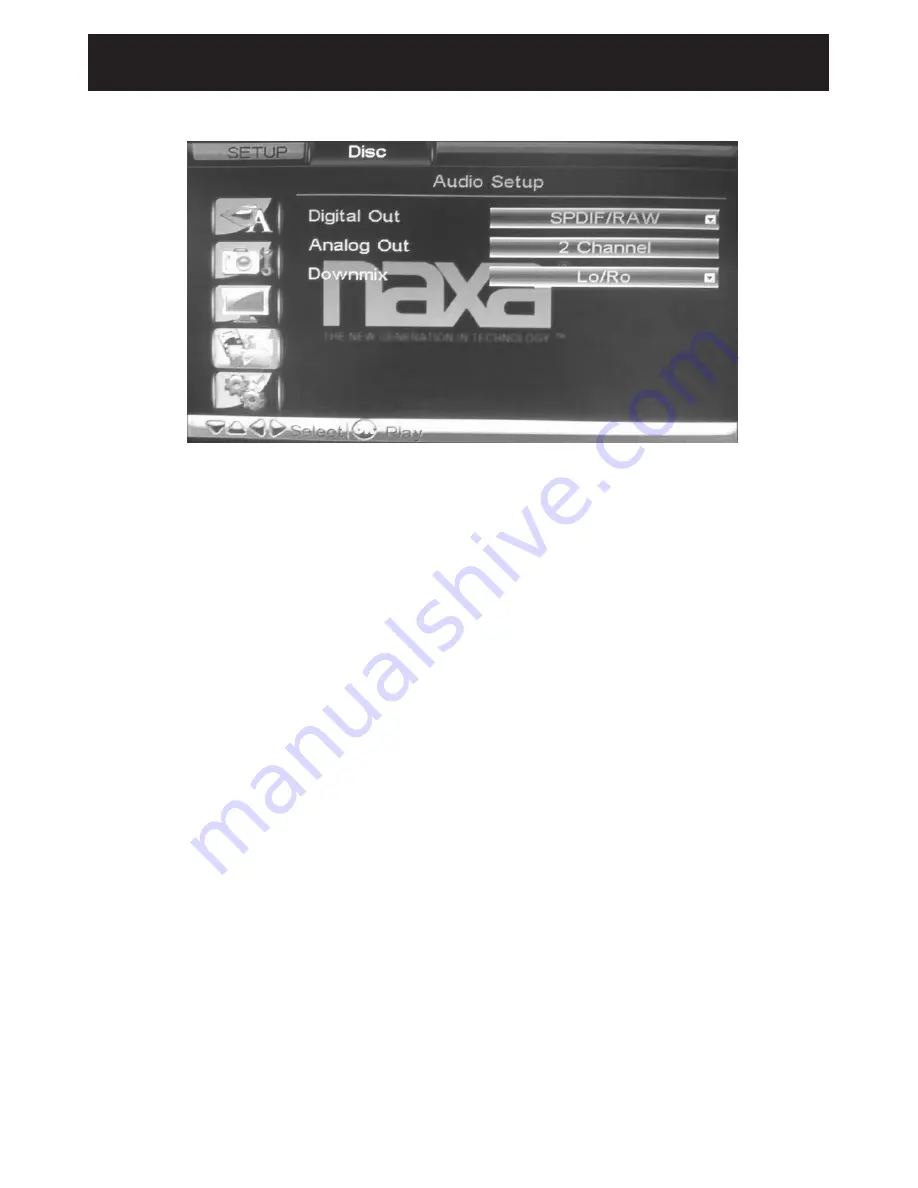
Audio Setup Page:

1. If Digital Out is selected, use the direction and ENTER buttons to set the output

 of the coaxial digital audio connector. Use SPIDF/PCM when connected to a TV 
 or other device that cannot decode digital audio. Use SPIDF/RAW when
connecting to a stereo system or other device that can decode digital audio.

2. Analog Out default setting is 2 channel (i.e., stereo).

3. If Downmix is selected, use the direction and ENTER buttons to set how the 

 player processes DVDs encoded with Dolby 5.1 surround sound for simpler
 2-speaker environments.

--Lo/Ro: The rear left/right channels are kept separate. The rear left channel will

play on the left speaker; the rear right channel will play on the right speaker.

--Lt/Rt: The rear left/right channels are mixed together. The mixed output will 

play on the left and right speakers. 

 
--Auto: the speaker will play automatically without limitation.

Audio Setup Page:

Audio Setup Page:

Audio Setup Page:

18

System Setup

Содержание ND-861

Страница 1: ...R HDMI DVD PLAYER INSTRUCTION MANUAL MODEL ND 861 PLEASE READ CAREFULLY BEFORE OPERATING ...

Страница 2: ...armful interference to radio or television reception which can be determined by turning the equipment off and on the user is encouraged to try to correct the interference by one or more of the following measures Reorient or relocate the receiving antenna Increase the separation between the equipment and receiver Connect the equipment into an outlet on a circuit different from that to which the rec...

Страница 3: ...nding prong The wide blade or the third prong are provided for your safety If the provided plug does not fit into your outlet consult an electrician for replacement of the obsolete outlet 10 Protect the power cord from being walked on or pinched particularly at plugs convenience receptacles and the point where they exit from the apparatus 11 Only use attachments accessories specified by the manufa...

Страница 4: ...ian to perform safety checks to determine that the product is in proper operating condition 23 Wall or ceiling mounting The product should be mounted to a wall or ceiling only as recommended by the manufacturer 24 Damage requiring service Unplug this product from the wall outlet and refer service to qualified service personnel under the following conditions a When the power supply cord or plug is ...

Страница 5: ...ages the DVD player Please read the following carefully Moisture condensation occurs for example when you pour a cold drink into a glass on a warm day Drops of water form on the outside of the glass In the same way moisture may condense on the optical pick up lens inside this unit one of the most crucial internal parts of the DVD player Moisture condensation occurs during the following cases When ...

Страница 6: ... on Copyright It is forbidden by law to copy broadcast show broadcast on cable play in public and rent copyrighted material without permission DVD video discs are copy protected and any recordings made from these discs will be distorted This product incorporates copyright protection technology that is protected by method claims of certain U S Patents and other intellectual property rights owned by...

Страница 7: ...Output jack 1 2 4 5 6 7 8 3 9 Power Indicator Open Close Button Disc Tray Play Pause Button Previous Button Next Button L R 1 2 3 4 5 6 7 Power Cable Right Audio Output jack Composite Video Output jack Left Audio Output jack Y PbCb PrCr Output jack 6 Product Overview 1 2 3 4 5 6 7 8 9 1 2 3 4 5 6 7 ...

Страница 8: ... UTTON selection ND 861 WIDE N P 1 2 3 4 5 6 7 8 9 10 11 12 13 14 15 16 2 OSD BUTTON To display the current playback information 4 TITLE BUTTON Go to title menu 6 SUBTITLE BUTTON To select one of the subtitle languages programs on a DVD if available 10 VOL BUTTONS To increase and decrease volume 11 STOP BUTTON To stop the playback 12 VIDEO BUTTON To change the video output mode UTTON To play the c...

Страница 9: ...26 WIDE BUTTON 27 REPEAT BUTTON To toggle between different repeat modes To switch the aspect ratio 17 POWER BUTTON Turns the power on or restores the DVD player to standby mode 18 To skip directly to a specific time title chapter track on a DVD GOTO BUTTON 19 LANGUAGE BUTTON Display the audio information or switch the channel ND 861 WIDE N P 17 18 19 20 21 22 23 24 25 26 27 28 8 Remote Control Pr...

Страница 10: ...he battery release tab Do not drop or cause impact to the remote control Do not spill water or any liquid on the remote control Do not place the remote control on a wet object Do not place the remote control under direct sunlight or near sources of excessive heat Remote Control Operation Range Point the remote control at the DVD player no more than 5 metres from the remote control sensor and withi...

Страница 11: ...ng any external AV device or TV do not connect the power cable to the mains power socket until all other connections are complete TV Connecting to a TV With an HDMI Cable Method 2 TV HDMI cable not included AV cable included L R coaxial cable not included White Red Yellow L R 10 Connections ...

Страница 12: ... to a TV with a Component Cable Note Audio Left white Audio Right red Yellow cable does not input A V Cable included White Red Yellow TV White Yellow Red L R 11 Connections Component Video Cable Y Pb Cb Pr Cr not included ...

Страница 13: ...o System and TV with an AV Cable Note Video yellow Audio Left white Audio Right red Note Video yellow Audio Left white Audio Right red White Red Yellow White Red Yellow Stereo A V Cable included A V Cable included TV TV White Red Yellow L R White Red Yellow L R 12 Connections ...

Страница 14: ...ble x2 speed to locate a section Repeatedly press these buttons and the speed will increase to x4 x8 x16 then resume normal playback Resume normal playback by pressing the button on the remote control or the button on the unit Note This function is not available on all discs SKIP NEXT PREV While a disc is playing you can skip forward or backward a chapter or track at any time by pressing the PREV ...

Страница 15: ... then ZOOM X1 SLOW During movie playback press the SLOW button to slow down by x1 2 1 4 1 8 1 16 1 32 REPEAT During movie playing press button to repeat chapter title all REPEAT A B Repeat Repeat a section between points A and B within a Title Chapter Track 1 Press the A B button to choose a starting point A 2 Press the A B button again to set an ending point B and complete the setting The selecte...

Страница 16: ...Use the Direction arrow buttons to select a position in the Program List e g 2 then press the RIGHT arrow to move to the Title column on the right Select a track e g 01 and press 4 Track 01 will appear on Program List in position 2 5 After programming press the OK Button to play the programmed tracks as desired ENTER to confirm Press STOP on the remote to clear any mistakes when programming ...

Страница 17: ...Screen fits the photo to the screen or Full Screen stretches the photo to fill the whole screen Color Tone Apply a color filter Normal none Black White or Classic Browse Change the way you browse the photos on the disc Thumbnail small picture preview or File Manage file names Language Setup Page Language Setup Page Language Setup Page Photo Setting Page Photo Setting Page Photo Setting Page If OSD...

Страница 18: ...olution output to match the native resolution of your TV If Sharpness is selected use the direction and ENTER buttons to adjust image sharpness If Contrast is selected use the direction and ENTER buttons to adjust the contrast level If Brightness is selected use the direction and ENTER buttons to adjust to brightness level selected use the direction and ENTER buttons to set the aspect ratio Displa...

Страница 19: ...eo 3 If Downmix is selected use the direction and ENTER buttons to set how the player processes DVDs encoded with Dolby 5 1 surround sound for simpler 2 speaker environments Lo Ro The rear left right channels are kept separate The rear left channel will play on the left speaker the rear right channel will play on the right speaker Lt Rt The rear left right channels are mixed together The mixed out...

Страница 20: ...all options to their default setting or press the SETUP button to exit Custom Setup Page Custom Setup Page Custom Setup Page 19 System Setup 1 Set the screen saver to On or Off 2 Angle Mark when playing a multi angle disc set angle mark to on the multi angle effect will be shown on screen ...

Страница 21: ...the disc to the outer edge of the disc Never wipe in circular motions Discs should be stored in their cases after each use to avoid damage Do not expose discs to direct sunlight high temperatures or dust etc Prolonged exposure or extreme temperatures can warp the disc Do not stick or write anything on either side of the disc Sharp writing instruments or the ink may damage the surface CLEANING THE ...

Страница 22: ... in the room and aim the remote at sensor Distance is too far Operate within 5 m 16 feet An obstacle is in the path of the beam Move obstacle The unit does not start playback Rating level set to block the TV Remove the lock with the password DVD not inserted or DVD inserted upside down Insert DVD correctly A non playback disc is inserted Try another CD DVD disc The disc is not placed correctly in ...

Страница 23: ...cm single sided single layer 8cm single sided dual layer 8cm double sided single layer COMPACT DISC VIDEO CD 12 cm disc 8 cm disc Video Output Level 1 Vp p Audio Output Level 2 Vrms 1KHz 0 dB AUDIO SIGNAL OUTPUT CHARACTERISTICS Frequency Responses DVD Linear Audio 20Hz 20KHz 48KHz 96KHz sampling CD Audio 20Hz 20KHz S N Ratio 70 dB PICKUP Wavelength 655nm Laser Power Classe 1 110 240V 50 60Hz 22 Sp...

Страница 24: ...manual Please also visit us on the web at www naxa com to get up to the minute news alerts and documen tation for your device For additional assistance please contact Naxa Technical Support Naxa Electronics Technical Support 2320 East 49th St Vernon CA 90058 http www naxa com naxa_support 23 ...

Отзывы: