background image

7

20

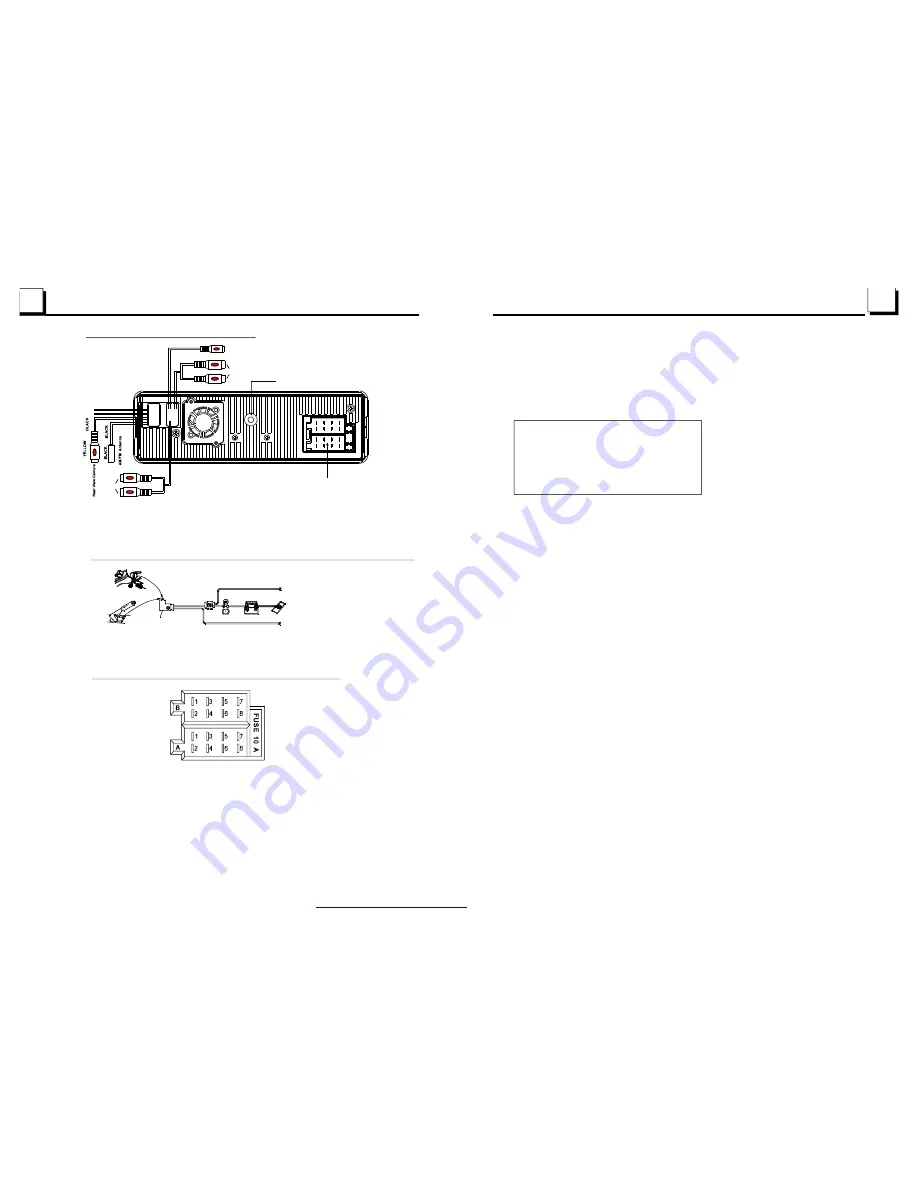
1.7 Description of the Rear Cabinet

Connecting the parking br ake line to the parking brake system built in the car

Parking brake

Parking brake switch
(inside the car)

To metallic body or chassis of the car

The Description of the Fixed ISO Female Connector

CONNECTOR A

1.

2.

3.

4. 12V

5. Auto Antenna

6.

7. 12V (To Ignition Key)

8. GROUND

CONNECTOR B

1. Rear Right Speaker (+)

2. Rear Right Speaker (-)

3. Front Right Speaker (+)

4. Front Right Speaker (-)

5. Front Left Speaker (+)

6. Front Left Speaker (-)

7. Rear Left Speaker (+)

8. Rear Left Speaker (-)

Reversal line White

Note: 1. after connecting the Parking Line, the video on the small monitor of the front panel will be display only after braking the car.

2. Use the clip end of a Ground Line provided by manufacturer to connect the Fixing Screw Bolt, use another end of the Ground

Line to connect the negative pole of the power source. Otherwise, the video on screen maybe flashes.

Fixing Screw Bolt

Fixed ISO Female Connector

GRAY

GRAY

VIDEO OUT

YELLOW

YELLOW

BLACK

RED R

WHITE L

BLACK

RCA LINE OUT

SUBWOOFER

GREY

GREEN

For the DVD System Menu, there are 6 setup pages in all. They display as follows:

5.19.1 SYSTEM SETUP

TV SYSTEM

TV TYPE

DEFAULT

This product supports output of various TV system.

If your TV set has only NTSC or PAL system, the screen will blink and become
colorless when a wrong TV system is selected. In this case, press the N/P button
to switch the right TV system to match the TV color system.

The setup item is for matching TV screen size.

4:3 PS: Choose the item when connect ing a TV set with 4:3 screen. When playing

the pictures with 16: 9 size, the left and right parts of the video will be cut out,
and display in full screen.

4:3 LB: Choose the item when connect ing a TV set with 4:3 screen. When playing

the pictures with 16: 9 size, the top and bottom parts of the TV screen will be
turned into a black square respectively.

16:9: Choose the item when connecting a TV set with 16:9 wide screen.

This item is for making all setup items change back to original st atus.

SYSTEM SETUP

TV SYSTEM
TV TYPE
DEFAULT

Ground(-)/Park Break(Green)

Ground(-)/Park Break(Green)

PDF created with FinePrint pdfFactory trial version 

http://www.pdffactory.com

Содержание NCD-691

Страница 1: ...ce that may cause undesirable operation NOTE This equipment has been tested and found to comply with the limits for a Class B digital device pursuant to Part 15 of the FCC Rules These limits are desig...

Страница 2: ...is not in use Disconnect the power plug from the power outlet when you do not intend to use the unit for a prolonged period of time Before moving the unit remove the disc from the unit tray first 4 D...

Страница 3: ...5 11 Change the Audio Language 17 5 12 Change the Video Signal System 17 5 13 Look over the Playback Status 17 5 14 Program Playback 18 5 15 Playback the Picture CD in JPEG Format 18 5 16 Mp4 OPERATI...

Страница 4: ...e electric shock NO PICTURE SOUND AND INDICATION Ensure that the power switch is on Ensure that the wall inlet is ok Ensure that the power cord is not damaged or the fuse is not blown Ensure that the...

Страница 5: ...c into disc compartment Why A Because the DVD player and disc has respective region code If the region codes of them are not match with each other the DVD player can not play the disc Appendix The reg...

Страница 6: ...disc with PRO LOGIC Dolby stereo effect choose the item so it will output audio signal with vivid theatre effect STEREO If you choose the item when outputting audio signal with 5 1 channels it will ou...

Страница 7: ...This item is for selecting a audio language This item is for selecting a subtitle language This item is for selecting a disc menu language there is only ANALOG mode i e SPDIF OFF not optional It is f...

Страница 8: ...ACK RED R WHITE L BLACK RCA LINE OUT SUBWOOFER GREY GREEN For the DVD System Menu there are 6 setup pages in all They display as follows 5 19 1 SYSTEM SETUP TV SYSTEM TV TYPE DEFAULT This product supp...

Страница 9: ...or PLAY button to open the FOLDER or play the selected file When displaying the root menu you can also use the number buttons to select the serial number of the file and play the file The ANGLE PROG R...

Страница 10: ...e programmed titles chapters tracks in programmed order only pressing the PLAY button also can play the programmed titles chapters tracks in programmed order To exit program playback firstly press the...

Страница 11: ...MA CD disc playing the button is not available 5 1 In the state of DVD disc playing press the AUDIO button repeatedly on the IR remote control to select the desired language type depend on the disc us...

Страница 12: ...LOC function then tune again for the distance radio station 2 In RADIO mode when the signal of the local radio station are too strong to lead that the interference to the receiving effect during tunin...

Страница 13: ...signal quality and therefore it is recommendable to select as lower as possible recording speed During slow forward press the PLAY button to resume normal playback The function is only for video 5 If...

Страница 14: ...d then press the OK or PLAY button to open the root menu of the selected title 3 Press the direction buttons to select your desired chapter finally press the OK or PLAY button to play the selected cha...

Отзывы: