background image


Troubleshooting 


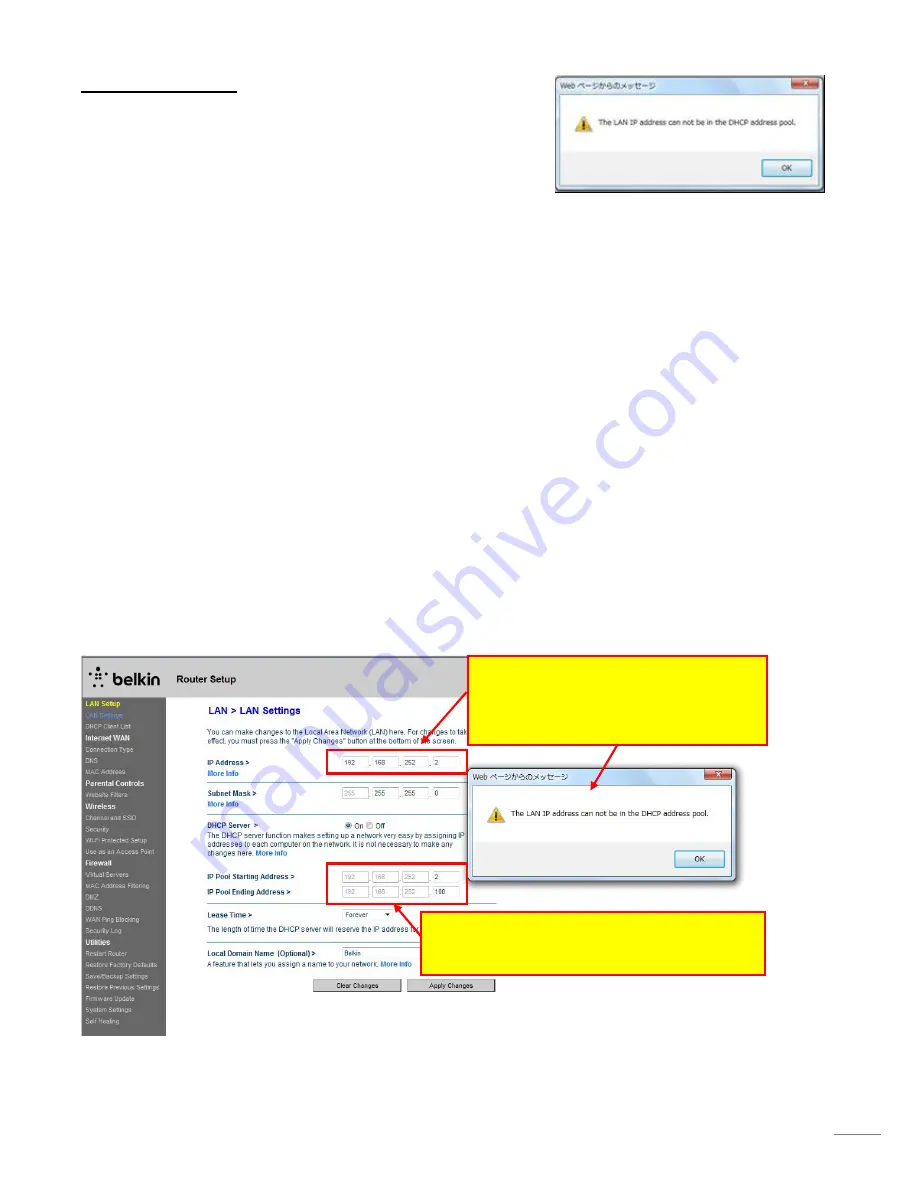
If the error message “The LAN IP address cannot be in the DHCP address 

pool” appears, change the [

IP Pool Starting Address

] or [

IP Pool 

Ending Address

]. See the following steps for solution. 


Tips: 

The router (DHCP Server) will allocate an IP address to a connected device (Client) in the IP range set in IP Pool Starting 

Address and IP Pool Ending Address. When the error message above appears, the IP address you tried to enter must be 

in that range. 


Steps: 

In this example, after you try to fix the router’s IP address to “192.168.252.

2

”, the error message appeared. 


1. Check the IP Pool Starting Address and IP Pool Ending Address. 


The present settings are: 

IP Pool Starting Address – 192.168.252.

2


IP Pool Ending Address – 192.168.252.100 


You can see that the IP address “192.168.252.

2

” you tried to enter is in the IP range for clients. In order to be able to 

fix the router’s IP address to “192.168.252.

2

”, the IP Pool Starting Address should be changed. 


2. Change the IP Pool Starting Address to “192.168.252.

3

”. 

After you tried to set the router’s IP address 

to “192.168.252.

2

”, the error message 

appeared. 

1. IP Pool Starting Address: 192.168.252.

2


IP Pool Ending Address: 192.168.252.100 

Содержание TZ Touch14

Страница 1: ...ditions especially if there are many other wireless signals around the TZT9 14 the distance in between is long or if there is an obstacle in between To solve these signal conflicts and remote communic...

Страница 2: ...7 If necessary Change the router s Password Note Setting the router s wireless channel to Auto will have an effect on avoiding signal conflicts between many wireless devices The original SSID and pass...

Страница 3: ...ther type of router is used open its setup page and make all the necessary settings shown in 1 Summary 2 1 Connect a router to a PC with a LAN cable Note The LAN cable should be connected to one of th...

Страница 4: ...4 2 3 Launch the Setup page 2 4 Click Advanced Tools 2 5 Click Network Name Security to make detailed settings such as IP address The Login page opens 2 6 Click Submit to open the detailed setup page...

Страница 5: ...68 252 99 In this example the IP address is fixed to 192 168 252 2 Note If the message The LAN IP address cannot be in the DHCP address pool appears as shown at left see troubleshooting on Page 7 8 2...

Страница 6: ...nal SSID is renamed to NNTZT Router 1 2 11 Ref Summary 1 5 Set wireless channel to Auto Wireless channels will then automatically switch to avoid surrounding wireless signals This setting is recommend...

Страница 7: ...o remember one if necessary Note When an iOS device is connected to the built in Wireless LAN of the TZT9 14 in ad hoc the security setting on the TZT9 14 should be WEP When connecting iOS devices to...

Страница 8: ...try to fix the router s IP address to 192 168 252 2 the error message appeared 1 Check the IP Pool Starting Address and IP Pool Ending Address The present settings are IP Pool Starting Address 192 16...

Страница 9: ...he security mode etc check if the connection can be established between the router and an iOS device 3 1 With an iOS device in Settings Wi Fi find the renamed SSID NNTZT_Router 1 or the name you selec...

Страница 10: ...If the password is changed in the Step 2 13 enter the same one here 3 3 Check that the connection is established To confirm the connection tap the icon to verify that an IP address 192 168 252 x and...

Страница 11: ...9 14 network 4 2 Connect an iOS device to the router following the Step 3 1 to 3 3 4 3 Launch the NavNet Remote app and NavNet Viewer app 4 4 Confirm that images and data are shown on the devices Note...

Страница 12: ...12 END...

Отзывы: