background image

14

iCN 500 series 

|


User Manual

G

et

tin

st

ar

te

d

4. Starting Your iCN

The 

Main Menu

 screen provides access to all of the iCN’s functions, including navigating to a destination.

Step One:

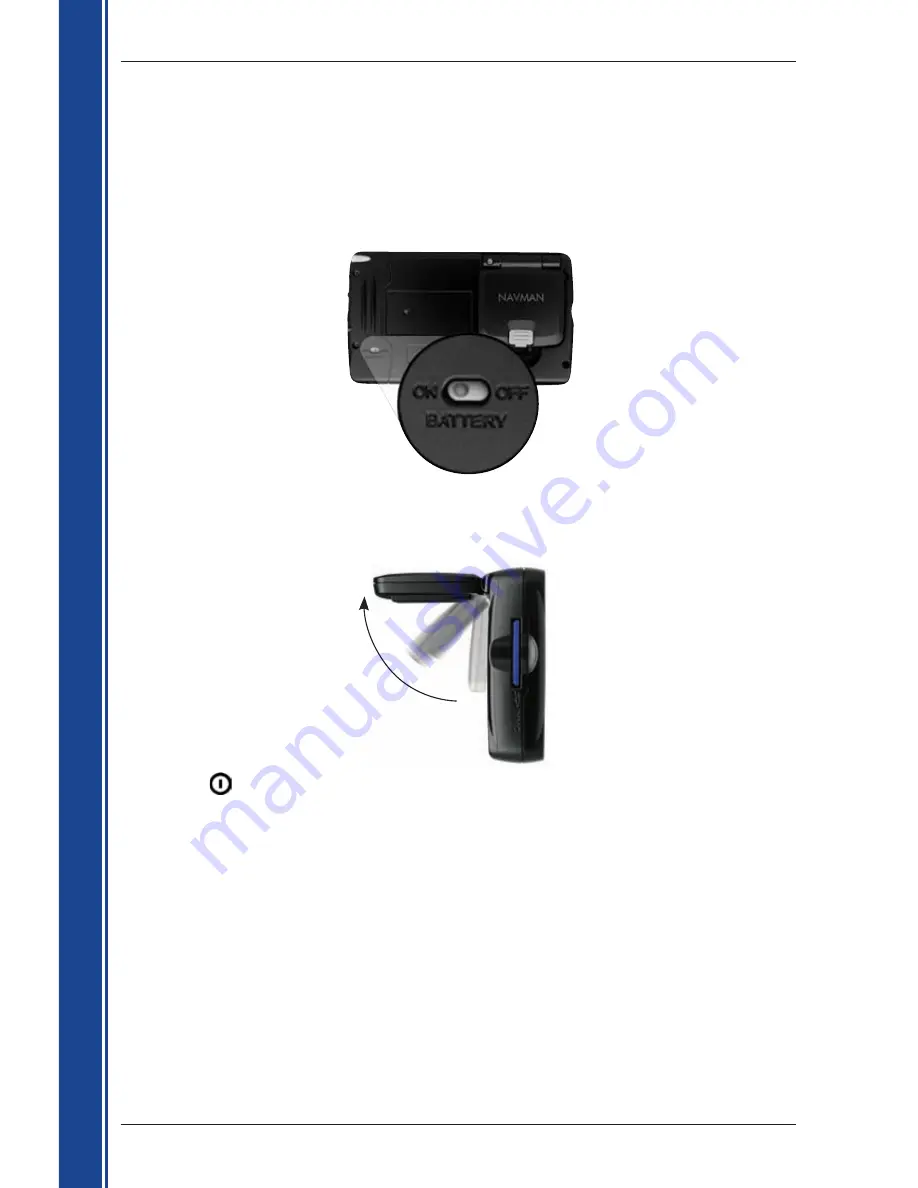
 Turn iCN On

1. Check the 

Battery Switch

 on the back of the iCN. If it is switched to 

OFF

, then remove the 

    stylus and use it to switch the 

Battery Switch

 to 

ON

.

2. Gently pull the bottom of the GPS receiver away from the iCN.  
    The receiver will lift out to a horizontal position to allow it to obtain a GPS fix.

3. Press 

    The iCN will turn on.

Содержание iCN 500 series

Страница 1: ...iCN 500 series with Smart TM 2005 User Manual iCN 510 iCN 520 English Europe Australia New Zealand...

Страница 2: ......

Страница 3: ...9 Using the 2D Map Screen to Plan a Route 38 10 Multi stop Trips 39 Europe and New Zealand 39 Australia Canada and USA 44 11 Viewing Your Route 50 12 The 2D Map Screen Pop up Menu 55 13 Avoiding an Ar...

Страница 4: ...4 iCN 500 series User Manual...

Страница 5: ...Contents Mounting brackets Socket clip Locking nut Suction cup ballfoot iCN with GPS Antenna 12 V In Vehicle Power Adaptor with Power Cable USB Cable Protective Carry Case CD ROMs including Smart 200...

Страница 6: ...6 iCN 500 series User Manual Getting started...

Страница 7: ...le outdoors and the GPS antenna has an unobstructed view of the sky The iCN can operate in all weather types except snowfall For details about GPS and your iCN see page 20 Safety Notice WARNING In a v...

Страница 8: ...enu screen Press and hold to reset the iCN Power Turns the iCN on or off When off the iCN enters a suspended state ESC Cancels an action returns to the previous screen and deletes the last text charac...

Страница 9: ...r preference press up or down to adjust the viewing angle on the 3D Map screen Speaker Outputs voice commands and warnings Use the Volume control to adjust Back Components Component Description Batter...

Страница 10: ...Pull out of the slot to use and insert in the slot to store Volume Control Rotate up or down to hear a sound test rotate and hold to adjust volume Headphone Socket Connection socket for headphones or...

Страница 11: ...iCN for 4 hours You can monitor battery power at the Power Status screen Main Menu Preferences More Preferences Hardware Power Status Charging the Battery When the battery is charging the Charge Indic...

Страница 12: ...CN Suction Mount Choose a position on the windshield that is clearly visible to the driver without obstructing the view of the road 1 Assemble the suction mount Slip the locking nut over the ballfoot...

Страница 13: ...l swab to clean and dry the suction cup and the mounting area on the windshield then attach the suction mount to the windshield a Hold the suction cup rmly against the windshield and b Press the lever...

Страница 14: ...o a destination Step One Turn iCN On 1 Check the Battery Switch on the back of the iCN If it is switched to OFF then remove the stylus and use it to switch the Battery Switch to ON 2 Gently pull the b...

Страница 15: ...ted in the SD MMC slot see page 14 If you are using a different memory card or files on your original memory card have been deleted you may need to install a language on your iCN internal memory See C...

Страница 16: ...last viewing 1 Remove the iCN from the suction mount bracket if necessary then gently push the GPS receiver back towards the iCN The receiver will click into place 2 Press The iCN will enter a suspen...

Страница 17: ...o not need to reset your iCN however should your iCN not turn on or not respond you can reset it to solve the problem To reset your iCN either a Press and hold The message Reset Device will display Ta...

Страница 18: ...mart Desktop on page 81 Inserting Memory Card Gently insert the card in the SD MMC slot with the label facing the front of the iCN Removing Memory Card Gently push down on the top edge of the card to...

Страница 19: ...anguage by selecting one at the Preferences Language screen see page 66 Installing a Language to your iCN 520 To install a language on your iCN the Language screen must be enabled to display at startu...

Страница 20: ...Turn and Next 4 Turns screens The GPS Strength Indicator will display green when there is a valid x 2D or 3D and between one and three bars will display to indicate the strength of the signal the GPS...

Страница 21: ...ode ZIP code Point of Interest POI intersection city town country or state As you specify each part of the address it will display in the You are going to eld at the top of the screen The available op...

Страница 22: ...or tap ABC Preview Screen The Preview screen is used to display a preview of your destination before navigating to it saving it as a Favourite or displaying it on the 2D Map screen To display a smalle...

Страница 23: ...Example 2 If searching for Fred Archer Way search by Fred Example 3 If searching for Franz Grillparzer Strasse search by Franz Street Named After People Italy In Italy if a street name is a person s n...

Страница 24: ...the first time you are setting your destination and you have maps from more than one country installed and selected then the Select country screen will display instead of the Destination screen Go dir...

Страница 25: ...Find area The Keyboard screen will display b Use the Keyboard screen to nd the area of your destination For information on using the Keyboard screen see pages 21 22 The Destination screen will display...

Страница 26: ...ges 21 22 The Destination screen will display Step Five Find the House Number of Destination a From the Destination screen tap Enter house number The Keyboard screen will display Note If the Enter hou...

Страница 27: ...he following To calculate the route and open the 3D Map screen tap Go The 3D Map screen will display To display the destination on the 2D Map screen tap the preview map The 2D Map screen will display...

Страница 28: ...you perform this procedure the Destination screen will open as expected ii If this is the first time you are setting your destination and you have maps from only one country but more than one state in...

Страница 29: ...anged Go to Step Four Find the Town or City of Destination a Select a state from the list The Destination screen will display Step Four Find the Town or City of Destination a From the Destination scre...

Страница 30: ...tination For information on using the Keyboard screen see pages 21 22 The Destination screen will display Step Six Find the House Number of Destination a From the Destination screen tap Enter house nu...

Страница 31: ...he following To calculate the route and open the 3D Map screen tap Go The 3D Map screen will display To display the destination on the 2D Map screen tap the preview map The 2D Map screen will display...

Страница 32: ...The Destination screen will display Important Note If this is the first time you are setting your destination and you have maps from more than one country installed and selected then the Select countr...

Страница 33: ...I you can first search by Area a From the Destination screen tap Find Point of Interest The Select POI screen will display b Select a POI type from the list The Keyboard screen will display c Use the...

Страница 34: ...2D Map screen tap the preview map The 2D Map screen will display To save the destination as a Favourite tap Save The New Favourite screen will display See Favourites and My Home on page 59 To change y...

Страница 35: ...Select the Country of Destination step b The next time you perform this procedure the Destination screen will open as expected ii If this is the first time you are setting your destination and you ha...

Страница 36: ...t and cannot be changed Go to Step Four Select the Type of POI a Select a state from the list The Destination screen will display Step Four Select the Type of POI Note To narrow the search for a type...

Страница 37: ...The 3D Map screen will display To display the destination on the 2D Map screen tap the preview map The 2D Map screen will display To save the destination as a Favourite tap Save The New Favourite scr...

Страница 38: ...lay a larger area in less detail press 2 Tap the Map screen or press the 4 way toggle button to display the cross hairs To remove the cross hairs press ESC 3 Drag the intersection of the cross hairs t...

Страница 39: ...up to 200 multi stop trips each with up to 14 destination points Case Study One Europe and New Zealand Th case study will show you how to set a multi stop trip by selecting your country then area then...

Страница 40: ...tination Point If you only have the map of one country installed and selected that country is selected for your destination point by default and cannot be changed Go to Step Three Find the Area of You...

Страница 41: ...he Keyboard screen will display b Use the Keyboard screen to nd the area of your destination point For information on using the Keyboard screen see pages 21 22 The Destination screen will display Step...

Страница 42: ...n Point a From the Destination screen tap Enter house number The Keyboard screen will display Note If the Enter house number option is not displayed house numbers are not available for your selected s...

Страница 43: ...on Point change the order of your destination points select a destination point to move from the list The Preview screen will display select Move The Multi stop Trip screen will display use the 4 way...

Страница 44: ...case study applies to Australia Canada and USA only For navigating in Europe and New Zealand see page 39 Step One Start Your Multi stop Trip a From the Main Menu tap Multi stop Trip The Multi stop Tr...

Страница 45: ...ry screen will display b Select a country from the list The Destination screen will display If you only have the map of one state installed and selected that state is selected for your destination by...

Страница 46: ...ity The Keyboard screen will display b Use the Keyboard screen to nd the town or city of your destination For information on using the Keyboard screen see pages 21 22 The Destination screen will displ...

Страница 47: ...on Point a From the Destination screen tap Enter house number The Keyboard screen will display Note If Enter house number option is not displayed house numbers are not available for your selected stre...

Страница 48: ...ination Point change the order of your destination points select a destination point to move from the list The Preview screen will display tap Move The Multi stop Trip screen will display use the 4 wa...

Страница 49: ...t affect the current route Main Menu Multi stop Trip To skip a destination point during a multi stop trip complete the following 1 Press to return to the Main Menu screen The Main Menu screen will dis...

Страница 50: ...r area in greater detail press To display a larger area in less detail press To display the cross hairs tap the map Tap the intersection of the cross hairs or press the 4 way toggle to display the Pop...

Страница 51: ...eater detail press To display a larger area in less detail press To display the Go To Pop up summary press the 4 way toggle GPS strength indicator Tap to display the Satellite Signal Strengths screen...

Страница 52: ...k Automatic Rerouting Your route is re directed if you make a wrong turn The symbol will display upper left of the 3D Map and Next Turn screens while the route recalculates Map of the next turn The ne...

Страница 53: ...is only available from the Main Menu when you are navigating a route Main Menu Route Information Show Route Tap Show Route to display your entire route on the 2D Map screen Instruction List Tap Instr...

Страница 54: ...al and the Distance remaining to your destination If you are navigating a multi stop trip the information displayed will relate to your next destination point Skip Next Destination Tap Skip Next Dest...

Страница 55: ...Tap the intersection of the cross hairs or press the 4 way toggle button to select the street as your destination The Pop up menu will display 5 You can choose one of the following options Menu Option...

Страница 56: ...enu 5 Select Add Avoid Area An Avoid Area is displayed 6 Set the Avoid Area to the correct size and position using the 4 way toggle 7 Tap the Avoid Area or press the 4 way toggle to enable the Avoid A...

Страница 57: ...ects on a street the street will highlight and the street name will display 4 Tap the intersection of the cross hairs or press the 4 way toggle button The Pop up menu will display 3 Select Set as Star...

Страница 58: ...ay the Main Menu screen 2 From the Main Menu screen tap Preferences 3 From the Preferences screen tap Routing The Routing screen will display 4 Press twice 5 Clear the Demonstrate Route check box 6 Ta...

Страница 59: ...cribed in Setting Your Destination pages 21 37 or create a multi stop trip as described in Multi stop Trips pages 39 49 until the Preview screen is displayed 2 Tap Save The New Favourite screen will d...

Страница 60: ...om the 2D Map Screen 1 From the Main Menu select Map The 2D Map screen will display 2 Tap the Map screen or press the 4 way toggle button to display the cross hairs 3 Position the intersection of the...

Страница 61: ...ter text screen press or tap ABC After you have entered a name for the Favourite tap Enter The New Favourite screen will display 7 Complete one of the following To save as a favourite tap Save as Favo...

Страница 62: ...w Favourite screen will display 5 Complete one of the following To save as a favourite tap Save as Favourite The Favourite is saved The Go To screen will display To save as My Home tap Save as My Home...

Страница 63: ...urites The Favourite screen will display 3 Select a Favourite The Preview Favourite screen will display 4 Tap Go The route is calculated and displayed on the 3D Map screen Navigating to My Home 1 From...

Страница 64: ...button up or down to hear a sound test 2 Rotate the Volume Control button up or down and hold to display the volume bar Rotate the Volume Control button up or down to adjust the volume You can also ad...

Страница 65: ...surfaced roads select the Avoid unsurfaced roads check box avoid ferries select the Avoid ferries check box receive a warning if your route includes toll roads select the Toll roads check box to displ...

Страница 66: ...the Language box by tapping the left or right arrows or using the left and right sides of the 4 way toggle iCN 510 If you a purchased your iCN in Australia Canada New Zealand or United States or b yo...

Страница 67: ...e Display Next Turn screen check box enable access to the Next 4 Turns screen select the Display Next 4 Turns screen check box change the colour scheme select your preferred scheme from the Map colour...

Страница 68: ...eck box 5 Tap Save The Main Menu screen will display Map Preferences Memory Card 1 From the Main Menu tap Preferences 2 From the Preferences screen tap Maps 3 From the Maps screen tap Memory card The...

Страница 69: ...lay 4 You may either choose to display or hide icons of all POI types on the 2D Map and 3D Map screens or to selectively display desired icons chosen from the list of POI types To display all POI icon...

Страница 70: ...terest POI Editor on pages 89 91 1 From the Preferences menu tap Safety Alerts The Safety Alerts screen will display 2 On the Safety Alerts screen tap Active POI The Select Active POI screen will disp...

Страница 71: ...ct the speed in the Speed box by tapping the left or right arrows or using the left and right sides of the 4 way toggle Tap Save The Safety alerts screen will display Note The GPS signal alert will be...

Страница 72: ...croll down using the 4 way toggle or press 5 Tap Save The Main Menu screen will display My Data Preferences Clear Data 1 From the Main Menu screen tap Preferences The Preferences screen will display 2...

Страница 73: ...eferences GPS status The Satellite Signal Strengths screen will display You can also access this screen from the 2D Map 3D Map Next Turn and Next 4 Turns screens by tapping the GPS Strength Indicator...

Страница 74: ...Time UTC for your location from the Local time offset box by tapping the left or right arrows or using the left and right sides of the 4 way toggle Next select either the 12 Hour or 24 Hour option for...

Страница 75: ...ces screen will display 2 From the Preferences screen tap More Preferences The second Preferences screen will display 3 On the second Preferences screen tap Hardware The Hardware screen will display 4...

Страница 76: ...eferences screen will display 3 On the second Preferences screen tap Hardware The Hardware screen will display 4 From the Hardware screen tap Power Options The Power Options screen will display 5 Comp...

Страница 77: ...es The Preferences screen will display 2 From the Preferences screen tap More Preferences The second Preferences screen will display 3 On the second Preferences screen tap Startup The Startup screen w...

Страница 78: ...ive The Smart Desktop installer will start If your computer does not automatically launch the CD start the installation manually Start Run Type D Setup SmartST 2005 for iCN500 Series exe where D is th...

Страница 79: ...your iCN click Next Microsoft ActiveSync will synchronise with your iCN You are now ready to install maps to your iCN To Open Smart Desktop Once Smart Desktop has been installed you can access it from...

Страница 80: ...Start Programs Navman Smart Desktop 2005 for iCN500 series 3 On the Setup menu select Update software then Check for updates on the web Your computer will connect to the Internet and display the Navma...

Страница 81: ...f you have already activated a Gold Pan European Map Product Key activates all maps in Europe go to step 7 otherwise continue to step 4 4 Click the map you want to install to your iCN Note You may nee...

Страница 82: ...step 7 until all required maps have been added to the Selected section of the Desktop Selected Maps tab European Silver Single Map Product Key users If you have another Silver Single Map Product Key t...

Страница 83: ...r iCN 1 Open Smart Desktop Start Programs Navman Smart Desktop 2005 for iCN500 series 2 Open the Maps on iCN section iCN tab Maps on iCN 3 Click the map to be removed and select Remove from iCN from t...

Страница 84: ...lled but in a language other than the one you want to install on your iCN you must first uninstall Smart Desktop see Uninstalling Smart Desktop on page 79 then reinstall Smart Desktop in the correct l...

Страница 85: ...prompts on your computer and iCN 3 You will be prompted to register your iCN Click No as your iCN has been preregistered 4 On the Tools menu select Recover registration information from Navman 5 Follo...

Страница 86: ...s contain roads and ferry connections of high national and international importance use less memory than would be necessary to install all equivalent detailed maps exclude smaller roads and have a red...

Страница 87: ...display If the Basemap is on the memory card from the Maps screen select Memory Card The Settings Memory Card screen will display 5 To activate the Basemap select the Basemap check box 6 Tap Save The...

Страница 88: ...me of the city or town The Map Display will rotate to centre on the selected city or town and will mark the city or town location Map Colours and Textures To access the Desktop Colours section Desktop...

Страница 89: ...y creating your own POI les or by using compatible POI les downloaded from the Internet A maximum of 25 Custom POI les can be saved on your iCN The Custom POI les are listed on the My POI screen Custo...

Страница 90: ...enu click Save The POI le is saved 5 Complete Saving a Custom POI File to your iCN below Importing a Custom POI File 1 Download a POI le from the Internet and save it on your computer 2 Open the POI l...

Страница 91: ...m icon a default icon will display Type the path to the icon le to be used to represent the POI type in the Icon File box or select the icon le from your local or network drive clicking locating the l...

Страница 92: ...To Delete a Backup 1 On the Smart Desktop File menu click Backup The Backup window will display 2 Select from the list the backup to delete 3 Click Delete then click OK The backup is deleted 4 Close t...

Страница 93: ...erformance in weak signal areas and in areas with poor or limited visibility of the open sky AC Power Adaptor Kit AC power cable with adaptor plugs for the following regions Western Europe United King...

Страница 94: ...EENWEG STRAAT BN BG DR LN MKT PK PL SQ STWG STR Belgium French AVENUE BOULEVARD CHAUSS E IMPASSE MONT MONTAGNE PLACE ROUTE ROUTE NATIONAL RUE SQUARE AVE BVD CH IMP MT MT PL RTE RN R SQ Belgium German...

Страница 95: ...SUPERSTRADA VIA VIALE C DA C SO FR LGO P ZA P LE SS SS V VL Luxembourg ALL E AVENUE BOULEVARD CHAUSS E DOMAINE FAUBOURG IMPASSE MONT MONTAGNE PASSAGE PLACE QUARTIER ROND POINT ROUTE ROUTE NATIONALE R...

Страница 96: ...NIDA CALLE CALLEJ N CAMINO CARRETERA GLORIETA PASEO PLAZA RAMBLA RONDA AVE C CJ CM CR G P O P RBLA RD Switzerland German BOULEVARD CHAUSSEE PLATZ STRASSE BVD CH PL STR Switzerland French AVENUE CHAUSS...

Страница 97: ...pcnsupport aus navman com www navman com Support for New Zealand Navman NZ Ltd PO Box 68 155 Newton Auckland New Zealand pcnsupport nz navman com www navman com Support for Europe Navman Europe Limite...

Страница 98: ...98 iCN 500 series User Manual Notes...

Страница 99: ......

Страница 100: ...MN000406B...

Отзывы: