background image

13

Navman’s GPS100 Series

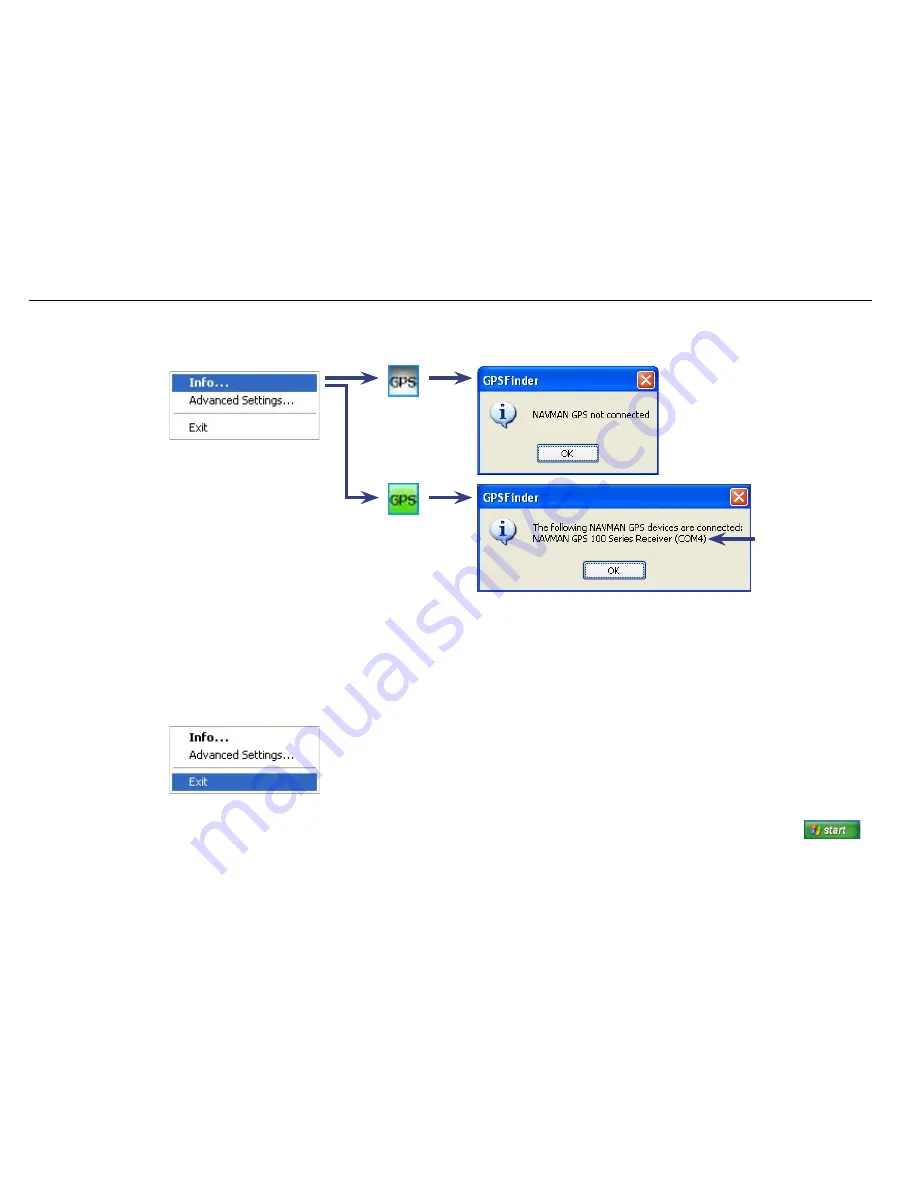
3-3 Finding the COM Port number

Select “Info...” to display the GPS100 Series Receiver connection status.

(Gray)

(Green)

3-4 Exit GPS Finder

Select “Exit” to turn the GPS Finder off.

If you turn the GPS Finder off, the GPS100 Series Receiver will operate with GPS data being sent to the laptop. The 
Communications Indicator flashes continuously, indicating normal operation. To restart the GPS Finder, click 


then browse to the Navman folder, then select GPS Finder.

Important

Please note the COM Port Number. You will need to select this COM Port Number in your mapping software to 
complete the installation. When using mapping software you don’t need to select the baud rate. See section 3-5 if you 
need to change the COM Port number.

COM Port Number

Tip: Some mapping 

software has a limited 

range of COM Port 

numbers (e.g. 1 to 4) 

so make sure the COM 

Port Number selected is 

within that range.

If you use another 

USB port, then you will 

need to change the 

COM Port Number. 

See section 3-5.

ý 


ý 


Содержание GPS100 SERIES

Страница 1: ...NAVMAN Installation Manual GPS100 SERIES RECEIVER...

Страница 2: ...r in any manner obstruct your view or vehicle safety equipment The user of this product is solely responsible for observing safe driving practices Do not operate your GPS100 Series Receiver while driv...

Страница 3: ...Finding the COM Port number 13 3 4 Exit GPS Finder 13 3 5 Changing the COM Port Number 14 4 INSTALLING THE GPS100 SERIES RECEIVER IN A VEHICLE 16 4 1 Attaching the Suction Mount to the Windshield 16 4...

Страница 4: ...ping software to plot your position on a map Some mapping software applications can direct you to your destination Here s what you should find in the box If there is anything missing please contact Na...

Страница 5: ...eries Receiver to the GPS Interconnect Cable and GPS USB Adaptor as illustrated 2 GPS USB Adaptor Note Don t plug the GPS USB Adaptor into your computer yet GPS100 Series Receiver Line up the arrows G...

Страница 6: ...the InstallShield Wizard Insert the CD ROM provided If the InstallShield Wizard does not start then select Start Run then browse to the CD ROM Drive usually D select setup exe click open then click OK...

Страница 7: ...Click to continue Step Four Step Three Click to continue Please wait a moment while the files are installed If you wish to install the GPS100 Series USB driver in another location click and browse to...

Страница 8: ...If this message appears click Next then Continue Anyway Note that the GPS100 Series has been thoroughly tested Navman is committed to the highest quality and is in the process of completing this compa...

Страница 9: ...es when hardware is detected by PC or laptop See the Troubleshooting Guide in section 5 for information on the Communications Indicator Plug in your GPS100 Series Receiver to your personal computer se...

Страница 10: ...Step Seven Click to continue If this message appears click Continue Anyway Note that the GPS100 Series has been thoroughly tested Navman is committed to the highest quality and is in the process of co...

Страница 11: ...rdware installation Step Eight Click to complete software installation Step Nine Click to continue After successful installation of your GPS100 Series Receiver the green GPS Finder icon appears in the...

Страница 12: ...1 Checking the status The status of the GPS100 Series Receiver is indicated by the GPS Finder icon located on the bottom right of your screen Green GPS100 Series Receiver is connected Gray GPS100 Ser...

Страница 13: ...t the GPS Finder click then browse to the Navman folder then select GPS Finder Important Please note the COM Port Number You will need to select this COM Port Number in your mapping software to comple...

Страница 14: ...d COM Port Number Advanced settings are not available when icon is gray Gray Green Some mapping software has a limited range of COM Port numbers e g 1 to 4 so make sure the COM Port Number selected is...

Страница 15: ...s message then left mouse button What s This to get the explanation OR Left click mouse button then left click the item to get the explanation Advanced settings for COM Port selection Please refer to...

Страница 16: ...d especially in strong sunlight 4 1 Attaching the Suction Mount to the Windshield 1 Attach the GPS100 Series Receiver to the Vehicle Mount Suction Cup by threading cable through the Vehicle Mount Suct...

Страница 17: ...from a vehicle You can remove the GPS100 Series Receiver from the vehicle for security reasons or to use it elsewhere 1 To remove the GPS100 Series Receiver unplug the USB cable release the suction c...

Страница 18: ...ware failure or the GPS100 Series Receiver is not plugged in to the USB adaptor ON continuously USB installation is successful but the GPS100 Series Receiver is not sending data This may be the result...

Страница 19: ...ed it Nothing The Navman GPS receiver uses data from satellites in orbit This data is available free of charge for any user Where will the GPS100 Series Receiver work As long as the Navman GPS100 Seri...

Страница 20: ...erving safe driving practices and will not operate the Software while operating a vehicle 3 The copyright and all other intellectual property rights in the Software and Materials including any enhance...

Страница 21: ...een damaged or rendered defective a as a result of incorrect installation misuse mishandling misapplication accident abuse breakage or other external causes b by operation outside the usage specificat...

Страница 22: ...ons However there is no guarantee that interference will not occur in a particular installation If this equipment does cause harmful interference to radio or television reception which can be determin...

Страница 23: ...e Toll Free 866 628 6261 Website www navmanusa com 7 4 Copyright 2003 Navman NZ Limited Navman is a registered trademark of Navman NZ Limited All rights reserved Microsoft Windows 98 ME 2000 or XP are...

Отзывы: