


58 –59
02 Prior to commissioning
2.1 Package contents
Please check that the contents of the package are
complete. If this is not the case, please inform us
within 14 days of purchase. The package you have
purchased contains:
–
The P´ 9611 navigation device
– Battery
– Car
holder
–
Car charging cable power supply cable for
12 V cigar lighter socket
– Mains
charger
cable
– USB
cable
–
[ Pre-installed ] SD Memory Card
– Manual
– Guarantee
card
–
DVD [ files for restoring the SD card and
manuals in pdf format ]
– Battery
compartment
cover
2.2 Initializing the device
The following steps are to be carried out before use:
– Insert
battery
– Charge
battery
– Insert
Memory
Card
–
Install the holder in the car
–
Switch the device on
2.2.1 Insert battery
1.
Remove the battery from the packaging.
2.
Remove the battery compartment cover.
3.
Insert the battery into the battery compartment.
4.
Close the battery compartment.
2.2.2 Charging the battery
!
Note:
the battery is not supplied in a charged
state and must be fully charged before it is used
for the first time. When charging the battery for
the first time, it should remain connected to the
power supply for at least 12 hours.
The battery cannot be charged when the device
is switched off, or, when the device is
connected to a computer, via the USB cable
provided. [6]
1.
Slide the adapter connector on the back side
into the guide of the mains adapter.
2.
Insert the mini USB connector of the mains
cable into the power supply socket on the LEFT
SIDE of the device.
3.
Insert the plug of the mains cable into a mains
socket.
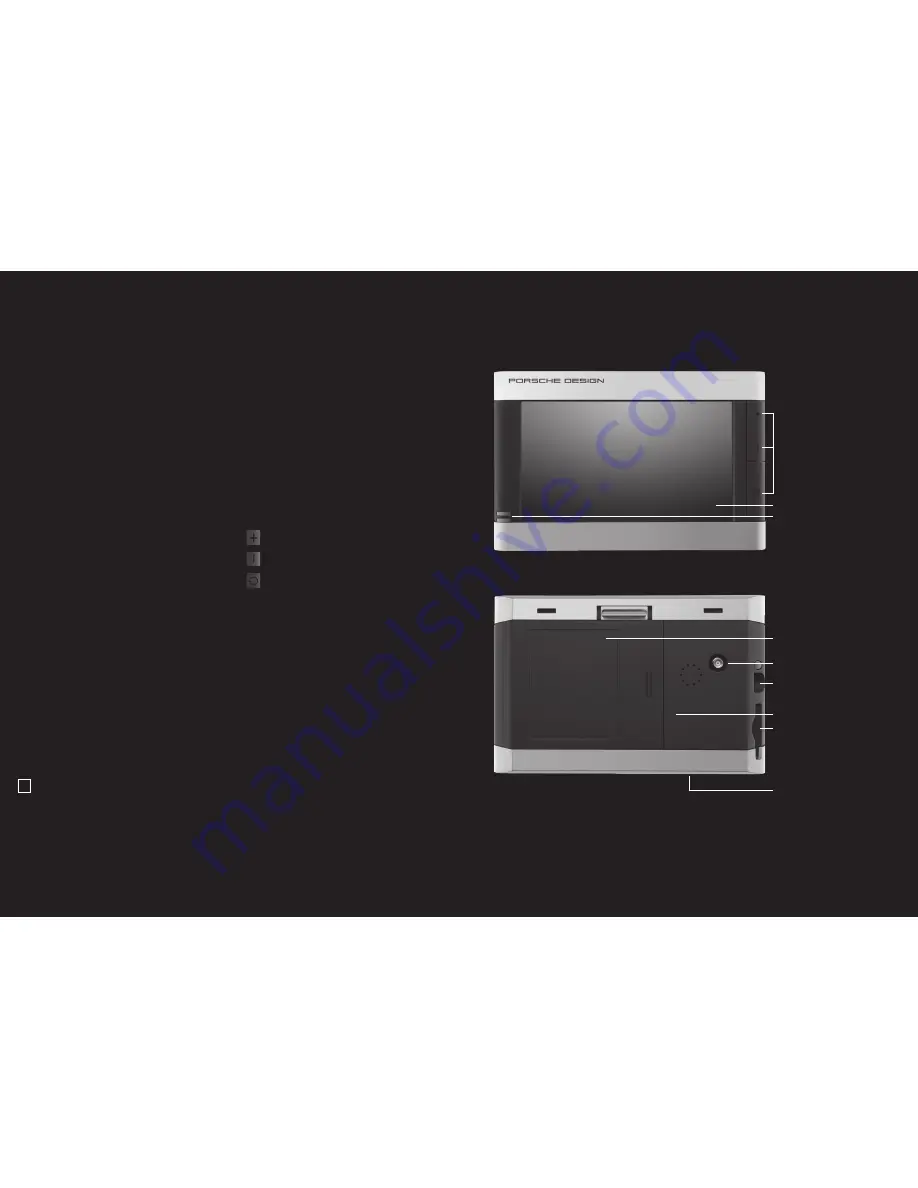
Front view
[ 1 ] Hardware keys
Key INCREASE VOLUME
Key DECREASE VOLUME
Key ON / OFF
[ 2 ] Touchscreen
[ 3 ] Display external power supply and Bluetooth
display:
–
The power supply display lights up ORANGE
when the device is connected to an external
power source.
–
The Bluetooth display lights up BLUE when
the P´ 9611 has established a Bluetooth
connection to a mobile telephone.
Rear view
[ 1 ] Battery compartment cover
[ 2 ] Connection for an external GPS antenna
[ optional ]
[ 3 ] Headphone connection
[ 4 ] Reset button
[ 5 ] SD slot
[ 6 ] Power supply connection / USB cable
connection
[ 1 ]
[ 2 ]
[ 3 ]
[ 1 ]
[ 2 ]
[ 3 ]
[ 4 ]
[ 5 ]
[ 6 ]
Содержание Porsche Design P9611
Страница 1: ...porsche design mobile navigation 9611...


