Nav TV A3/GOLF 7-CAM Скачать руководство пользователя страница 5

BHM 

12/10/14 

NTV-DOC184 


Agreement

End user agrees to use this product in compliance with all State and Federal laws. NAV-TV Corp. would not be held liable for 

misuse of its product.  If you do not agree, please discontinue use immediately and return product to place of purchase. This product is 
intended for off-road use and passenger entertainment only.  

5 | 

P a g e


4.


Connect the smaller white 
plug side of the provided 

LVDS Video Cable

 to the 

port on the A3/GOLF7 
interface labeled 

‘LVDS-

IN’

.  


5.


Connect the free end of the provided 

LVDS Video Cable

 back to the factory radio at the 

appropriate port.  
 

6.


Connect the AV Input cable to the 4-pin port on the 
A3/GOLF7 interface labeled 

‘CAMERA IN’

.  

7.


Connect ground and power for your camera to 
the black (GROUND) and red (REAR 12V OUT) 
wires from the provided 

CAM input harness. 

NOTE: 

This power source will only supply 12v when 

the vehicle is in reverse.  
 

8.


Connect the white plug from the 

‘Power/CAN Harness’

 to the port on the A3/GOLF7  

interface labeled 

‘POWER/CAN’

.  


9.


Optional:


If adding an additional video input, 

connect the provided 

‘Video in Harness’

 to the 

2-pin port on the interface labeled 

‘CAMERA 

IN’.


Note: if adding an additional video input, dip switch 2 must be in the 

down

 position. 

By default, AUX Video is used for a front camera (which will show the AUX image for ~10 
secs when in Drive), this option is adjustable via the main Menu. 
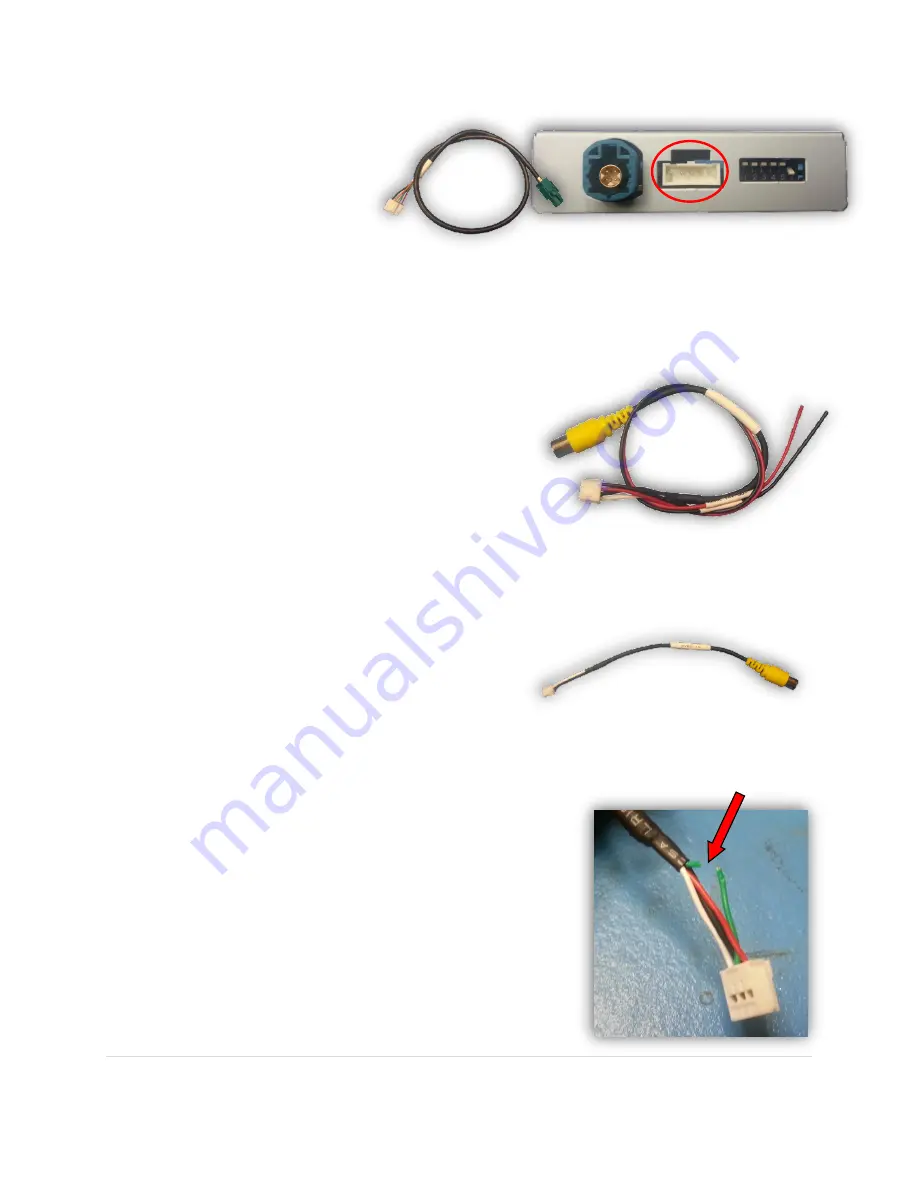


10.


Optional:

 If you’re installing the optional 

AUDI 3G-

CAM

, remove the grid lines by cutting the 

green wire


near the connector: 


Installation continues on next page…


Содержание A3/GOLF 7-CAM

Страница 1: ...inment only 1 P a g e 3950 NW 120th Ave Coral Springs FL 33065 TEL 561 955 9770 FAX 561 955 9760 www nav tv com info nav tv com A3 GOLF 7 CAM NTV KIT500 Overview The A3 GOLF7 CAM Kit allows the user t...

Страница 2: ...t to place of purchase This product is intended for off road use and passenger entertainment only 2 P a g e Interface Connectors Dip Switch Settings Quick Reference Rear CAM IN CAM Power Power CAN OUO...

Страница 3: ...ip switch 6 is down in order to enter the Menu Car Select If the car does not switch to the reverse image when in reverse try placing dip switch 1 in the other position Resolution Down for high res la...

Страница 4: ...kit Connect the following wires to the car radio s main power plug 3 Locate the factory Pink For AUDI s with NAV this connector is GRAY 4 pin round connector that was removed from the radio in step 1...

Страница 5: ...ce labeled CAMERA IN 7 Connect ground and power for your camera to the black GROUND and red REAR 12V OUT wires from the provided CAM input harness NOTE This power source will only supply 12v when the...

Страница 6: ...this module differently Follow the steps below a Disconnect the main Power CAN connector from the module b Locate the dip switches on the side of the module and verify that dip switch 6 is DOWN the r...

Страница 7: ...oduct is intended for off road use and passenger entertainment only 7 P a g e A3 Controls MMI knob GOLF 7 Controls steering wheel Hold for 5 seconds ENTER MENU Press quickly DISPLAY AUX VIDEO Rotate C...

Отзывы: