background image

19

SAAB 9-5 2009-2011

  Testing and Settings

STEP 5

Camera Settings

• 

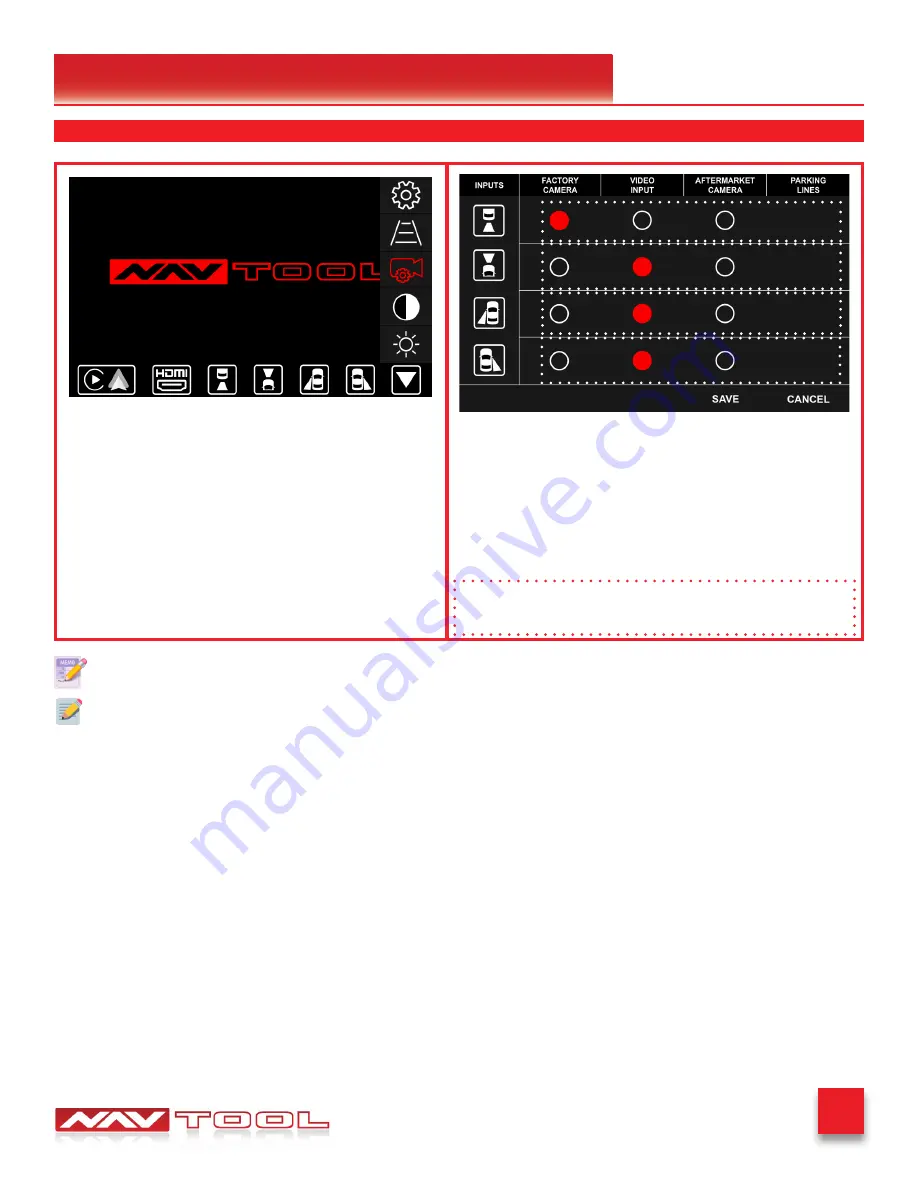
Touch the Camera Settings icon.

Camera Settings

• 

Image above shows you typical camera settings. 

• 

To change camera input, touch the desired line of the camera 

as indicated in the image above. (rear, front, left, or right). Tap 

repeatedly to change the options for your camera input. 

• 

Once all camera inputs are set, tap the SAVE button on the 

bottom right. 

Step: 1

Step: 2

Set vehicle in reverse gear to test the operation of the factory rear view camera. 

Press and hold one of the four corners of the touch screen for 3 seconds to turn OFF the NavTool inter-

face. Press and hold the corner of the touch screen for a few seconds until the bottom menu appears on 

the screen, release the finger and hold the corner of the screen again to return to the factory menu. 

(See page 18 for details)

To change the camera input settings, touch the area on the 

screen that is indicated in the image with the dotted outline.

Содержание SAAB 9-5 2009-2011

Страница 1: ...ual SAAB 9 5 2009 2011 NOTICE Navtool recommends having this installation performed by a certified technician Logos and trademarks used here in are the properties of their respective owners Interface with HDMI Mirroring Part NAVTOOL6 0 LG1 ...

Страница 2: ...technician who has this knowledge and understanding Failure to follow these instructions carefully and install the interface as described could cause harm to the vehicle or safety systems on the vehicle Interference with specific safety systems could cause damage to persons as well Open the camera app on your smart phone and point your rear camera at the QR Code to scan it Finally tap the pop up b...

Страница 3: ...t to its intended way of operation may result in property damage personal injury or death Set Parking brake Remove the negative battery cable Protect fenders before starting Using protective blankets to cover front seats interior of the vehicle and center console Always install a fuse 6 12 inches away from NavTool interface 5 amp fuse should be used Always secure NavTool interface with Velcro or d...

Страница 4: ...terface Part NAVTOOL6 0 LG1 NavTool LVDS Cables Part NT GMBLU LVDS NavTool Interface Harness Part NT WHNT6 NavTool Vehicle Specific Plug and Play Harness Part NT GMQUAD BLU USB Configuration Cable Part NT USB CNG NavTool AUX Activator Part NT AUX ACT ...

Страница 5: ...from the vehicle If the blue LED is not blinking the interface will not operate properly Power LED Normal operation of the interface must have a green LED ON If the green LED is not ON the interface is not receiving power If the green LED is not ON the interface will not work and your vehicle radio may also stay OFF HDMI LED Normal operation of the interface must have a green LED ON If the green L...

Страница 6: ...an aftermarket left view camera or a video source with an RCA video output Your vehicle factory camera will continue to work as before without any changes Right Camera Input Video Input 4 This input is dedicated for an aftermarket right view camera or a video source with an RCA video output Your vehicle factory camera will continue to work as before without any changes Connector for Vehicle Specif...

Страница 7: ...GMQUAD BLU NavTool Interface Part NAVTOOL6 0 LG1 NBT NavTool Supplied Harness Part NT WHNT6 Back of Car Radio Left Camera Input Video Input 3 Right Camera Input Video Input 4 Front Camera Input Video Input 2 Rear Camera Input Video Input 1 Not Used Click Click Click Click Click Click See Page 8 ...

Страница 8: ... Click 2 Close Up View of Radio Connectors 2 Cable that previously used to be connected to blue connector in the back of the radio NavTool Supplied LVDS Cable NavTool Supplied LVDS Cable Factory LVDS Cable See Part 1 NavTool Interface Back of Car Radio See Page 7 ...

Страница 9: ...ONFIGURE THE INTERFACE GO TO HTTPS CONFIG NAVTOOL COM Connect the interface to the computer using supplied USB Configuration Cable Part NT USB CNG To see a video of the configuration process Scan QR Code or go to https youtu be iES_rW240X0 Remove Vehicle Navigation Radio or Color Screen List of Required Tools 1 Plastic Panel Removal Tool Example of a removal tool is shown below Any similar removal...

Страница 10: ...10 SAAB 9 5 2009 2011 Installation Instructions STEP 2 Continued Step 1 Remove the radio ...

Страница 11: ...11 SAAB 9 5 2009 2011 Installation Instructions STEP 2 Continued This page has been intentionally left blank ...

Страница 12: ...NT GMQUAD BLU Back View of Car Radio Step 2 Reconnect previously removed radio connectors into the back of the radio Connect supplied universal wiring harness Part NT WHNT6 into plug and play harness Part NT GMQUAD BLU For complete image see Quick Connection Guide on page 7 Click Part NT GMQUAD BLU Part NT WHNT6 For complete image see Quick Connection Guide on page 7 Continued on Step 4 STEP 4 STE...

Страница 13: ...Step 1 Connect the 4 pin plug from the vehicle specific supplied harness Part NT GMQUAD BLU to the 4 pin microphone input connector on the NavTool Interface Harness Part NT WHNT6 Click NavTool Supplied Harness Part NT WHNT6 End View of Harness NT GMQUAD BLU ...

Страница 14: ...ted to blue connector in the back of the radio NavTool Supplied LVDS Cable Factory LVDS Cable See Part 1 NavTool Interface Back of Car Radio STEP 7 Step 1 Connect NavTool supplied LVDS cable into the blue port on the back of the radio Step 2 Connect NavTool supplied LVDS cable into the brown port shown in the image below Click Click Close Up View of Radio Connectors NavTool Supplied LVDS Cable See...

Страница 15: ... Radio Left Camera Input Video Input 3 Right Camera Input Video Input 4 Front Camera Input Video Input 2 Rear Camera Input Video Input 1 Not Used The NavTool interface installation is now complete Do not reassemble the vehicle until testing is fully complete Only after you have tested that everything is working can you reassemble the car If you are adding side or front cameras install them and plu...

Страница 16: ...elow STEP 10 After the interface is installed and you activate the NavTool if your screen is blinking or you see a NavTool image for a second and it goes to a black screen you must cut a wire on the harness This is a front view of the connector NOT wire side Cut pin 10 AUX Input Located Inside Center Console NavTool supplied AUX Activator Part NT AUX ACT ...

Страница 17: ... appropriately All radio functions are working including CD Satellite Radio AM FM radio audio plays from car speakers and all other radio features STEP 2 SRCE Button Press the SRCE button to display the audio screen Press to switch between AM FM or XM if equipped Disc or AUX Auxiliary Must set a radio to auxiliary AUX before activating NavTool to hear audio from car speakers Audio will not play th...

Страница 18: ...n you must cut a wire on the harness See Page 16 STEP 4 Adjust camera inputs if you haven t done so already during the initial configuration of the interface Touch the settings menu option The menu option is the last icon on the bottom right Touch the settings gear The settings gear is the top icon Touch the text Manual Activation Wire as Reverse Trigger 12V Change the setting to OFF once the red ...

Страница 19: ...SAVE button on the bottom right Step 1 Step 2 Set vehicle in reverse gear to test the operation of the factory rear view camera Press and hold one of the four corners of the touch screen for 3 seconds to turn OFF the NavTool inter face Press and hold the corner of the touch screen for a few seconds until the bottom menu appears on the screen release the finger and hold the corner of the screen aga...

Страница 20: ...terface or if you are installing any aftermarket cameras To test aftermarket front camera put the car in reverse then into drive Front camera should display on the screen To test aftermarket left and right cameras use left and right turn signals Left and right cameras should display depending on the turn signal activated To exit HDMI input or any Camera inputs tap the touch screen to bring up the ...

Страница 21: ... power source for accessory or constant power Check to see if any other panels that were removed during installation and now being reassembled have all and any electrical connectors reconnected Turn on parking light and check all dashboard lights operation Check all panels for proper fit make sure no gaps in panels are left behind If all steps above are checked off you will save time money and hav...

Страница 22: ...d hold one of the four corners of the touch screen to activate or deactivate NavTool interface After you activated the interface you will be brought to this screen that you can navigate using the factory touch screen See page 18 Interface Menus and Settings ...

Страница 23: ...selecting this option on the NavTool interface that is not equipped with Apple CarPlay Android Auto module Interface Menus and Settings HDMI Tap the HDMI button to enter this option After selecting HDMI with a HDMI source attached you will be brought to your HDMI s device screen and connected image will appear on the screen To exit HDMI tap the touch screen to bring up the bottom menu No HDMI Sign...

Страница 24: ...h screen to bring up the bot tom menu Left Lane Watch Camera Tap the Left Lane Watch Camera button to enter this option After selecting the left lane watch camera input you will be brought to your left lane watch camera screen This will not work if a left lane watch camera is not installed Note This input will not display factory installed left lane watch camera To exit Left Lane Watch Camera tap ...

Страница 25: ... to enter this option After selecting brightness you can adjust the brightness of the interface The white bar in the middle shows the interface bright ness setting You can lower the brightness of the interface by tap ping the minus on the left and increase the interface s brightness by tapping the plus on the right Save or cancel any changes you have made Contrast Tap the Contrast button to enter ...

Страница 26: ...ket camera or if you wish to use this input as a video input Aftermarket camera Select this option if you are installing an aftermarket left lane watch camera Parking lines Select this option if you are installing an aftermarket left lane watch camera and you wish to add distance lines to the camera image Factory camera Select this option if your vehicle is equipped with a factory installed rear v...

Страница 27: ...You can increase your parking line width to a desired size Cancel After making changes to your parking line settings select the X to cancel your changes Save After making changes to your parking line settings select the check to save your changes Left You can move your parking lines left by selecting the left arrow for your selected parking line Right You can move your parking lines right by selec...

Страница 28: ...I input or if you want to view other video inputs Set this feature to OFF if you want to enter NavTool menu upon activation of the interface Turn this feature to ON to enable audio feedback from the interface when activating the interface or when smartphone wireless connection is established Turn this feature to OFF if audio feedback from the interface is not required Turn ON manual activation wir...

Страница 29: ...011 HDMI Sources 1 in 2 Out HDMI Splitter NavTool Interface HDMI to AV Adaptor Car Monitor How to Connect Rear Screens to Car With AV Input Examples of equiptment used if connecting or installing additional rear screens ...

Страница 30: ...2011 HDMI Sources 1 in 2 Out HDMI Splitter NavTool Interface Car Monitor Car HDMI Input How to Connect Rear Screens to Car With HDMI Input Examples of equiptment used if connecting or installing additional rear screens ...

Страница 31: ...ay the audio screen Press to switch between AM FM or XM if equipped Disc or AUX Auxiliary Must set a radio to auxiliary AUX before activating NavTool to hear audio from car speakers Audio will not play through car speakers if AUX activator jack is not connected or radio is not set to AUX input Set Radio to AUX Audio Input AUX Input Located Inside Center Console NavTool supplied AUX Activator Part ...

Страница 32: ...ur vehicle and do Forget This Device Apple CarPlay Android Auto HDMI Aftermarket Rear Camera Aftermarket Front Camera Aftermarket Left Camera Aftermarket Right Camera Settings Fig 2 How to exit video inputs To leave HDMI or any camera inputs tap anywhere on the touch screen to bring up the bottom menu bar Aftermarket Camera Operation The factory rearview camera will continue to work in reverse If ...

Страница 33: ...e interface when activating the interface or when smartphone wireless connection is established Turn this feature to OFF if audio feedback from the interface is not required Turn ON manual activation wire as reverse trigger if your manual tells you to or if done by an installer Do not change if installer has set this feature to ON Turn OFF Most vehicles will have manual activation wire turned off ...

Страница 34: ... the right Save or cancel any changes you have made Contrast Tap the Contrast button to enter this option After selecting contrast you can adjust the contrast of the inter face The white bar in the middle shows the interface contrast setting You can lower the contrast of the interface by tapping the minus on the left and increase the interface s contrast by tapping the plus on the right Save or ca...

Отзывы: