background image

18

BMW 1 Series 2008

  Testing and Settings

STEP 1

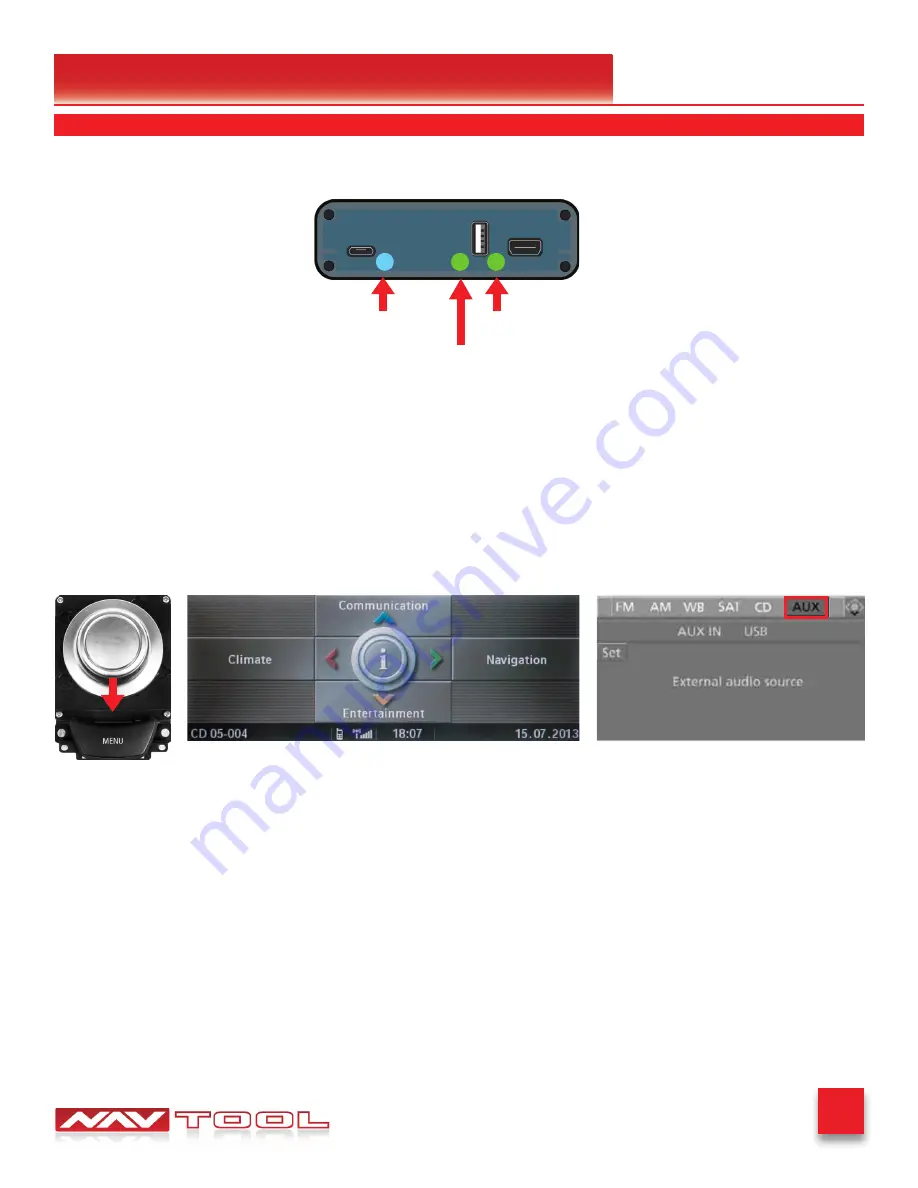
• Start the car, observe NavTool LED lights should be one blinking blue and two steady lit green LED 

lights.

Data LED

Power LED

HDMI LED

• At this time, your car radio should boot up into its initial state, and the radio should be working. 

Please check that the radio operates appropriately. All radio functions are working, including CD, 

Satellite Radio, AM/FM radio, audio plays from car speakers, and all other radio features.

Set Radio to AUX Audio Input:

•Pull the joystick back towards the rear seat to select the Entertainment menu.
•Rotate the factory joystick remote to the right and select AUX.
•Press enter on the joystick to set the audio to AUX.

• Audio will not play through car speakers if AUX input is not connected or radio is not set to AUX 
input.

Note:

 If your vehicle is not equipped with AUX input, there is a way to retrofit your vehicle 

with AUX, contact us for more deatils

Содержание NAVTOOL6.0-LB0-HDMI

Страница 1: ...nual BMW 1 Series 2008 NOTICE Navtool recommends having this installation performed by a certified technician Logos and trademarks used here in are the properties of their respective owners Interface...

Страница 2: ...consult a technician who has this knowledge and understanding Failure to follow these instructions carefully and install the interface as described could cause harm to the vehicle or safety systems on...

Страница 3: ...to its intended way of operation may result in property damage personal injury or death Set Parking brake Remove the negative battery cable Protect fenders before starting Using protective blankets to...

Страница 4: ...pecific Plug and Play Harness Part NT QUADLOCK V1 NavTool Interface Part NAVTOOL BMWRLY NavTool Interface Harness Part NT WHNT6 Vehicle Specific Plug and Play Harness Part NT BMWDRV NavTool Interconne...

Страница 5: ...ot receiving power If the green LED is not ON the interface will not work and your vehicle radio may also stay OFF HDMI LED Normal operation of the interface must have a green LED ON If the green LED...

Страница 6: ...video output Your vehicle factory camera will continue to work as before without any changes Right Camera Input Video Input 4 This input is dedicated for an aftermarket right view camera or a video so...

Страница 7: ...put Video Input 3 Right Camera Input Video Input 4 Front Camera Input Video Input 2 Rear Camera Input Video Input 1 Not Used Click Click AUX Input jack installed in your car from the factory Click Cli...

Страница 8: ...Play Harness Part NT BMWDRV Vehicle Specific Plug and Play Harness Part NT QUADLOCK V1 Car s Factory Harness Back of the Car s Screen Close up view of the Back of the Car s Screen Click NavTool Inter...

Страница 9: ...fiber optic assembly plug Gently pull the fiber optic plug out Image above is the fiber optic assembly removed from the vehicle s factory harness Take the NavTool supplied harness with out the inserte...

Страница 10: ...e Chrome browser TO CONFIGURE THE INTERFACE GO TO HTTPS CONFIG NAVTOOL COM Connect the interface to the computer using supplied USB Configuration Cable Part NT USB CNG To see a video of the configurat...

Страница 11: ...trim 1 at fastening points 4 and pull back Release corresponding plug connections and detach control panel 2 Step 3 Pull trim cover 1 inward to release from pin 2 Detach trim cover 1 and disconnect pl...

Страница 12: ...Harness from the back of the Radio STEP 4 Step 1 Remove the Fiber Optic Cable from the factory plug and insert it into the supplied plug and play harness See page 9 Factory Wire Plug and Play Harness...

Страница 13: ...structions Step 1 Connect supplied plug and play harness Part NT QUADLOCK V1 into the back of the radio Step 2 Reconnect previously removed radio connectors into the back of the radio Step 1 Connect s...

Страница 14: ...reen Step 1 Plug in Vehicle Specific Plug and Play Harness Part NT QUADLOCK V1 into the Vehicle Specific Plug and Play Harness Part NT BMWDRV Step 2 Connect the cable previously connected to the back...

Страница 15: ...p 2 Plug in Vehicle Specific Plug and Play Harness Part NT BMWDRV into NavTool Interface Part NAVTOOL BMWRLY Cable that was previously connected to the back of the vehicle s screen End view of harness...

Страница 16: ...ble Part NT EXT BOX NavTool Interface Part NAVTOOL6 0 LB0 NBT Installation Instructions STEP 9 Step 1 Plug in NavTool Interconnect Cable Part NT EXT BOX into NavTool Interface Part NAVTOOL BMWRLY Step...

Страница 17: ...everything is working you reassemble the vehicle If you are adding side or front cameras install them and plug them into the appropriate camera RCAs If you are installing any HDMI or streaming device...

Страница 18: ...ing including CD Satellite Radio AM FM radio audio plays from car speakers and all other radio features Set Radio to AUX Audio Input Pull the joystick back towards the rear seat to select the Entertai...

Страница 19: ...tick to the right to highlight menu option The menu option is the last icon on the right Then press enter on the joystick remote to enter settings Rotate joystick remote to highlight the settings gear...

Страница 20: ...left or right then press enter on the joystick remote to change the option for particular camera input Once the selected option is highlighted rotate joystick to another camera input Once all camera i...

Страница 21: ...onnected or the connected source is not correctly working you will see this message Test AV inputs by selecting them in the menu of the interface or if you are installing any aftermarket cameras To te...

Страница 22: ...ower source for accessory or constant power Check to see if any other panels that were removed during installation and now being reassembled have all and any electrical connectors reconnected Turn on...

Страница 23: ...23 BMW 1 Series 2008 HDMI Sources 1 in 2 Out HDMI Splitter NavTool Interface HDMI to AV Adaptor Car Monitor How to Connect Rear Screens to Car With AV Input...

Страница 24: ...24 BMW 1 Series 2008 HDMI Sources 1 in 2 Out HDMI Splitter NavTool Interface Car Monitor Car HDMI Input How to Connect Rear Screens to Car With HDMI Input...

Страница 25: ...era will continue to work in reverse If you installed a forward facing camera you could manually select it in the menu or it will automatically display up to 10 miles per hour on the screen This autom...

Страница 26: ...menu Rotate the factory joystick remote to the right and select AUX Press enter on the joystick to set the audio to AUX Audio will not play through car speakers if AUX input is not connected or radio...

Страница 27: ...avTool menu Rotate Right Go right inside NavTool menu Menu Click once to go back when on HDMI or Camera Inputs Press and hold for 3 5 seconds to turn the interface ON when on the car s factory screen...

Отзывы: