Installation Guide
V1.0
Page 6-7
Figure 2
Figure 3
LED 5.5
“
Bollard
TYPE 3 PLATE INSTALLATION
Figure 4
Figure 5
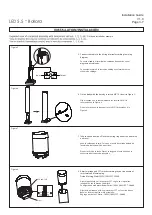
Pull out the top cover of bollard.
3.
Insert Type 3 plate into the fixture head.
4.
Fix the M12 nut and waterproof connector of the bollard head.
5.
Flat head installed as example.
Retire el conector impermeable y la tuerca M12 en la parte inferior
de la cabeza del bolardo.
Retirez le connecteur étanche et l'écrou M12 au bas de la tête de
la borne.
Saque la cubierta superior del bolardo.
Retirez le couvercle supérieur de la borne.
Inserte la placa Tipo 3 en el cabezal de la luminaria.
Insérez la plaque de type 3 dans la tête du luminaire.
Fijar la tuerca M12 y el conector estanco de la cabeza de la pilona.
Fixez l'écrou M12 et le connecteur étanche de la tête de borne.
Remove waterproof connector and M12 nut at the bottom of the
bollard head.
2.
Waterproof
connector
M12 Nut
SPD09P-10R
Driver
Sealing gasket
Sealing gasket
Waterproof
connector
M12 Nut
SPD09P-10R
Driver
Sealing gasket
Sealing gasket


