background image

3   If a leak exists at this point in the disassembly of the meter, remove the calibration shaft O-ring  Before reinserting the 

O-ring, apply a light coat of silicon grease to it  

4   Clean all parts 

To gain access to the calibration ring, the straightening vane/nose cone must be removed  See 

“Removing the Magnet Carrier/Top Gear Set” on page 14

 for instructions 

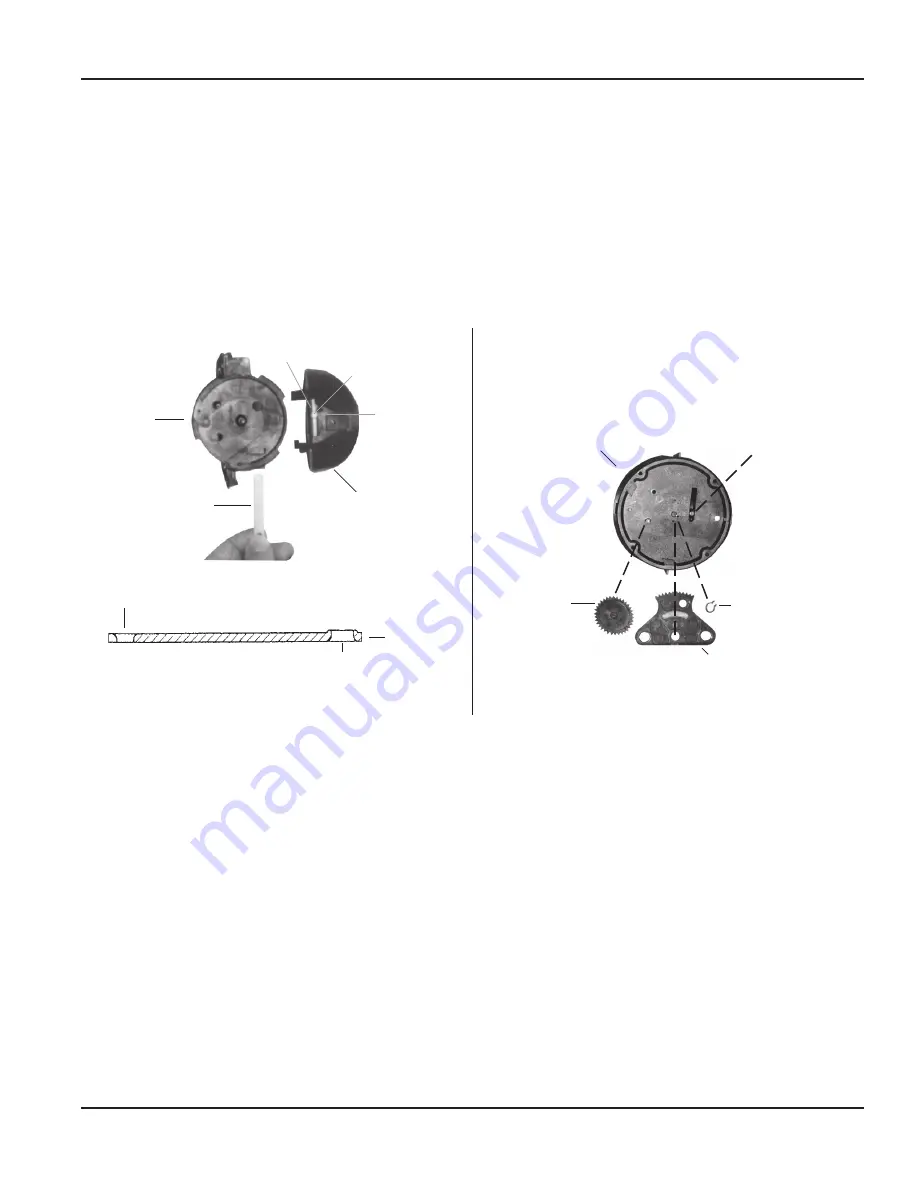
To remove the calibration ring from the nose cone assembly:

1   Align the ring slots with the bayonets of the nose cone assembly (located on inner ring of calibration ring)  
2   Carefully lift the calibration ring from the nose cone assembly 

To reinstall the calibration mechanism, follow this procedure in reverse 

CALIBRATION 

LINKAGE

ARROW TIP

CAGE 

INSERT

NOSE 

CONE

TOP SIDE

SMALL HOLE WITH

CHAMFER UP

LARGE HOLE WITH

CHAMFER DOWN

INTO CAGE 

THIS END

CALIBRATION RING

PIN

2", 3" and 4"

RETAINING RING

TRANSMISSION 

GEAR

CALIBRATION DRIVE 

PLATE

CAGE INSERT 

(TOP VIEW)

PIN OF 

CALIBRATION 

RING

6"

Figure 11:  Calibration ring/linkage assemblies

Reassembling the Calibration Mechanism

1   Align the pin on the perimeter of the calibration ring with the arrow tip located on the nose cone assembly (see 

Figure 11 on page 15

)  

2   For 2", 3" and 4" sizes, install the calibration linkage into the cage with the larger hole to engage the calibration ring 

tab, with the side of chamfered edge of the hole towards the nose cone assembly (see 

Figure 11 on page 15

)  

3   With the calibration linkage fully inserted to the cage stop, install the nose cone onto the cage and rotate it counter-

clockwise to engage the pin of the ring to the calibration linkage  The hole of the calibration linkage has to be aligned 

onto the calibration shaft, engaging it fully so that the calibration ring cannot vibrate during operation  

4   Tighten the calibration shaft lock screw to securely hold the calibration ring in position 

After servicing or replacing the calibration mechanism, check the accuracy and calibration according to the instructions in the 

Recordall Turbo Series Meter User Manual


Servicing Parts and Assemblies

June 2016

RCS-UM-00076-EN-04

Page 15 

Содержание T200

Страница 1: ...Size High Side Model Placed on Short side of meter Low Side Model Placed on Taller side of meter 2 T200 M25 or also labeled Low 2 3 3 M450 M25 or also labeled Low 2 3 4 M1000 M35 or also labeled Low 4...

Страница 2: ...ector endpoint side with the corresponding projection on the other encoder side and push the ends together for the correct fit See 308 In line connector Figure 2 With Nicor in line connectors hold the...

Страница 3: ...nut onto the tube threads as shown 2 Insert the endpoint tube through the bottom of the lid 3 Screw the top cap onto the endpoint tube threads as shown and tighten 4 Tighten the lock nut against the b...

Страница 4: ...ND PRIOR TO ATTACHING THE ENDPOINT TO AVOID DAMAGE 2 Once in the ground secure the mounting bracket on the appropriate rebar or pipe using the enclosed washer wing nut and hex head bolt provided with...

Страница 5: ...RCS UM 00076 EN 04 June 2016 Recordall Compound Series Meter Lead Free Bronze Alloy Sizes 2 3 4 6 NSF ANSI Standards 61 and 372 Certified User Manual...

Страница 6: ...Page ii Recordall Compound Series Meter Lead Free Bronze Alloy Sizes 2 3 4 6 June 2016 RCS UM 00076 EN 04...

Страница 7: ...nd Assemblies 12 Removing the High Flow Turbo Meter Head Assembly 12 Removing the Turbo Measuring Element Assembly from the Cover Plate 14 Removing the Magnet Carrier Top Gear Set 14 Removing the Stra...

Страница 8: ...Page iv Recordall Compound Series Meter Lead Free Bronze Alloy Sizes 2 3 4 6 June 2016 RCS UM 00076 EN 04...

Страница 9: ...rs Product Data Sheet contains information on operating principle meter construction materials tolerances and specifications The Recordall Compound Series Meters Parts List contains part numbers part...

Страница 10: ...s in pipe direction or valving resulting in more accurate registration Contact your Badger Meter representative for information on Recordall Plate Strainers Avoid locating the meter in close quarters...

Страница 11: ...equal in size to the meter is required upstream of the meter Additional length is required if a sharp contraction or an eccentric reducer rather than a concentric tapered reducer is used Installing t...

Страница 12: ...er Figure 4 2 adapter with a 2 round meter Figure 5 4 adapter Figure 6 4 with a 4 meter Description Part Number 2 Elliptical Flange Adapter Kit 64186 001 2 Round Flange Adapter Kit 64186 002 4 Flange...

Страница 13: ...n Now open all applicable service valves Check the flow rate to verify that the flow does not exceed the maximum continuous duty specification The rate of flow can be quickly checked by timing the qua...

Страница 14: ...e added together to determine the total flow through the meter Compare this to that recorded by the test meter or test tank If more than one revolution of the high flow test circle occurs take new rea...

Страница 15: ...aning Clean all dirt grease moisture or other foreign material from the exterior of the meter After cleaning rinse thoroughly with water In the event that system pressure has been reduced and the upst...

Страница 16: ...DO SO CAN LEAD TO THE HEAD BEING EJECTED FROM HOUSING CAUSING PERSONAL INJURY AND OR PROPERTY DAMAGE 1 Loosen each of the High Flow Turbo Head Assembly bolts about 1 1 2 turns Do not completely remov...

Страница 17: ...bottom bearing Calibration ring rear Rotor Calibration ring front Nose cone setscrew Cage setscrew 1 Cage seal Nose cone straightening vane assembly 2 Calibration shaft seal plug Calibration shaft lo...

Страница 18: ...in access to them remove the measuring element from the cover Removing the upstream nose cone provides access to the rotor calibration ring and the transmission assembly To remove the nose cone 1 Unsc...

Страница 19: ...NG 6 Figure 11 Calibration ring linkage assemblies Reassembling the Calibration Mechanism 1 Align the pin on the perimeter of the calibration ring with the arrow tip located on the nose cone assembly...

Страница 20: ...ng pins are an integral part of the straightening vane and nose cone assembly Wear or damage would require the replacement of this component Reassembling the Rotor and Bearings 1 Install the rear nose...

Страница 21: ...and out of the bottom bearing then slide shaft downward and diagonally out towards you to remove it from the nose cone cage assembly 7 Holding cage firmly with one hand rotate the nose cone clockwise...

Страница 22: ...the Low Flow Cover Assembly bolts about 1 1 2 turns Do not completely remove the bolts 2 If the O ring between the Low Flow Cover Assembly and the housing is secure and not leaking pry the Measuring...

Страница 23: ...magnet in the meter head is clean Valve Assembly Removing the Valve Assembly With the cover assembly removed the valve assembly is exposed for service 1 Remove the lock pawl see Figure 14 2 Turn the v...

Страница 24: ...stic Rotor Thrust Bearing Sapphire jewels Rotor Bearing Pivots Passivated 316 stainless steel Calibration Mechanism Stainless steel thermoplastic Measuring Chamber Disc Thermoplastic High Flow Valve S...

Отзывы: