background image

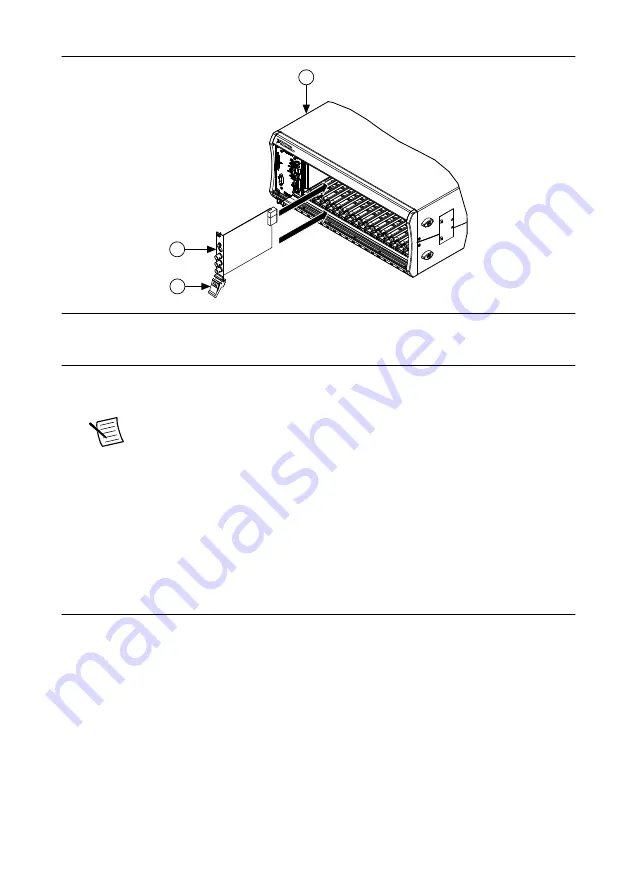
Figure 3.

  Module Installation

2

3

NI PXIe-1075

1

1. Chassis
2. Hardware Module
3. Ejector Handle in Down (Unlatched) Position

9.

Latch the module in place by pulling up on the ejector handle.

10. Secure the device front panel to the chassis using the front-panel mounting screws.

Note


Tightening the top and bottom mounting screws increases mechanical

stability and also electrically connects the front panel to the chassis, which can
improve the signal quality and electromagnetic performance.

11. Cover all empty slots using filler panels or slot blockers to maximize cooling air flow.
12. Attach output connections.

a)

Connect the output connector assembly to the device. Tighten any thumbscrews on
the output connector assembly to hold it in place.

13. Power on the chassis.

Configuring the NI 414x in MAX

Use Measurement & Automation Explorer (MAX) to configure your NI hardware. MAX
informs other programs about which devices reside in the system and how they are configured.
MAX is automatically installed with NI-DCPower.
1.

Launch MAX.

2.

In the configuration tree, expand 

Devices and Interfaces

 to see the list of installed

devices.

Installed devices appear under the name of their associated chassis.

3.

Expand your 

Chassis

 tree item.

6

  | 

ni.com

  | 

NI PXIe-414x Getting Started Guide

Содержание NI PXIe-4140

Страница 1: ...ou can impair the protection provided by the NI 414x if you use it in a manner not described in this document Contents Electromagnetic Compatibility Guidelines 2 Verifying the System Requirements 2 Un...

Страница 2: ...erate it under your local regulatory rules Caution To ensure the specified EMC performance operate this product only with shielded cables and accessories Verifying the System Requirements To use the N...

Страница 3: ...that you need to operate the NI 414x Your application may require additional items not included in your kit to install or operate your device Required Items A PXI Express chassis and chassis document...

Страница 4: ...temperature Pollution Degree 2 Indoor use only Note Refer to the device specifications on ni com manuals for complete specifications Safety Caution Always refer to the specifications document for your...

Страница 5: ...ion Do not install a module if the backplane is damaged 4 Remove the black plastic connectors from all the captive screws on the module front panel 5 Identify a supported slot in the chassis The follo...

Страница 6: ...or slot blockers to maximize cooling air flow 12 Attach output connections a Connect the output connector assembly to the device Tighten any thumbscrews on the output connector assembly to hold it in...

Страница 7: ...ramming Options Application Programming Interface API Location Description NI DCPower SFP Available from the start menu at Start All Programs National Instruments NI DCPower NI DCPower Soft Front Pane...

Страница 8: ...ol Panel System and Maintenance Device Manager Windows XP Select Start Control Panel System Hardware Device Manager 5 If you are using a PXI or PXI Express controller verify that a National Instrument...

Страница 9: ...tact NI technical support or visit ni com support Where To Go Next custom applications within an application programming interface API NI DCPower Soft Front Panel NI DCPower Instrument Driver about ha...

Страница 10: ...866 ASK MYNI 275 6964 For telephone support outside the United States visit the Worldwide Offices section of ni com niglobal to access the branch office websites which provide up to date contact infor...

Отзывы: