background image

7

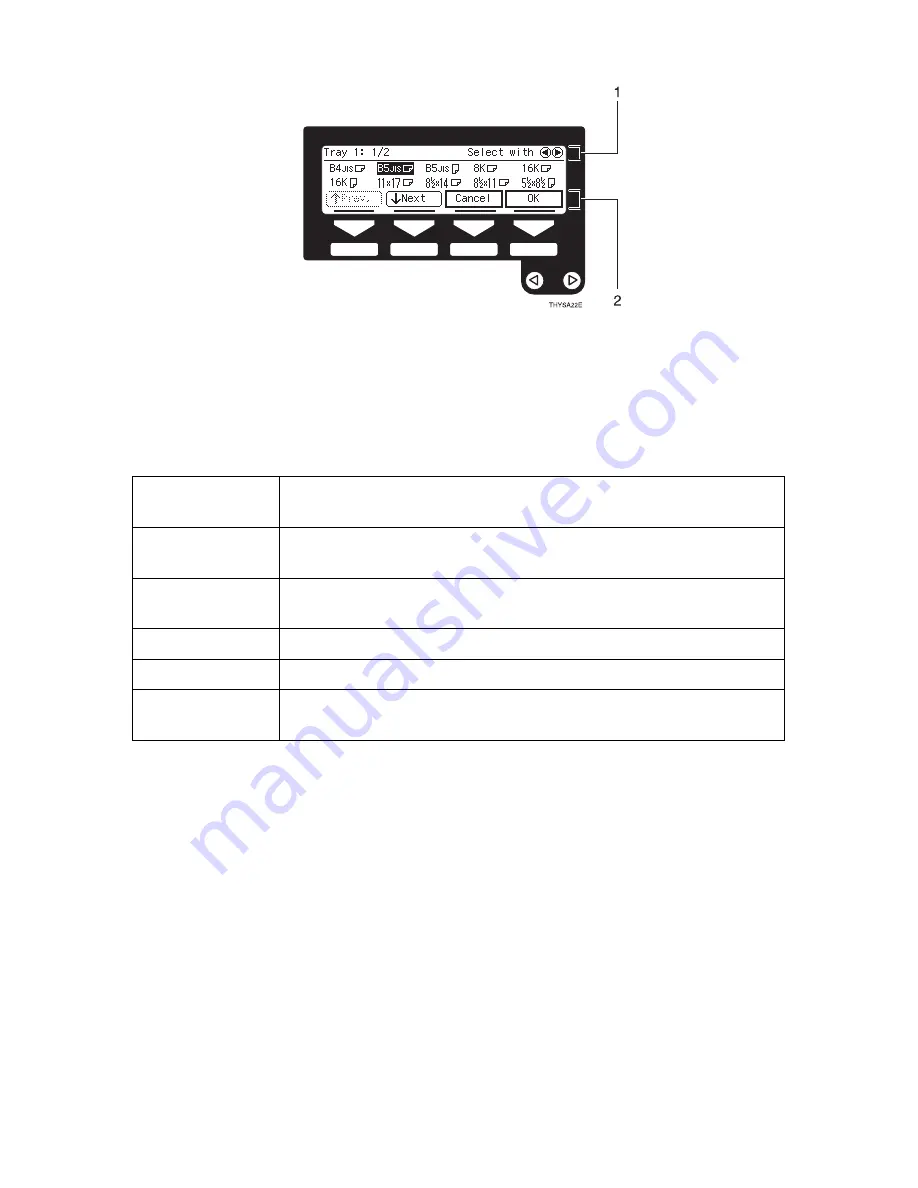
Function menu display

1.

Displays operational status or

message.

2.

Displays items which can be se-

lected or specified.

Common keys

[OK]

Sets a selected function or entered value and returns to the previ-
ous display.

[Cancel]

Cancels a selected function or entered value and returns to the 
previous display.

[

↑↑↑↑

Prev.][

↓↓↓↓

Next]

When there are too many items fit on the display, use these keys 
to move between pages.

01

Press to highlight the selection you wish to select.

[Prev Menu]

Press to return to the previous menu.

[Exit]

Sets a selected function or entered value and returns to the initial 
display.

Содержание d418

Страница 1: ...eam exposure to the operator The following label is attached on the back side of the machine Laser Safety The optical housing unit can only be repaired in a factory or at a location with the requisite equipment The laser subsystem is replaceable in the field by a qualified Customer Engineer The laser chassis is not repairable in the field Customer engineers are therefore directed to return all cha...

Страница 2: ...e requirements of the EMC Directive 89 336 EEC and the Low Voltage Directive 73 23 EEC In accordance with IEC 60417 this machine uses the following symbols for the main power switch a a a a means POWER ON c c c c means STAND BY Copyright 1999 Ricoh Co Ltd ...

Страница 3: ...RNING Ignoring this warning could cause serious injury or even death R CAUTION Ignoring this caution could cause injury or damage to property Symbols R mean a situation that requires you take care Symbols v mean Hot surface Do NOT carry out the operation represented by this symbol m This example means Do not take apart Symbols mean you MUST perform this operation This example means You must remove...

Страница 4: ...e serious eye damage When the machine needs to be checked adjusted or re paired contact your service representative Do not take apart or attempt any modifications to this ma chine There is a risk of fire electric shock explosion or loss of sight If the machine has laser systems there is a risk of serious eye damage If the machine looks damaged or breaks down smoke is coming out there is a strange ...

Страница 5: ...iii Do not incinerate used toner or toner containers Toner dust might ignite when exposed to an open flame Dispose of the used toner containers according to local regulations for plastics ...

Страница 6: ...n unit horizontally If the paper tray unit be comes detached from the main unit this could cause an injury When you move the machine unplug the power cord from the wall outlet to avoid fire or electric shock When the machine will not be used for a long time unplug the power cord When you pull out the plug from the socket grip the plug to avoid damaging the cord and causing fire or electric shock I...

Страница 7: ...oner used or unused and toner containers out of reach of children This equipment is only to be installed by a qualified service per sonnel Deliver to collection point for waste products Do not be disposed of via domestic refuse collection ...

Страница 8: ...h copier feature only To conserve energy this copier automatically turns off 30 minutes after the last copying job has been completed To exit the Auto Off Mode turn on the main switch For how to change the default interval before entering Auto Off mode see Auto Off Timer of the System Settings As an ENERGY STAR Partner we have deter mined that this machine model meets the ENER GY STAR Guidelines f...

Страница 9: ...d recycled paper types that may be used in this machine Copier only Fax or Printer is in stalled Level 1 Level 2 Level 1 Level 2 Low power Mode Power consump tion about 60W about 30W about 75W about 50W Default interval 1min Recovery time 10 sec 20 sec 10 sec 20 sec Sleep Mode 1 Power consump tion Not Available less than 38W 3 Default interval 30 min Auto Off Mode 2 Power consump tion 0W 3 Not Ava...

Страница 10: ...the instructions under this symbol Be sure to read the instructions all of which are described in the Safety Information section The statements above are notes for your safety Important If this instruction is not followed paper might be misfed originals might be damaged or data might be lost Be sure to read this Preparation This symbol indicates the prior knowledge or preparations required before ...

Страница 11: ...e 54 Sort Page 37 1 2 1 2 Series Copy Page 57 2 1 3 2 1 3 2 1 3 2 1 3 2 1 3 2 1 3 2 1 3 2 1 3 Sort Auto Reducel Enlarge Page 35 Zoom Page 53 Rotate Sort 1 THYSA310E eps Reduce Eularge Page 51 Selecting Copy Paper Page 33 1 The optional paper tray unit is required to use this function Adjusting Copy Image Density Page 31 Selecting Original Type Setting Page 32 ...

Страница 12: ... 17 Envelopes 20 Non recommended Paper 21 Paper Storage 22 Toner Cartridge 23 Handling Toner 23 Toner Storage 23 2 Copying Basic Procedure 25 Setting Originals 27 Setting Originals on the Exposure Glass 27 Setting Originals in the Document Feeder 28 Setting Originals When Auto Paper Select Cannot Recognize the Size 29 Basic Functions 31 Adjusting Copy Image Density 31 Selecting Original Type Setti...

Страница 13: ...s from Book Originals 57 Combination Chart 59 3 What to do If Something Goes Wrong If Your Machine does not Operate as You Want 61 Message 61 Display 62 If You Cannot Make Clear Copies 63 If You Cannot Make Copies as You Want 65 B Loading Paper 66 D Replacing the Toner Cartridge 67 x Clearing Misfeeds 70 Changing the Paper Size 72 4 User Tools Copy Features Accessing the User Tools Copy Features 7...

Страница 14: ...ing Your Machine 89 Cleaning the Exposure Glass 89 Cleaning the Platen Cover 89 Cleaning the Document Feeder 89 6 Specification Mainframe 91 Document Feeder Option 94 500 Sheet Tray Unit Option 95 1000 Sheet Tray Unit Option 96 Internal Tray 2 1bin tray Option 97 48MB Copier Memory Unit Option 98 INDEX 99 ...

Страница 15: ...t off The Machine with fax or printer option Do not touch this switch This switch is used only by a service representative when the optional fax unit is installed Note If the machine does not operate after turning on the operation switch check if the main power switch is turned on If it is off turn it on 5 Operation switch The Machine with fax or priner option Press this switch to turn the power o...

Страница 16: ...the paper tray or to replace the toner cartridge 3 Paper tray side cover Open this cover to remove jammed paper which fed from the paper tray unit 4 Optional paper tray side cover Open this cover to remove jammed paper which fed from the optional paper tray unit 1 Ventilation hole Prevents overheating Do not obstruct the ventilation hole by placing or leaning an object near it If the machine over ...

Страница 17: ... See 14 Output Tray Prio in the System Settings 2 Platen cover Lower this cover over originals for copy ing 3 Document feeder ADF Insert a stack of originals here They will be fed automatically 4 Paper tray unit Consists of two paper trays 5 Paper tray unit Consist of one paper tray Other options 48MB copier memory unit ...

Страница 18: ...play 5 Program key Press to select the program mode See P 47 Program Storing Your Copy Set tings in Memory 6 Clear Modes key Press to clear the previously entered copy job settings 7 Energy Saver key Use to switch to and from Energy Saver mode See P 49 Energy Saver Mode Saving Energy 8 Interrupt key Press to make interrupt copies during a copy run See P 49 Interrupt Tempo rarily Stopping One Job t...

Страница 19: ...le mode for machines with optional fax function See the Facsimile Reference 19 Number keys Use to enter the desired number of copies and data for selected modes Use the key to enter data in selected modes 20 Clear Stop key While entering numbers press to cancel a number to have entered While copying press to stop copying 21 Start key Press to start copying Use to set the Auto Start See P 50 Auto S...

Страница 20: ... be changed See Settings You Can Change With The User Tools of the System Settings Displays and Key Operations Copy initial display 1 The machine status and messages appear here 2 Items which can be selected or specified 3 These four keys correspond to the keys that are in the bottom line of the display e g Reduce Enlarge and 100 in the above display Press the relevant key to select a key in the d...

Страница 21: ... the previ ous display Cancel Cancels a selected function or entered value and returns to the previous display Prev Next When there are too many items fit on the display use these keys to move between pages 01 Press to highlight the selection you wish to select Prev Menu Press to return to the previous menu Exit Sets a selected function or entered value and returns to the initial display ...

Страница 22: ...8 This page is intentionally blank ...

Страница 23: ...up you can make copies or send faxes Main power switch left side of the front panel The machine only with copy fea ture Turn on this switch to activate the machine Turn off this switch to shut off The machine with Fax or Printer option Do not touch the main power switch It should be used only by a service representative when the optional fax unit is installed Important If you leave the main power ...

Страница 24: ...Clear Modes key and the Clear Stop key simultane ously after copying Reference For setting user codes see P 81 1 General Features 4 4 When the Energy Saver indicator is lit The machine is in Energy Saver mode A Press the Energy Saver key The machine will return to the ready condition Note The machine will also return to the ready condition when an original is set in the document feeder or when the...

Страница 25: ...achine is set for user codes A Enter your user code using the Number keys Then press the key Note To prevent others from making copies with your user code press the Clear Modes key and the Clear Stop key simultane ously after copying Reference For setting user codes see P 81 1 General Features 4 4 When the Energy Saver indicator is lit The machine is in Energy Saver mode A Press the Energy Saver k...

Страница 26: ...er cord or turn off the main power switch make sure that the remaining memory space indicates 100 on the display for facsimile mode Fax files stored in memory will be lost an hour after you turn the main power switch off or you unplug the power cord See Turning Off The Power of the Facsimile Referencre ...

Страница 27: ...Press the Copy key to use copy functions press the Fax key to use facsimile functions or press the Printer key to use printer functions Limitation You cannot switch modes in any of the following cases When scanning in a fax message for transmission During immediate transmission When accessing the user tools During interrupt copying ...

Страница 28: ...d originals Originals with any kind of coating such as thermal fax paper art paper alu minum foil carbon paper or conductive paper Originals with indexes tags or other projecting parts Sticky originals such as translucent paper Thin original that has low stiffness Originals of inappropriate weight P 14 Sizes and Weights of Recommended Originals Bound originals such as books Transparent originals s...

Страница 29: ...ch partially contain solid image Originals which have solid image at their edges Originals other than those with in the table below See P 15 Sizes de tectable by the Auto Paper Select Sizes detectable by the Auto Paper Select Metric version Inch version Size A3 L B4 L A4 KL B5K L A5 KL 11 17 L 81 2 14 L 81 2 11 K L 51 2 81 2 KL 81 2 13 L Place of original Exposure glass Document feeder Size A3 L B...

Страница 30: ...ocument feeder or on the exposure glass 0 5mm 3 5mm margins on top and left sides or 0 5mm margins on bot tom and right sides might not be copied A3 A3 A4 Horizontal size Vertical size Reference position Maximum Scanning area A3 297x420mm 11 x17 279x432mm CP01AEE A3 A4 Horizontal size Vertical size Maximum Scanning area 297x1 260mm 11 7 x49 6 CP02AEE ...

Страница 31: ...ray Tray 1 Specify the size with 11 Special Pap of the System settings B4L B5KL 8K 1 L 16K 2 KL 11 17 L 81 2 14 L 81 2 11 L 81 2 51 2 K 71 4 101 2 L 8 13 L 81 4 13 L 8 10 L 81 4 14 L A3L B4L A4L B5KL A5K 8K 1 L 16K 2 KL 11 17 L 81 2 51 2 K 71 4 101 2 L 8 13 L 81 4 13 L 8 10 L 81 4 14 L Paper tray unit 3 Tray 2 3 Adjust the paper size selector A3L A4KL 11 17 L 81 2 14 L 81 2 11 KL 500 sheets Paper ...

Страница 32: ... 11 17 L 10 sheets Standard size Thick paper 3 A3L A4L A5L 8 13 L 11 17 L 81 2 11 L 105 162 g m2 28 43 lb 10 sheet Standard size Plain paper 4 A4L B5KL A5K B6L 16K 2 KL 81 2 11 KL 81 2 51 2 L 71 4 101 2 K A4KL B5KL A5KL B6L 16K 2 KL 81 2 11 K 81 2 51 2 L 71 4 101 2 KL 60 104 g m2 16 27 lb 100 sheets B4L 8K 1 L 11 17 L 81 2 14 L 81 2 13 L 81 4 13 K A3L B4L 8K 1 L 81 2 14 L 8 13 L 81 2 13 L 81 4 13 ...

Страница 33: ...en the tray in use runs out of paper This function is called Auto Tray Switch This saves inter rupting a copy run to replenish paper even when you make a large number of copies You can cancel this setting See 13 Auto Tray Switch of the Sys tem Settings Reference If you want to add paper see P 66 B Loading Paper If you want to change the paper size see P 72 Changing the Paper Size Bypass tray Metri...

Страница 34: ...es Load the envelopes with the flaps aligned to the right side fence The flaps should be securely folded down Make sure that there is no air in the envelopes before setting To get the better copy quality it is recommended that you set the right left top and bottom margin to at least 15 mm 0 6 each Do not copy on both sides of envelopes Load only one size and type of envelope at a time Before loadi...

Страница 35: ...ortant Do not use paper with any kind of coating such as Thermal fax paper Art paper Aluminum foil Carbon paper Conductive paper Otherwise a fault might occur Do not use copy paper that has been already copied on Otherwise a fault might occur Metric version Inch version A Good construction for envelopes B Poor construction for envelopes A Good construction for envelopes B Poor construction for env...

Страница 36: ... interlocked with nicked edges of bent corners with rough cockle or laid finishes with any exposed adhesive when the flap is in the sealed or closed posi tion If you make a copy on rough grain paper the copy image might be blurred Do not use paper which has been copied or printed on Paper Storage Note When storing paper the following precautions should always be followed Do not store paper where i...

Страница 37: ...l dry place free from direct sunlight Do not store the toner cartridge where it will be exposed to heat Do not eat or swallow toner and keep it out of reach of children Store on a flat surface Do not incinerate used toner or toner containers Toner dust might ignite when exposed to an open flame Dispose of the used toner containers according to local regulations for plastics Do not eat or swallow t...

Страница 38: ...Basics 24 1 This page is intentionally blank ...

Страница 39: ...iginals E Set your desired settings F Enter the number of copies re quired with the Number keys Note The maximum copy quantity can be set between 1 and 99 de fault 99 See 05 Max Copy Q ty in P 79 1 General Fea tures 2 4 To change the number entered press the Clear Stop key and enter the new number G Press the Start key The machine starts copying Important If the number of delivered cop ies exceeds...

Страница 40: ...unction is called Auto Reset Note You can change the Auto Reset time See 09 Copy Auto Reset in P 80 1 General Features 3 4 Auto Off The machine turns itself off automat ically after your job is finished after a certain period of time This function is called Auto Off Note You can change the Auto Off time See 09 Auto Off Timer in the System Settings You can change the default set tings for basic fun...

Страница 41: ...r details see explana tions of each function Reference See P 14 Originals Setting Originals on the Exposure Glass A Lift the platen cover or the docu ment feeder Note Be sure to open the platen cover or the document feeder by more than 30 otherwise the original size might not be detected cor rectly B Set the original face down on the exposure glass Slide your origi nal up to the blue scale then in...

Страница 42: ...ges of different sizes set the pages one at a time in the ADF See P 29 Set ting one original at a time SADF mode When setting documents whose sizes cannot be scanned from the ADF select Custom Size See P 29 Setting Originals When Auto Paper Select Cannot Recognize the Size Reference Regarding originals that the docu ment feeder can handle see P 14 Originals Setting a stack of originals in the docu...

Страница 43: ...t pressing the Start key Note You can adjust the time the ma chine waits before being ready for the next original See SADF Auto Reset in P 82 2 Input Output Setting Originals When Auto Paper Select Cannot Recognize the Size When you wish to use Auto Reduce Enlarge when setting non standard size documents in the ADF specify the size of your original using the fol lowing procedure Important Be sure ...

Страница 44: ... key and enter the new number B Enter the Vertical size with the Number keys Then press the OK key Kp appeared in exchange for Auto after the sizes setted Note To change the number en terd press the Clear Stop key and enter the new number When you select the bypass tray A Press the key B Press the Orig Size key C Enter the Horizontal size with the Number keys Then press the key Note To change the ...

Страница 45: ... Change with the User Tools You can have the settings stored in program 10 used as the initial set tings when the initial display is shown See P 47 Program Storing Your Copy Settings in Mem ory P 80 10 Initial Mode set Adjusting Copy Image Density You can adjust the copy image densi ty to match your originals There are three types in this function Auto Image Density The machine automatically adjus...

Страница 46: ...tters no pic tures Text Photo Select Text Photo when your origi nals contains photographs or pic tures with letters Photo Delicate tones of photographs and pictures can be reproduced with this mode If you do not select any mode your originals will be scanned with the set tings suitable for text originals Text mode A Press the Original Type key and select the original type Note Press the Original T...

Страница 47: ...et at a dif ferent direction from the copy paper in the paper tray with Auto Tray Switch mode ON the machine automatically rotates the original image by 90 to match the copy paper direction the paper tray unit option is required This applies to the following paper sizes Reference For Auto Tray Switch see 13 Auto Tray Switch in the Sys tem Settings Manual Paper Select You can select the desired cop...

Страница 48: ...elected Manual paper select A Select the paper tray or bypass tray by pressing 0 0 0 0 1 1 1 1 key Where origi nal is set Original size and di rection Exposure glass A3 L B4 L A4 KL B5 KL 81 2 13 L Document feeder A3 L B4 L A4 KL B5 KL A5 KL 81 2 13 L Where origi nal is set Original size and di rection Exposure glass 11 17 L 81 2 14 L 81 2 11 KL 10 8 L 81 2 13 L 10 14 L Document feeder 11 17 L 81 ...

Страница 49: ...nal of two dif ferent size at a time you must set one original at a time See P 29 Setting one original at a time SADF mode Image Rotation is not available when copying onto A3 11 17 paper with the Enlarge feature Set your original lengthwise when copying onto A3 11 17 paper with the Enlarge feature A Press the Auto Reduce Enlarge key Where original is set Original size and direc tion Exposure glas...

Страница 50: ...Copying 36 2 B Select the paper tray by pressing 0 0 0 01 1 1 1 Note The enlargment reduction ra tio automatically calculated to match the size of copy paper you have chosen is displayed ...

Страница 51: ...city is as follows When the number of cop ies exceeds the tray capacity re move copies from the tray The maximum tray capacity might be less than the above when you use the Rotate Sort The maximum tray capacity might also be reduced when copy paper is considerably curled The paper sizes that can be used in Sort function are as same as the siz es applied to Tray 1 2 or 3 See P 17 Copy Paper The pap...

Страница 52: ...h the Sort fea ture reset the remaining originals in the ADF starting with the jammed page When setting an original on the exposure glass or in the document feeder Reference P 29 Setting one original at a time SADF mode A Set the original then press the Start key Note Start with the first page to be copied B Set the next original then press the Start key Note Set the original in the same direction...

Страница 53: ... input ver tical and horizontal dimensions The sizes that you can input are as follows To make copies onto OHP trans parencies or thick paper 105 162g m2 28 43lb be sure to specity the paper type thick See P 42 When copying onto OHP transparencies or thick paper To make copies onto envelopes See P 43 When Copying onto En velopes Reference For details about paper capacity of the bypass tray see P 1...

Страница 54: ... When you set a OHP transpar encies make sure that its front and back faces are properly po sitioned D Lower the paper hold lever When copying onto custom size copy paper Important You should specify the size of copy paper to avoid paper mis feeds If you select Standard or Cus tom as the Paper Size setting these functions will remain in effect even after Auto Clear or pressing the Clear Modes key ...

Страница 55: ...ered press the Clear Stop key and enter the new number When you specify the paper size appears on the dis play to indicate bypass tray copying G Press the Exit key When copying onto standard size copy paper Important If you select Standard or Cus tom as the Paper Size setting these functions will remain in effect even after Auto Clear or pressing the Clear Modes key You can alter this behavior by ...

Страница 56: ...k Paper Spe cial Paper as the Paper Type set ting these functions will remain in effect even after Auto Clear or pressing the Clear Modes key You can alter this behavior by changing 12 Reset Bypass Set See P 80 1 General Fea tures 3 4 A Make sure the Bypass is se lected B Press the key C Press the Pap Type key D Select Thick with the 0 0 0 01 1 1 1 keys Then press the OK key Note Only select Speci...

Страница 57: ... copied sheets one by one Note Push on the engraved center point of the bypass tray to close it When Copying onto Envelopes Important If you select Thick Paper as the Pa per Type setting and select Stand ard or Custom as the Paper Size setting these functions will remain in effect even after Auto Clear or pressing the Clear Modes key You can alter this behavior by changing 12 Reset Bypass Set See ...

Страница 58: ...re that the envelope flap are securely folded down and that there is no air inside the envelopes You can load up to 10 envelopes 72 90g m2 19 24 lb Do not stack envelope over the limit mark otherwise a skew image or paper misfeeds might occur D Lower the paper hold lever E Make sure the Bypass is selected F Press the key G Press the Pap Type key H Select Thick with the 0 0 0 01 1 1 1 keys Then pre...

Страница 59: ...e lope with the Number keys then press the OK key Note You have to enter the size as fol lows Metric version Inch version To change the number entered press the Clear Stop key and enter the new number When you specify the paper size appears on the display to indicate bypass tray copying Horizontal Vertical Com 10 Env 241 3 104 8mm C6 Env 162 114mm DL Env 220 110mm Monarch Env 190 5 98 4mm Horizont...

Страница 60: ...Copying 46 2 M Press the EXIT key N Set your originals and press the Start key Note Push on the engraved center point of the bypass tray to close it ...

Страница 61: ... the Sys tem Settings Programs are not cleared by turn ing the power off or by pressing the Clear Modes or Energy Saver key They are canceled only when you delete or overwrite them with another program Limitation You cannot store the number of copies in a program Storing Your Settings A Edit the copy settings so that all functions you want to store in this program are selected in a pro gram B Pres...

Страница 62: ...on press the No key E To delete another program repeat steps C C C C and D D D D F Press the Exit key Recalling a Program You can recall a stored program A Press the Program key B Select the program number you want to recall with the 0 0 0 01 1 1 1 keys Then press the OK key The stored settings are displayed Note Only programs with mcontain a program C Set your originals enter the number of copies...

Страница 63: ... to return to the ready condi tion varies with the effectiveness of energy saving If you press the Energy Saver key during the operation the current settings will be cleared Reference See 07 Energy Saver Level and 08 Energy Saver Timer of the System Settings Interrupt Temporarily Stopping One Job to Copy Something Else You can make urgently needed copies during a multi copy run A Press the Interru...

Страница 64: ...ence For setting user codes see P 81 1 General Features 4 4 Auto Start Entering Copy Job Settings During the Warm up Period If you press the Start key during the warm up period the Start key will blink and your copies will be made as soon as warm up finishes A Make any adjustments to copy settings during the warm up peri od B Set your originals C Press the Start key The Start key indicator alterna...

Страница 65: ...ht not be copied or mar gins will appear on copies Copies can be reduced or enlarged as follows Metric version 1 Default Inch version 1 Default Ratio Original Copy paper size 200 enlarge area by 4 1 A5 A3 141 enlarge area by 2 1 A4 A3 A5 A4 122 1 F A3 A4 B4 115 B4 A3 93 1 Create Margin 87 A3 B4 82 F A4 B4 F 71 reduce area by 1 2 1 A3 A4 A4 A5 65 A3 F 50 reduce area by 1 4 1 A3 A5 F A5 Ratio Origin...

Страница 66: ...Copying 52 2 A Press the Enlarge or Reduce key to select a ratio Note Another preset ratio is dis played every time you press the key B Set your originals then press the Start key ...

Страница 67: ...et ratio which is near the desired ratio then press the Zoom key and adjust the ratio with the n or o key A Press the Zoom key B Enter the ratio When using the n or o key A Enter the desired reproduction ratios with the o o o o or n n n n key Note To change the ratio in 1 steps just press the n or o key To change the ratio in 10 steps press and hold down the n or o key When using the Number keys A...

Страница 68: ...tomati cally This reproduction ratio de pends on the copy paper sizes and the number of originals The machine uses ratios within the range of 50 to 200 If the calculated ratio is under the minimum ratio it is corrected within the range of the ratio auto matically However with some ra tios parts of the image might not be copied or blank margins appear on copies When the number of originals placed i...

Страница 69: ... Series Copies key B Press the Combine key C Select the desired combine modes with the 0 0 0 01 1 1 1 keys Then press the OK key D Press the Exit key E Press the 0 0 0 01 1 1 1 keys to select the copy paper When setting a stack of originals in the document feeder A Set your originals then press the Start key Note The last page should be on the bottom 1 2 8 5 6 7 8 1 2 3 4 1 2 4 2 3 1 GCSHUY1E 1 3 ...

Страница 70: ...n press the Start key Note Start with the first page to be copied B Set the next original then press the Start key Note When you set an original in the document feeder the sec ond and subsequent origi nals can be fed automatically without pressing the Start key C After all originals are scanned press the key ...

Страница 71: ... two sheets copies from two facing pages of a bound original book Note Refer to the following table when you select original and copy paper sizes with 100 ra tio Metric version Inch version A Press the Combine Series Copies key B Press the Series key C Press the OK key Original Copy paper A3L A4K 2 sheets B4L B5K 2 sheets A4L A5K 2 sheets Original Copy paper 11 17 L 81 2 11 K 2 sheets 81 2 11 L 51...

Страница 72: ...Copying 58 2 D Press the Exit key E Set your originals then press the Start key ...

Страница 73: ...ou re working in means that these modes cannot be used together The mode before you select will be the mode you re working in Mode after you Select Setting Originals on the Exposure Glass Setting Originals in the Document Feeder Input the Original size Auto Image Density Lighter Darker Text Text Photo Photo Auto Paper Select Auto Reduce Enlarge Sort Copying from the Bypass Tray Reduce Enlarge Zoom...

Страница 74: ...ls in the Document Feeder Input the Original size Auto Image Density Lighter Darker Text Text Photo Photo Auto Paper Select Auto Reduce Enlarge Sort Copying from the Bypass Tray Reduce Enlarge Zoom Combine Series Copies Mode before you Select Copying from the By pass Tray 1 1 1 1 Reduce Enlarge Zoom Combine 1 Series Copies 1 ...

Страница 75: ...t paper manually not in Auto Paper Select mode Do not use Auto Reduce Enlarge mode When you set originals in the document feeder input the both horizontal and vertical sizes of the non standard original See P 27 Setting Originals on the Exposure Glass Original is not set Set your originals The machine instructs you to check the original direc tion There is no copy paper that is the same direction ...

Страница 76: ...ires maintenance Please contact your service representatives Even if this indicator is lit you can still use copy fax and printer features Problem Cause Action The panel display is off The machine is in Energy Saver mode Press the Energy Saver key to cancel Energy Saver mode The operation switch is turned off Turn on the operation switch Nothing happens when the operation switchis turned on The ma...

Страница 77: ...ty Change the direction of the original Put mending tape on the pasted part The same copy area is dirty whenever making copies The exposure glass platen cover or document feeder belt is dirty Clean them P 89 Main taining Your Machine Copies are too light The image density is too light Adjust the image density P 31 Adjusting Copy Im age Density Damp or rough grain pa per is used Use dry paper witho...

Страница 78: ...y Images are dark Black and white printed originals Press the Lighter key P 31 Adjusting Copy Image Density Original with designed background Press the Lighter key P 31 Adjusting Copy Image Density The reverse side of an orig inal is copied Timetables or maps Specify Sharp for Text mode in 08 Image Adjust ment Then select the Text mode P 79 08 Image Adjustment A moire pattern is pro duced on copie...

Страница 79: ...roblem Cause Action Misfeeds occur frequently Copy paper size setting is not correct Set the proper paper size See P 72 Changing the Paper Size You cannot combine sever al functions Selected functions cannot be used together Refer to the combination chart See P 59 Combi nation Chart ...

Страница 80: ...ng paper in the paper tray Tray 1 Note The bottom plate lower auto matically if not lower it When the bottom plate is up the paper tray cannot reset A Make sure the bottom plate is down B Square the paper and set it in the tray Loading paper in the paper tray unit Tray 2 3 A Square the paper and set it in the tray Important Do not stack paper over the limit mark Note Shuffle the paper before set t...

Страница 81: ...idge Do not use used toner This will damage the machine Note You can still make about 150 copies after the D appears but replace the toner early to prevent poor copy quality Reference Regarding toner storage see P 23 Toner Storage Do not incinerate used toner or toner containers Toner dust might ignite when exposed to an open flame Dispose of the used toner containers according to local regulation...

Страница 82: ...this case the print quality might be reduced E Place the toner cartridge on a flat surface Pull out the tape inside the unit hor izontally while holding the cartridge with one hand as shown in the illustra tion Note Be sure to remove the tape completely before installing the new toner car tridge Otherwise the machine might be damaged Be sure to pull the tape horisontally Pulling it upward or downw...

Страница 83: ...tops G Close the side cover Important Do not close the side cover with force If you cannot close the cover easily pull out the toner cartridge from the copier and insert it again After that close the side cover again After installing the new toner cartridge the first few page migth be printed with light density ...

Страница 84: ...scraps of paper within the ma chine If paper misfeeds occur repeatedly contact your service representative Note More than one misfed areas may be indicated In this case check every appli cable area Refer to the following charts A B C D R P Y You can find a sticker explaining how to remove misfed paper inside of the rightside cover When removing misfed paper do not touch the fusing section be cause...

Страница 85: ...x Clearing Misfeeds 71 3 ...

Страница 86: ... sure that the paper tray is not being used B Pull the paper tray then remove papers in it Note The bottom plate is down auto matically if not lower the bot tom plate When the bottom plate is up the paper tray cannot reset C Press the release lever and pull the left guide up Then put it to the paper size you want to use D Square the paper and set it in the tray Important Do not stack paper over th...

Страница 87: ... are shown below If the paper size you need is not there see 11 Special Pap Size in the System Set tings Metric version A3L A4KL A5K 81 2 11 K 8 13 L Inch version 11 17 L 81 2 14 L 81 2 11 KL 81 2 13 L A4K Tray 2 3 A Make sure that the paper tray is not being used B Pull the paper tray then remove papers in it C Square the paper and set it in the tray Important Do not stack paper over the lim it m...

Страница 88: ...F While pressing the release lever slide the left guide to the paper size you want to use G Adjust the paper size selector Note The available paper sizes on the paper size selector are shown below If the paper size you need is not there see 11 Special Pap Size in the System Set tings Metric version A3L A4KL 11 17 L 81 2 14 L 81 2 11 KL Inch version A3L A4KL 11 17 L 81 2 14 L 81 2 11 KL ...

Страница 89: ...or print out the total number of prints made by the machine Press the Language key to switch the display panel lan guage C Enter the number of the desired User Tools menu with the Number keys Note To return to the previous menu press the PrevMenu key D Search for the desired setting with the Next key Enter its number with the Number keys Note Next Press to go to the next page Prev Press to go back...

Страница 90: ... 76 4 Exiting from User Tools A After changing the user tools set tings press the User Tools Coun ter key Note The settings are not canceled even if the power switch is turned off or the Clear Modes Energy Saver key is pressed ...

Страница 91: ...User Tools Menu Copy Features 77 4 User Tools Menu Copy Features ...

Страница 92: ...ority As a default setting Auto Paper Select is selected You can cancel this setting Note Default Yes 02 ADS Priority In each mode of Text Text Photo and Photo you can spec ify whether to select Auto Image Density Note Default Text Yes Text Photo Yes Photo No 03 Original Priority As a default setting Text is selected as original Type You can change it to Text Photo or Photo Note Default Text 04 Ma...

Страница 93: ...et Reduce Enlarge Reducing and Enlarg ing Using Preset Ratios 06 En Ratio Priority You can change the preset Eularge ratio 07 Re Ratio Priority You can change the preset Reduce ratio 08 Image Adjustment You can adjust the quality level of copies for each of the original types Text Texto Photo Photo You can specify the toner saving feature in Text Note Default Text Normal Texto Photo Photo Priority...

Страница 94: ...itial Mode Set You can select the Initial mode or Program No 10 as the mode to be effective when modes are cleared Note Default Standard 11 Original Tone The key tone sounds when you forgot to remove originals after copying Note Default On If the Panel Tone setting is set to Off see System set tings the key tone does not sound irrespective of the setting On or Off of this Original Tone function 12...

Страница 95: ...n also reset each user code s counter to 0 Note If more than one user code is registered you can view all the counters using the Prev or Next key 3 Clear Code Counter You can delete all user codes or reset all counters to 0 4 Prog User Code You can register user codes Note Up to 50 user codes 8 digits or less can be registered 5 Chg Del User Code You can change or delete user codes Note The number...

Страница 96: ... a default setting the display shows the copy quantity you specified and the number of copies made You can can cel this setting and instead view the number of originals to be fed in the document feeder and the number of copies made Note Default No 3 SADF Auto Reset When you set one original at a time in the optional docu ment feeder the Auto Feed indicator lights for a selected time after an origi...

Страница 97: ...Settings You Can Change with the User Tools 83 4 2 Input Output Menu Description 5 Sort You can select a Sort or Rotate Sort P 37 Sort Note Default Sort ...

Страница 98: ...User Tools Copy Features 84 4 This page is intentionally blank ...

Страница 99: ...e operation switch make sure that copying or printing is completed The machine might fail to produce good copy images if there should occur condensation inside caused by temperature change Do not open the covers of machine while copying or printing If you do mis feeds might occur Do not move the machine while copying or printing If you operate the machine improperly or a failure occurs on the mach...

Страница 100: ...rge well ventilated room that has an air turnover of more than 30 m3 hr person Environments to avoid Locations exposed to direct sunlight or strong light more than 1 500 lux Locations directly exposed to cool air from an air conditioner or heated air from a heater Sudden temperature changes might cause condensation with in the machine Places where the machine might be subjected to frequent strong ...

Страница 101: ...g Do not damage break or make any modifications to the pow er cord Do not place heavy objects on it pull it hard or bend it more than necessary These actions could cause an elec tric shock or fire Do not plug or unplug the power cord with your hands wet Otherwise an electric shock might occur Make sure the wall outlet is near the machine and freely ac cessible so that in event of an emergency it c...

Страница 102: ...n More clearance required when clearing misfeeds or replacing the toner car tridge 1 Rear more than 1cm 0 4 2 Right more than 1cm 0 4 3 Front more than 75cm 29 6 4 Left more than 2cm 0 8 Note For the required space when options are installed please contact your service representative 2 1 3 4 CP999EE ...

Страница 103: ...o remove the water Important Do not use chemical cleaner or or ganic solvent such as thinner or benzene If they get into the ma chine or melt plastic parts a failure might occur Do not clean parts other than those specified in this manual Such parts should be cleaned by your service representative Cleaning the Exposure Glass Cleaning the Platen Cover Cleaning the Document Feeder When black lines a...

Страница 104: ...Remarks 90 5 This page is intentionally blank ...

Страница 105: ...sh development system Fusing Heating roll system Resolution 600dpi Exposure glass Stationary original exposure type Original reference position Rear left corner Warm up time Less than 30 seconds 20 C Originals Sheet book objects Maximum original size A3L 11 17 L Copy paper size Trays A3L A5K 11 17 L 51 2 81 2 K Bypass A3L A5KL B6L 11 17 L 51 2 81 2 L Bypass non standard size Vertical 90 305mm 3 5 ...

Страница 106: ...2 First copy time 100 feeding from 1st or 2nd paper tray Text Photo mode Auto Image Density Copying speed 8 copies minute A3L 11 17 L 18 copies minute A4K 81 2 11 K Reproduction ratio Preset reproduction ratios Zoom Metric version 50 200 Inch version 50 200 A4K 81 2 11 K 6 5 seconds or less 4 0 seconds or less Metric version Inch version Enlargement 200 200 141 155 122 129 115 121 Full Size 100 10...

Страница 107: ... W D 550 575mm 21 7 22 7 The bypass tray closed 690 575mm 27 2 22 7 The bypass tray opened Noise Emission ISO 7779 Sound Power Level Based on actual measurement 1 Mainframe with the document feeder Internal Tray 2 and 1000 sheet unit Weight Approx 38kg 83 8 lb Note Specifications are subject to change without notice Mainframe only Complete System 1 Warm up About 760W About 770W Stand by About 110W...

Страница 108: ... 51 2 81 2 KL Original weight 40 128g m2 10 34 lb Number of originals to be set 50 sheets 80g m2 20 lb Maximum power consumption 25W power is supplied from the main frame Dimensions W D H 550 470 130mm 21 7 18 6 5 2 Weight Approx 9kg 19 9 lb Note Specifications are subject to change without notice ...

Страница 109: ...81 2 11 KL 5 1 2 8 1 2 L 71 4 101 2 KL 8 13 L 81 2 13 L 81 4 13 L 8 10 KL 8 101 2 KL 10 14 L 11 15 L 11 14 L 10 15 L 8 1 4 14 L Maximum power consumption 20W power is supplied from the main frame Paper capacity 500 sheets 80g m2 20 lb 1 tray Dimensions W D H 550 520 134mm 21 7 20 5 5 3 Weight Approx 12kg 26 5 lb Note Specifications are subject to change without notice ...

Страница 110: ...1 KL 5 1 2 8 1 2 L 71 4 101 2 KL 8 13 L 81 2 13 L 81 4 13 L 8 10 KL 8 101 2 KL 10 14 L 11 15 L 11 14 L 10 15 L 8 1 4 14 L Maximum power consumption 30W power is supplied from the main frame Paper capacity 500 sheets 80g m2 20 lb 2 tray Dimensions W D H 550 520 271mm 21 7 20 5 10 7 Weight Approx 25kg 55 2 lb Note Specifications are subject to change without notice ...

Страница 111: ... 2 KL Paper capacity 125 sheets 80g m2 20 lb Note The paper capacity might be less than 125 sheets when copy paper is con siderably curled Copy paper weight 60 105g m2 16 28 lb Maximum power consumption 17W power is supplied from the main frame Dimensions W D H 447 456 122mm 17 6 18 0 4 8 Weight Approx 1 5kg 3 3 lb Note Specifications are subject to change without notice ...

Страница 112: ...ation 98 6 48MB Copier Memory Unit Option Memory capacity 48MB Number of originals to be stored Up to 99 pages reference value based on ITU T No 1 chart Up to 99 pages reference value based on ITU T No 4 chart ...

Страница 113: ...sor keys 5 D Darker key 5 Deleting a Program 48 Document feeder ADF 1 3 14 15 16 28 94 Do s and Don ts 85 E Energy Saver key 4 Energy Saver mode 49 ENERGY STAR Program vi En Ratio Priority 79 Envelopes 19 20 43 Exposure glass 1 14 15 16 27 F Function key 13 I Image Adjustment 79 Initial Mode Set 80 Internal tray 1 Internal tray 2 1 3 97 Interrupt 49 Interrupt key 4 K Key Op Tools 81 L Lighter key ...

Страница 114: ...er Cartridge 67 Re Ratio Priority 79 Reset Bypass Set 80 Rotate Sort 37 R Srt Aut Pap 82 S SADF Auto Reset 82 SADF mode 29 Selecting Copy Paper 33 Selecting Original Type Setting 32 Selection key 5 Series Copies 57 Set Ratio 79 Side cover 2 Sort 37 83 Sort key 5 Specification 91 Start key 5 Storing Your Settings 47 T Toner cartridge 23 67 Translucent paper 19 U User Codes 50 User Tools 75 User Too...

Отзывы: