


- 20 -
GAS FORGE H3
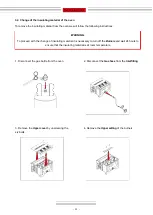
5.7. First set up of furnace
For the first start-up of Nargesa gas furnaces, the automatic ignition provided is not used. We will use an
external device to light the burner flame. For example a long lighter or a blowtorch.
*
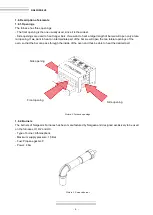
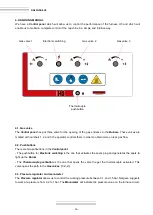
The Adapter (C)
for the gas bottle is not supplied with this furnace, since each country uses different
adapters. The Adapter will have to be equipped with a left 21.8 male thread. (L)
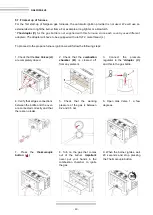
To proceed to the propane furnace ignition we will follow the following steps:
1. Check that the
Gas Valves (A)
are completely closed.
3.
Connect
the
pressure
regulator to the
*
Adapter (C),
and this to the gas bottle.
2. Check that the
combustion
chamber (B)
is cleared off
from any element.
4. Verify that all gas connections
between the bottle and the oven
are connected correctly and that
there are no leaks.
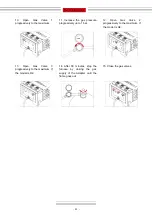
6. Open Gas Valve 1, a few
degrees.
5. Check that the working
pressure of the gas is between
0.2 and 0.5 bar.
7. Press the
thermocouple
button ( )
9. When the burner ignites, wait
20 seconds and stop pressing
the Thermocouple button.
8. Turn on the gas that comes
out of the burner.
Important:
never put your hands in the
combustion chamber to ignite
the gas.
Содержание H3
Страница 2: ...Thank you for choosing our machines www nargesa com...
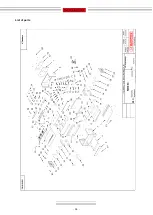
Страница 26: ...Tecnichal Annex Furnace H3 List of parts Gas layout...
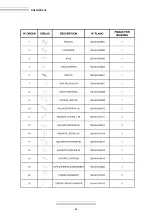
Страница 27: ...A3 List of parts...
Страница 28: ...A4 GAS FORGE H3...
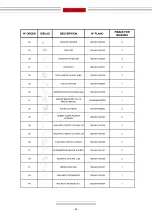
Страница 29: ...A5...
Страница 30: ...A6 GAS FORGE H3...
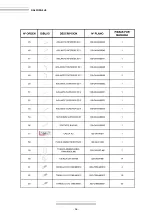
Страница 31: ...A7...
Страница 32: ...A8 GAS FORGE H3...
Страница 33: ...A9 Gas layout...


