


W415-1198 /05.24.13
EN
A.
Using the remote transmitter you may set the fl ame directly to the "HI" setting by double clicking the
large fl ame button . Increasing the fl ame height can also be done by pressing and holding the large
fl ame button .
B.
Using the remote transmitter you may set the fl ame directly to the "LO" setting by double clicking the
small fl ame button . Decrease the fl ame height can also be done by pressing and holding the small
fl ame button .
NOTE: For fine adjustment tap the large flame button or small flame button when using the remote
transmitter. If the small flame button is held too long the main burner will turn off.
NOTE: Time display will flash upon battery installation or when the large and small flame buttons are
pressed simultaneously.
A.
To set the hour press the large fl ame button .
B.
To set the minutes press the small fl ame button .
C.
Press the "OFF" button to set the time.
A.
To set the Timer Mode quickly press the SET button, scrolling to the desired mode.
B.
To scroll through P1
, P1 , P2
,
P2
briefl y press the set button.
C.
Once the desired timer function is shown on the display and the time fl ashes, press the large fl ame
button
to adjust the hour and the small fl ame button to adjust the minutes. Press the "OFF" button
to set the time.
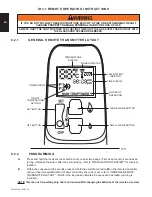
NOTE: The default setting for the Timer Function is as follows: P1
6:00am and P2 8:00pm, P2
11:50 and P2 11:50, refer to "GENERAL REMOTE TRANSMITTER LAYOUT".
NOTE: Press the "OFF" button and the small flame button simultaneously until the temperature
display changes from Fahrenheit to Celsius, and vice versa. When changing from Fahrenheit to Celsius
the clock will change from a 12 hour to 24 hour clock, refer to "GENERAL REMOTE TRANSMITTER
LAYOUT".
A.
To set Daytime Temperature Mode quickly press the SET button, scrolling to the desired mode, then
hold the SET button until the "TEMP" on the display fl ashes.
B.
To increase the Daytime Temperature press the large fl ame button . To decrease the Daytime
Temperature press the small fl ame button . To use this setting as the new temperature press the OFF
button.
C.
To set Nighttime Temperature Mode quickly press the SET button, scrolling to the desired mode, then
hold the SET button untill the "TEMP" on the display fl ashes.
D.
To increase the Nighttime Temperature press the large fl ame button . To decrease the Nighttime
Temperature press the small fl ame button . To use this setting as the new temperature press the OFF
button.
NOTE: When in regular operation the remote will always show the room temperature.
6.2.6
TEMPERATURE DISPLAY
6.2.7 SETTING THE TIME
6.2.8 SETTING THE TIMER FUNCTION
6.2.9
FLAME HEIGHT


