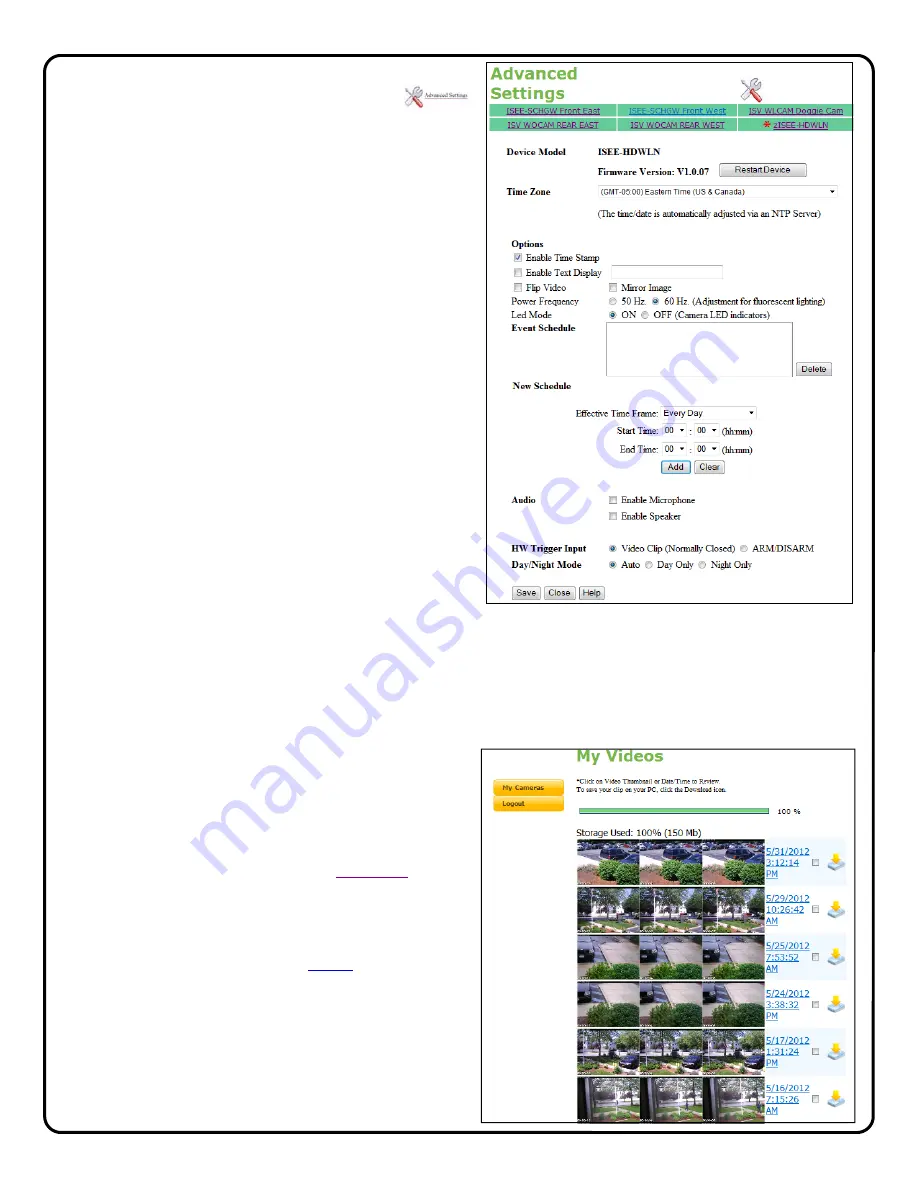
NAPCO iSeeVideo ISV WLHDCAM Скачать руководство пользователя страница 11


11 

ADVANCED SETTINGS 


To enter Advanced Settings, click the tool icon  


Firmware Version 

The firmware version of the camera will display. If there is a new 
version available, a message will display, along with a button to 
upgrade to the new version. 


Camera Time Zone 

Use to set the time zone of the camera. 


Enable Time Stamp 

Enable to place a time and date stamp on the live and saved video. 

Enable Text Display 

Enable and enter the camera name you would like to see on the 
screen.  

Flip Video 

Enable to invert video in cases where camera is installed upside 
down.  

Power Frequency  

Use to adjust frequency in cases where fluorescent lighting is caus-
ing flicker.


LED Mode 

Use to disable camera LED indications (Power and Network LEDs)


Event Schedule 

To enable a time schedule for motion detection triggering, select 

the desired day(s) in the Effective Time Frame window.  Click 
Start Time and End Time  to select the start and end time of the 
motion detection schedule. As schedules are programmed, they 
will appear in the Event Schedule window.  

Audio 

• 

Enable

 Microphone 

to activate the microphone on the front of the 

camera  

• 

Enable

 Speaker 

to activate the speaker line output


on the back of 

the camera.  

HW Trigger Input 

• 

Select 

Video Clip 

to trigger transmission of video clip to server 

upon closure of trigger input D/I.  

• 

Select 

Arm/Disarm 

to activate arming of motion detection feature 

upon closure of trigger input D/I. 


Viewing of Stored Video  


To view stored video clips, click on the 

My Videos

 link 

and the My Videos page will appear.  
For each video, a three frame thumbnail image will ap-
pear, along with a time and date stamp indicating the 
time and date of the creation of the file.  
The file can be deleted by clicking 

Delete


adjacent to 

the file.   
The file can also be saved on the hard drive of the com-
puter being used to view the file by clicking the 
download icon


adjacent to the file.   

Once the number of video clips stored in the account 
reaches the maximum allotted size for the account, 
each new file stored will result in the automatic deletion 
of the oldest file. 


Day/Night Mode 

Controls the Infrared night vision feature of the camera 

• 

Select 

Auto 

to automatically switch to night vision mode upon 

darkness 

• 

Day Only 

deactivates the night vision feature   

• 

Night Only 

will  permanently activate the night vision feature   

Содержание iSeeVideo ISV WLHDCAM

Страница 1: ...1701 For Sales and Repairs 800 645 9445 For Technical Service 800 645 9440 Publicly traded on NASDAQ Symbol NSSC NAPCO 2012 Designed exclusively for use with NAPCO iSeeVideo VideoAlert net Server COMP...

Страница 2: ...ed for event triggering Pats Pending PIR Motion Detection Pattern ORDERING INFORMATION ISVWLKIT1 Fixed IP WL Camera Kit 1 ISVWLCAM fixed IP wireless camera mounting bracket Suction Cup Window Bracket...

Страница 3: ...he iSeeVideo portal protected by the default iSeeVideo 128bit encryption Once all cameras are up and running simply click the LOCK icon on the portal to prompt the camera to send a new unique random 1...

Страница 4: ...cked state Repeat for each camera in the system If a new camera is added to the system in the future simply repeat the above procedure to secure it 1 CONFIGURE THE NETWORK CONNECTION ISVWLCAM ISVWLCAM...

Страница 5: ...ll appear Create Subscriber Account Now Click to create a new Subscriber account with this camera and enter the Subscriber details see below ADD or REPLACE a VIP Device To add or replace a camera to t...

Страница 6: ...ation section verifies all information en tered above Be sure to check the accuracy of the information dis played and if changes are required click the Prev button to edit any previously entered infor...

Страница 7: ...Viewer should always be enabled Click Update to add the new user and return to the pre vious screen or click Prev to cancel and return to the previous screen The system supports a maximum of 5 Users i...

Страница 8: ...SC _ _ _ _ _ _ OR 000E8F _ _ _ _ _ _ Click Next 2 The Dealer Branding screen will appear En ter your Company Dealer Admin ID and Password and click Next 3 After Dealer Branding is complete click Add o...

Страница 9: ...continue 5 The following screen allows the en try of the camera description in the Enter New Device Description field Click the pull down menu and se lect Add Device to complete the addition of the ne...

Страница 10: ...live view screen and size it appropriately by pressing SHIFT and dragging a side of the window Once the window is properly positioned and sized the sensitivity threshold can be set by dragging the cor...

Страница 11: ...to activate the microphone on the front of the camera Enable Speaker to activate the speaker line output on the back of the camera HW Trigger Input Select Video Clip to trigger transmission of video c...

Страница 12: ...purporting to act on its behalf to modify to change or to assume for it any other warranty or liability concerning its products In no event shall NAPCO be liable for an amount in excess of NAPCO s or...

Отзывы: