NAPCO iBridge Z-Wave Скачать руководство пользователя страница 16

16 

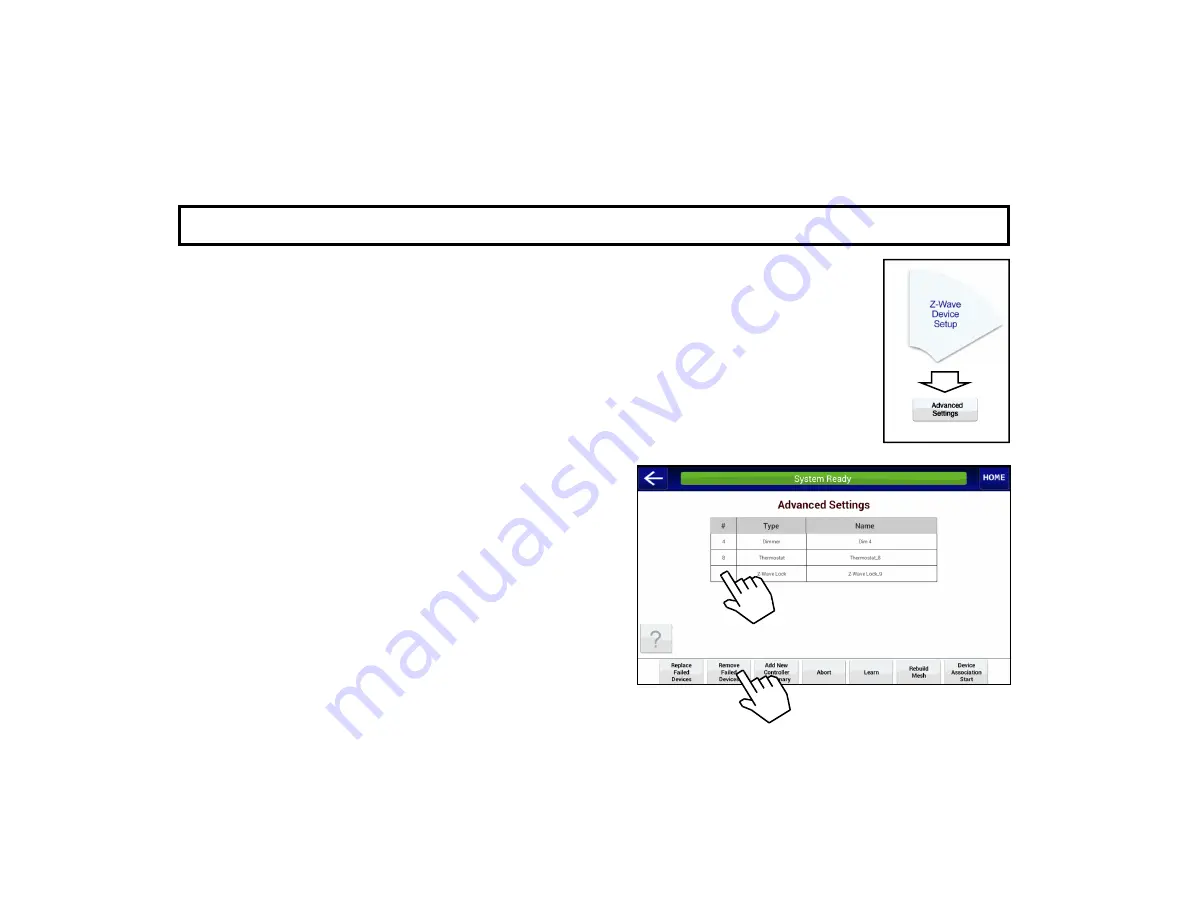
A D V A N C E D   S E T T I N G S :     R E M O V E   F A I L E D   D E V I C E S  

You can easily remove an existing failed, un-plugged or missing device using the 

Remove Failed 

Devices 

button.  Remove a failed device as follows: 


1.

  Although you likely already tried testing the failed device, try testing it again using the app.  

This will ensure the failed device is properly designated as a "failed" device within the system.  

After about 10 seconds, a warning popup will appear to indicate the device has failed (press 

OK 

to close the warning popup and continue). 

2.

  Tap in the 

column to highlight the failed device you wish to remove (in the image below, 

device #19 with the 

Type 

named "

Dimmer

" is selected). 

3.

 Tap the 

Remove Failed Devices 

button.   


Wait for the system to check to be certain the selected device is non-operational or is missing 

(the message "

Checking for failed device

" will appear).   

4.

  Wait for the status message field to read "

Remove Com-

plete

".   


Note: 

 It is not possible to remove a working (" non-

failed") device using these steps.  To remove a working 

device, use the "

REMOVE Z-WAVE DEVICES

" proce-

dure on page 12. 


Содержание iBridge Z-Wave

Страница 1: ...1 NAPCO 2019 OI409ALF 12 19...

Страница 2: ...r charges may apply Contact your Internet service provider for details All features functionality and other product specifications as well as the information contained in this guide are based upon the...

Страница 3: ...GS REPLACE FAILED DEVICES 15 ADVANCED SETTINGS REMOVE FAILED DEVICES 16 ADVANCED SETTINGS ADD NEW CONTROLLER AS PRIMARY 17 ADVANCED SETTINGS LEARN 19 ADVANCED SETTINGS REBUILD MESH 20 ADVANCED SETTING...

Страница 4: ...al Tap to discover and view the camera transmissions in your system Automation optional Tap to control the home automation system compo nents see Automation Overview page 6 including lighting and othe...

Страница 5: ...ed Touch To chose an icon or press a button or choose a menu selection touch or tap it with your finger or fin gernail Some screens may for example contain lists of devices to select a device in the l...

Страница 6: ...le button presses on both the controller and the device Controllers can be static physically immo bile such as a wall switch controller or mobile such as a portable key fob controller If you are new t...

Страница 7: ...r home automa tion system For example a burglary alarm triggers certain lights to turn on Rebuild Mesh A manual request to redesign the Routing Table to increase communication efficiency accelerate re...

Страница 8: ...gned by the manufacturer to support Associations devices are usually labeled Supports Z Wave associations Replication Refers to the protocol replication between Controllers that is used to exchange pr...

Страница 9: ...Screen MESSAGING Tap to config ure system event notifications where an email or SMS text mes sage can be sent to your mobile device for virtually any security system event for example Alarm Arm Disarm...

Страница 10: ...11 Tap to configure up to 32 pre set home auto mation conditions page 22 Tap for mode specific assistance Tap to associate alarm events to your home automation system page 25 Tap to manage multiple d...

Страница 11: ...s require two see the docu mentation for the specific device you wish to add to ensure correct operation 3 Wait for the NodeType Description and Status of the device to appear in the table For example...

Страница 12: ...e button press others re quire two see the documentation for the specific device you wish to add to ensure correct op eration After a short time the status message field will indicate Node Removed Tap...

Страница 13: ...appears tap the text field to open the keyboard Type a new device Description When finished tap Done then tap OK to save The new device Description ap pears in the list For example the Description of...

Страница 14: ...pear to be removed howev er the memory data within each device will not be erased Therefore to completely erase the memory within each Z Wave device simply follow the steps detailed in the section REM...

Страница 15: ...the device has failed press OK to close the warning popup and continue 3 In the Advanced Settings screen tap in the column to highlight the failed device you wish to replace in the image below device...

Страница 16: ...to indicate the device has failed press OK to close the warning popup and continue 2 Tap in the column to highlight the failed device you wish to remove in the image below device 19 with the Type nam...

Страница 17: ...onnect the Primary Controller again use the Learn button see page 19 for instructions Why add a new Primary Controller Some Z Wave devices available in the marketplace only operate in low power during...

Страница 18: ...Node Added Update complete The new Primary Controller will appear in the device list with a NodeType that will vary with the manufacturer will likely indicate Controller or Controller P The former Nap...

Страница 19: ...rk You will need to consult the documentation for the Primary Controller of this other network for the exact procedure but at some time during this process it will be requested to press the Learn butt...

Страница 20: ...uild the mesh as follows 1 Tap Rebuild Mesh 2 In the Confirmation popup that appears tap OK to proceed 3 When finished the message Rebuild Mesh Complete appears 4 Tap back arrow at the top left to ret...

Страница 21: ...the specific device to ensure correct operation of its Learn button used during the Association process as follows 1 Tap Device Association Start Wait for the status message field to indicate Associat...

Страница 22: ...they let simple actions control complex tasks that greatly enhance your home automation experience To add a new Scene 1 In the Scene Management screen shown below left tap Add Scene 2 In the Enter Sc...

Страница 23: ...item in the Type or Name column then drag your finger up or down Tap Done to add the item s to the Scene Creation screen when finished tap Save Exit to save your Scene For example when selecting item...

Страница 24: ...een Tap in the emp ty field to open the keyboard to add your user code as required SECURITY WARNING If you create a Scene or Event that involves arming the alarm control panel and the system is config...

Страница 25: ...Actions are allowed per Trigger Restriction Select limitations that if met will allow the Action Examples include time of day limitations day of week limitations and security alarm zone status conditi...

Страница 26: ...he Start Time and End Time of the Trigger see Note below Note The End Time applies only to switch devices returned to their original state after the End Time passes The End Time field is ignored for a...

Страница 27: ...s Done to save Then tap the Status field for that zone and select either Open Closed or Alarm When finished tap the Save Exit button to save your settings and enable the Event Tap the back arrow at th...

Страница 28: ...ts and switches located in that room Devices can be added to two or more Groups To add a new Group 1 Tap Add Group In the Enter Group Name screen tap the text field to open the keyboard Type a new nam...

Страница 29: ...n finished tap Save Only the devices that remained highlighted when Save was tapped will be added to the Group The Group Management screen automatically appears shown below right listing all Groups In...

Страница 30: ...ame you wish to view 2 Tap the Select Devices button 3 In the Device Selection screen that appears scroll through the list to view the devices in the Group To make changes scroll through the list and...

Страница 31: ...ft tap in the column to select the Group Name you wish to view 2 Tap the View Devices button 3 In the View Group Devices screen that appears scroll through the list to view the devices in the Group Ta...

Страница 32: ...d room displayed under the word CURRENT Change the heat and cool set point temperature degree setting tap the up down arrows next to the words SET TO Turn the heating and cooling system on or off Tap...

Страница 33: ...st to select All Lights All Devices with the Type name of Light will be listed In the example shown below a Device with the name of Dimmer is listed first accompanied by its activation slide bar To th...

Страница 34: ...each existing Scene in the system appears as a but ton To turn on a Scene simply tap its button Using an example in the screen below Disarm is used after disarming your alarm sys tem In this example...

Страница 35: ...tically most other applications require you to tap a text field to open the keyboard Tap to save when finished typing Backspace Moves cursor one column to the left deleting the character in that posit...

Страница 36: ...n on previous page Numbers and Symbols On the Standard keyboard shown on the previous page tap the 123 key and switch to the Numbers and Symbols keyboard shown below Tap to save when finished typing B...

Страница 37: ...e Additional Symbols keyboard shown below 123 Tap to return to the Numbers and Sym bols keyboard shown on previous page ABC Tap to switch back to the Standard ALL CAPS keyboard Tap to save when finish...

Страница 38: ...38 NOTES...

Страница 39: ...39 NOTES...

Страница 40: ...ent testing and due to but not limited to any or all of the following criminal tampering electrical or communications disruption it is possible for the system to fail to perform as expected NAPCO does...

Отзывы: