background image

• 5 •

5.4  Charging will take approximately 4 hours.

5.5  When fully charged, unplug the charger from the power source, and then the 

charging cable from the unit. The head lamp is now ready for use.

5.6  Recharge the head lamp after use, and at least every 6 months.

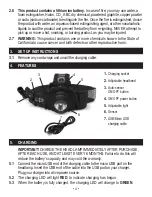
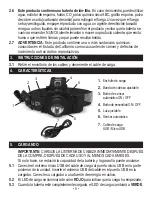
6.  OPERATING INSTRUCTIONS

6.1  Place the head lamp on your head and adjust the headband for proper fit.

6.2  Press the top ON/OFF button once for full power.  

Press again for half power.  

Press a third time for a flashing light.  

Press again to turn light off.

6.3  Auto-sensor:  

Press the auto-sensor button (on the side) once to turn on. The button will glow red. 

Pass your hand in front of the sensor to turn the light ON/OFF, as needed.  

Press the auto-sensor button again, to turn off this function. 

6.4  The angle of light may be adjusted.
6.5  Recharge the head lamp after use, and at least every 6 months.

7.  MAINTENANCE INSTRUCTIONS

7.1  After use and before performing maintenance, unplug and disconnect the unit.

7.2  Any servicing should be performed by qualified service personnel.

8.  STORAGE INSTRUCTIONS

8.1  Store inside, in a cool, dry place.

8.2  Take care to avoid/prevent damage to the charging cable and unit. Failure to do 

so could result in personal injury or property damage.

8.3  Charge the head lamp’s internal battery immediately after purchase, after every 

use and every 6 months.

8.4  All batteries are affected by temperature. The ideal storage temperature is at 

70°F. The internal battery will gradually self-discharge (lose power) over time, 

especially in warm environments. Leaving the battery in a discharged state may 

result in permanent battery damage. To ensure satisfactory performance and 

avoid permanent damage, charge the internal battery every 6 months. 

Содержание Blue-Fuel 85-919

Страница 1: ...En este manual le explica c mo utilizar la luz de trabajo de manera segura y confiable Por favor lea y siga las siguientes instrucciones y precauciones ESSAYER DE GARDER LE MANUEL D INSTRUCTIONS ET LE...

Страница 2: ...fic country P ngase en contacto con el proveedor del equipo para recibir informaci n detallada sobre c mo desechar este producto correctamente en un pa s espec fico Contactez le fournisseur d quipemen...

Страница 3: ...en dropped or otherwise damaged in any way take it to a qualified service person 1 8 DO NOT leave the battery in a discharged state 1 9 DO NOT use the head lamp with a charger which has a damaged cord...

Страница 4: ...r other reproductive harm 3 SET UP INSTRUCTIONS 3 1 Remove any cord wraps and uncoil the charging cable 4 FEATURES 1 Charging socket 2 Adjustable headband 3 Auto sensor ON OFF button 4 ON OFF power bu...

Страница 5: ...le of light may be adjusted 6 5 Recharge the head lamp after use and at least every 6 months 7 MAINTENANCE INSTRUCTIONS 7 1 After use and before performing maintenance unplug and disconnect the unit 7...

Страница 6: ...AIRS If these solutions do not eliminate the problem or for more information about troubleshooting call Schumacher Electric Corporation Customer Service 1 800 621 5485 Monday Friday 7 00am to 5 00pm C...

Страница 7: ...e product is misused subjected to careless handling repaired or modified by anyone other than Manufacturer or if this unit is resold through an unauthorized retailer Manufacturer makes no other warran...

Страница 8: ...rido de alguna forma ll vela a una persona de mantenimiento calificada 1 8 NO deje la bater a descargad 1 9 NO use la linterna de cabeza con un cargador que tiene un cable o un enchufe da ados reempla...

Страница 9: ...reproductivos 3 INSTRUCCIONES DE INSTALACI N 3 1 Retire el envoltorio de los cables y desenrede el cable de carga 4 CARACTER STICAS 1 Enchufe de carga 2 Banda de cabeza ajustable 3 Bot n de sensor aut...

Страница 10: ...var esta funci n 6 4 El ngulo de la luz se puede ajustar 6 5 Recargue la linterna de cabeza despu s de usarla y por lo menos cada 6 meses 7 INSTRUCCIONES DE MANTENIMIENTO 7 1 Despu s de usar la linter...

Страница 11: ...s descriptas no eliminan el problema o por m s informaci n sobre la soluci n de problemas llame a Servicio de atenci n al cliente de Schumacher Electric Corporation 1 800 621 5485 Lunes viernes 7 00am...

Страница 12: ...s al fabricante o a sus representantes autorizados para que sta se pueda reparar o reemplazar El Fabricante no presta garant a por lo accesorios utilizados con este producto que no sean los fabricados...

Страница 13: ...nt a impl cita por lo que las limitaciones o exclusiones mencionadas anteriormente podr an no corresponder con su caso La presente garant a le otorga derechos legales espec ficos y es probable que ust...

Страница 14: ...onner la lampe frontale s il a re u un choc violent s il est tomb ou endommag de toute autre mani re prendre un technicien qualifi 1 8 NE PAS laisser la batterie dans un tat d charg 1 9 NE PAS utilise...

Страница 15: ...batterie ne reprenne feu N ESSAYEZ JAMAIS de prendre ou de d placer un produit chaud fumant ou en feu car vous risqueriez de vous br ler 2 7 AVERTISSEMENT Ce produit contient un ou plusieurs produits...

Страница 16: ...5 6 Rechargez la lampe frontale apr s utilisation et au moins tous les 6 mois 6 CONSIGNES D UTILISATION 6 1 Placez la lampe frontale sur votre t te et r glez le bandeau pour bien la fixer 6 2 Appuyez...

Страница 17: ...la batterie dans un tat d charg peut entra ner des dommages irr versibles la batterie Pour assurer une performance satisfaisante et viter des dommages permanents charger la batterie interne tous les...

Страница 18: ...entretien Si votre appareil n est pas sans d fauts de mat riaux ou de fabrication la seule obligation du fabricant sous cette garantie est de r parer ou de remplacer votre produit avec un nouvel appa...

Страница 19: ...ndage d interruption des activit s et tout autre pr judice ou dommage Chacune et toutes ces garanties autres que les garanties limit es incluses dans la pr sente sont express ment d clin es et exclues...

Отзывы: