Nanoxia Deep Silence 5 Rev. B Скачать руководство пользователя страница 8

2. Installation of external drives


You can install up to four external drives. An adapter frame for mounting a 3.5 inch drive is 

included.


2.1 Optical drives

To install the optical drives, please remove both side panels. The installation of optical 

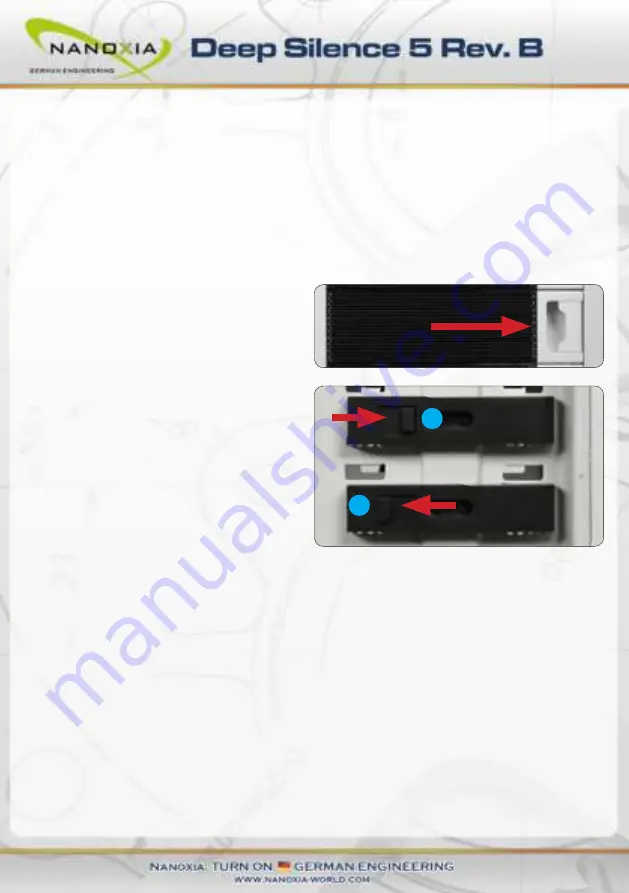
drives is tool-free.


Remove the 5.25 inch cover by pulling the 

lateral tilting lever cautiously towards you 

and take out the cover.

Then loosen the lock on both sides by drag-

ging the black slider backwards (1).

Then slide the drive into the desired positi-

on.

Lock the holder by pushing the slider back 

to its original position (2).

2.2 Utilizing the external 3.5 inch bay

If you for example desire to place a 3.5 inch card reader, you can use the internal adapter for 

this purpose. Please remove at first the 5.25 inch cover (

see chapter 2.1

).

Open the two quick release of the bottom 5.25 inch bay and remove the adapter frame. Install 

the card reader in the frame and then put both the frame and the card reader back into the 

bay. Lock the quick-release. At the end you can put the included 3.5 inch adapter plate carefully 

before the card reader.


3. Installation options of HDD’s


The Deep Silence 5 Rev. B allows you the decoupled mounting of 14 hard disk drives. A total 

of 11 x 2.5/3.5 inch bays are available. Included is the newly developed 6 x 2.5 inch mounting 

frame, which will take three 3.5 inch bays for installation. By using the 5.25 inch to 3.5 adaptor, 

you can mount a total of 15 hard disks drives in your case.


1

2

07

Содержание Deep Silence 5 Rev. B

Страница 1: ......

Страница 2: ...________________________________________________________02 _______________________________________________________________03 ________________________________________________________06 ________________...

Страница 3: ...led mounting of up to six 2 5 inch drives In the new revision the Deep Silence 5 Tower provides plenty of space for your most demanding projects Due to the modular hard drive cages the case offers max...

Страница 4: ...ss 2 channel fan control for up to 6 fans Nanoxia VentCover noise indulated 2 x top cover Noise Insulation The Nanoxia Deep Silence 5 Rev B has been developed with the aim to offer the buyer a low noi...

Страница 5: ...e mounted The Nanoxia VentCover under the top can be removed at any time and allow the installation of 120 mm or 140 mm fans for optimized heat dissipation The Deep Silence axial flow fans have been s...

Страница 6: ...panel a 120 or 240 mm radiator can be mounted Please note that the front HDD cages must be removed for this the HDD cage on the secondary mounting rail can usually remain in the case For compact wate...

Страница 7: ...Mini ITX Attach the included EPS extension cable on to your motherboard do not connect it to the power supply yet Next you should mount the CPU cooler for very large CPU coolers the attachment of the...

Страница 8: ...desire to place a 3 5 inch card reader you can use the internal adapter for this purpose Please remove at first the 5 25 inch cover see chapter 2 1 Open the two quick release of the bottom 5 25 inch b...

Страница 9: ...Figure 3B To lock the drive push the bracket with the drive back installed back into the slot until the bracket is re engaged 3 2 Conversion and removal of the HDD cages Your new case is equipped wit...

Страница 10: ...rd disks please remove the mounting frame Insert your 2 5 inch drives If you want to remove the lower hard drive cage in order to install a water cooling radiator simply loosen the 8 screws holding th...

Страница 11: ...when removing the front vertically in the frame and secure them on both sides with the 2 5 inch mounting screws long Then push the frame with the hard drives into the HDD cage in the position you pre...

Страница 12: ...ngs are equipped with easy to clean dust filters We recommend that you clean them on a regular basis 5 1 Front Fans To switch the fans in the front or to clean the dust filters first open the lower fr...

Страница 13: ...an at the bottom of the case You can install a 120 or 140 mm fan on the bottom of the case To do that you must remove the secondary HDD cage mounting rail from the case bottom We recommend the followi...

Страница 14: ...p to three fans per channel 6 1 Connecting the fans to the fan control The fan controller is powered by a 4 pin Molex connector that is connected directly to the power supply The controller has two ch...

Страница 15: ...e recommend the installation of the radiator behind the front panel 7 1 Installation of a radiator or compact water cooling solution behind the front Thanks to the modular HDD cages you can mount a 12...

Страница 16: ...the installation please check carefully if the distance to the motherboard compo nents is sufficient 8 The I O Panel The I O panel includes connectors for exter nal USB devices 2 x USB 2 0 2 x USB 3...

Страница 17: ...ies quickly and professionally Likewise we would appreciate your suggestions and comments about our case very much Customers from Germany and other European countries can use the following e mail addr...

Страница 18: ...Nanoxia 2015...

Отзывы: