background image

NDS Quick Start Guide 

English

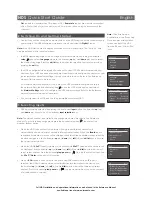
1 Installing and Connecting

•   The four transit screws located on the underside of the NDS must be carefully removed 

before use. Do not invert the NDS to remove the transit screws but work from the underside 
by positioning it at the edge of a table. The transit screws must be replaced if the NDS is to 
be re-packed or shipped. 

Do not invert the NDS during or following transit screw removal.

•   Following transit screw removal, stand the NDS on an appropriate, level and stable surface. 

Make sure it is adequately ventilated. 

•   The NDS requires an external XP5 XS, XPS or 555PS power supply connected to one (XP5 

XS, XPS) or both (555PS) of its power supply input sockets. Use only the Burndy cable or 
cables supplied with the power supply. If an XP5 XS or XPS power supply is used it should 
be connected to NDS Power Supply Input 1. If a 555PS power supply is used it should be 
connected to both NDS Power Supply Inputs 1 and 2. The link plug must remain fitted to 
Power Supply Input 2 unless a 555PS power supply is used. Do not switch on the external 
power supply until all required NDS connections are made.

•    Identify the 

Signal Ground Switch

 and select the “chassis” option unless the NDS is 

connected in a hi-fi system incorporating another earthed source component (all Naim CD 
players, for example), or mains “hum” is audible through the loudspeakers when the NDS is 
switched on.

•   To play audio from a 

UPnP

™ server or from internet radio stations, the NDS 

network socket


must be connected to a router using an Ethernet cable, or its 

Wi-Fi Antenna

 must be fitted. 

Internet radio also requires a high-speed internet connection.

•   If the NDS is to play audio files stored on a 

USB

 device, connect it using an appropriate 

cable, if necessary, to the front panel USB socket.

•   If any external S/PDIF digital audio sources are to be used with the NDS, connect them, 

using the appropriate BNC coaxial, phono coaxial or optical cables, to the 

digital

 inputs.

•   Connect one of the NDS outputs to an appropriate preamplifier or external DAC input. The 

NDS DIN output is the default active analogue output. To select an alternative analogue 
output, press the handset setup key ( ) once the NDS is switched on and select 

Analogue 

Outputs

. Select 

Digital Output

 to activate the digital output.

•    NDS control can be linked using 

System Automation 

to the control of some Naim 

preamplifiers, CD players and the Naim DAC. System Automation enables for example, 
preamplifier inputs to be selected via the NDS, or for n-Stream transport functions to control 
a CD player. To take advantage of System Automation, connect one of the NDS 

Remote 

Full NDS installation and operational information can be found in the Reference Manual 

available on line at www.naimaudio.com

Important: 

XPS power supplies 

with serial numbers below 
188015 are not compatible 
with the NDS and should not 
be used. Contact your local 
retailer or distributor for more 
information.

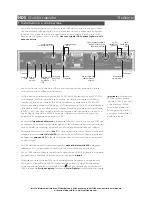
network 

socket 

 signal ground 

switch

digital 

output

wireless network  

(Wi-Fi) antenna 

socket

power supply 

socket 2

(link plug fitted)

power supply 

socket 1

USB  

upgrade

interface

remote 

in

remote 

out 1 & 2

digital inputs 

1, 2 & 3

analogue 

output 

(phono)

analogue 

output 

(DIN)

Note:

 NDS System Automation 

is switched off by default. 
A full description of its use 
can be found in the NDS 
Reference Manual.

Содержание NDS NETWORK AUDIO PLAYER

Страница 1: ...NDS QUICK START GUIDE KURZANLEITUNG GUIDE DE MISE EN ROUTE RAPIDE GUIDA RAPIDA GU A DE INICIO R PIDO SNELSTARTGIDS ENGLISH DEUTSCH FRAN AIS ITALIANO ESPA OL NEDERLANDS...

Страница 2: ...tenna must be fitted Internet radio also requires a high speed internet connection If the NDS is to play audio files stored on a USB device connect it using an appropriate cable if necessary to the fr...

Страница 3: ...by pressing the front panel input button the handset up 5 and down 6 keys or one of the handset input selection keys Note The default handset input selection key assignments are described in the Refe...

Страница 4: ...mode by navigating to the item and selecting it by pressing ok list or play During playback from the USB or UPnP inputs the handset transport keys can be used to control play pause next previous or s...

Страница 5: ...ringen Sie die im Lieferumfang enthaltene WLAN Antenne an F r die Wiedergabe von Webradio Sendungen ben tigen Sie au erdem einen Internetzugang mit hoher Verbindungsgeschwindigkeit Wenn der NDS Audiod...

Страница 6: ...und w hlen Sie Netzwerkeinstellungen um die WLAN Einstellungen des NDS zu konfigurieren Weitere Informationen finden Sie in der ausf hrlichen Bedienungsanleitung W hlen Sie ggf an der Vorstufe bzw de...

Страница 7: ...ttaste ok list oder exit bzw die Fernbedienungstaste exit In den meisten Listen k nnen Sie mithilfe der Zifferntasten an der Fernbedienung zu bestimmten Anfangsbuchstaben springen Um im Listenmodus di...

Страница 8: ...s quand le NDS est sous tension Pour lire de l audio partir d un serveur UPnP ou de stations de radio Internet la prise r seau doit tre connect e un routeur l aide d un c ble Ethernet ou son antenne W...

Страница 9: ...ecter automatiquement Reportez vous au manuel de r f rence si cela semble tre le cas Si une connexion r seau en Wi Fi doit tre utilis e le NDS aura besoin d tre configur pour pouvoir joindre le r seau...

Страница 10: ...En mode liste les boutons de la fa ade du NDS et les touches de la t l commande per mettent de naviguer dans les listes Pour faire d filer une liste vers le haut ou le bas et s lec tionner des l ments...

Страница 11: ...route rapide du NDS Fran ais Des informations compl tes sur l installation et le fonctionnement du NDS se trouvent dans le manuel de r f rence disponible en ligne sur www naimaudio com Windows MediaTM...

Страница 12: ...dell alimentazione nei diffusori Per riprodurre l audio da un server UPnP o dalle stazioni della Internet Radio necessario collegare la presa di rete LAN dell NDS a un router con cavo Ethernet oppure...

Страница 13: ...ecessario configurare l NDS in modo che possa essere collegato alla rete Premete il tasto di impostazione sul telecomando dopo che l NDS stato acceso e selezionate l opzione Impostazioni rete per conf...

Страница 14: ...lenchi molto lunghi i tasti numerici del telecomando possono essere utilizzati per spostarsi all interno dell elenco in modo alfabetico Le voci possono essere selezionate per l ascolto o la riproduzio...

Страница 15: ...o componente fuente conectado a tierra todos los reproductores de CD de Naim por ejemplo o si se escucha un zumbido a trav s de los altavoces al encender el NDS Para reproducir audio desde un servidor...

Страница 16: ...icamente a una red TCP IP cableada No obstante si su NDS ya ha sido utilizado previamente y su configuraci n de red ha sido modificada o su router requiere unos ajustes distintos de los est ndar puede...

Страница 17: ...ol de la reproducci n Si pulsa el bot n ok list del panel delantero o la tecla ok list del mando a distancia el NDS pasar al modo Lista y mostrar una lista de los componentes de los medios disponibles...

Страница 18: ...las teclas de desplazamiento del mando a distancia para controlar las funciones reproducir pausa siguiente anterior o parar NDS Gu a de inicio r pido Espa ol Puede encontrar informaci n completa sobre...

Страница 19: ...wanneer de NDS is ingeschakeld Als u audio van een UPnP server of van online radiozenders wilt afspelen moet de netwerkingang van de NDS met een Ethernetkabel op een router zijn aangesloten of moet d...

Страница 20: ...al dient u de Referentiehandleiding te raadplegen Als een draadloze netwerkverbinding wordt gebruikt moet de NDS geconfigureerd worden om verbinding met het netwerk te maken Druk wanneer de NDS is ing...

Страница 21: ...eeft het apparaat een lijst weer van alle beschikbare media items voor de geselecteerde invoerbron Opmerking wanneer een externe NDS invoerbron is geselecteerd werken de toetsen ok list niet In de lij...

Страница 22: ...tartgids Nederlands Voor volledige informatie over het instellen en bedienen van de NDS raadpleegt u de Referentiehandleiding op de website www naimaudio com Windows Media is een handelsmerk van Micro...

Страница 23: ...PS Burndy XP5 XS XPS NDS 1 555PS NDS 1 2 2 555PS NDS NDS Naim CD NDS UPnP NDS Wi Fi NDS USB USB S PDIF NDS BNC NDS DAC NDS DIN NDS NDS Naim CD Naim DAC NDS n Stream CD NDS CD DAC 3 5mm 3 5mm NDS www n...

Страница 24: ...6 3 UPnP USB USB USB NDS 5 6 3 iRadio 5 6 iRadio UPnP iPod USB iTunes n Stream iPhone iPad iPod touch NDS 4 9 4 1 5 4 NDS C135 DHCP Language 7 7 Espa ol Italiano Nederlands 4 UPnP 3 3 UnitiServe NAS...

Страница 25: ...s 11 UPnP Windows UPnP NDS Windows 11 Windows Windows UPnP UPnP This product incorporates Spotify software which is subject to 3rd party licences found here www spotify com connect third party license...

Страница 26: ...XPS 555PS XP5 XS XPS 555PS Burndy XP5 XS XPS 1 NDS 555PS 1 2 NDS 555PS 2 NDS NDS chassis NDS hi fi CD Naim NDX UPnP NDS Ethernet Wi Fi NDS USB USB NDS S PDIF BNC NDS NDS DIN NDS www naimaudio com XPS...

Страница 27: ...Remote Out CD Remote In 3 5 3 5 RCA 2 NDS NDS Digital 1 1 NDS Auto off NDS Language up 5 down 6 ok list ok exit NDS TCP IP NDS NDS NDS Network Settings NDS NDS 3 NDS input up 5 down 6 input selection...

Страница 28: ...a Player Select Library Configure Sharing Share my media NDS iRadio up 5 down 6 left 3 ok list ok NDS UPnP UPnP up 5 down 6 left 3 ok list ok play pause UPnP USB USB USB NDS up 5 down 6 left 3 ok list...

Страница 29: ...eft 3 right 4 ok list ok ok list ok exit exit ok list ok play USB UPnP This product incorporates Spotify software which is subject to 3rd party licences found here www spotify com connect third party...

Страница 30: ...Naim Audio Limited Southampton Road Salisbury England SP1 2LN Tel 44 0 1722 426600 Fax 44 0 871 2301012 W www naimaudio com Part No 12 001 0175 Iss 2A...

Отзывы: