background image

WHAT’S IN THE BOX

Packed with your M50.2 you will find

• 

Two detachable mains power cord

• 

Four magnetic feet

• 

Two wireless antenna 

• 

Cleaning cloth

• 

USB flash drive

• 

Quick Setup Guide

SAVE THE PACKAGING

Please save the box and the packaging that came with the M50.2. Should 
you move or need to transport your M50.2, this is the safest container to 
use. We’ve seen too many otherwise perfect components damaged in 
transit for lack of a proper shipping carton. So please, save that box!

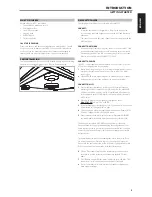
FEET INSTALLATION

The supplied magnetic feet can be easily installed by aligning and attaching 
them to their corresponding foot shoe.  Refer to illustration below.

QUICK SETUP GUIDE

This simple guide will help you get started with your M50.2.

CONNECT! 
• 

Follow the enclosed M50.2 Digital Music Player Quick Setup Guide 
for connecting input and output devices and the Wi-Fi and Bluetooth 
antennas. 

• 

The connectors used in the setup connection are not supplied with the 
M50.2 package.

CONNECT TO NETWORK
• 

Using an Ethernet cable (not supplied), connect one end to M50.2’s LAN 
port and the other end directly to your Wired home network or router.

• 

Alternatively, the M50.2 can also be connected by Wireless connection. 
Refer to section below about “CONNECT TO Wi-Fi”.

CONNECT TO POWER

The M50.2 comes supplied with two separate AC power cords. Select the 
AC power cord appropriate for your region.

Before connecting the AC power cord’s plug to the wall outlet, connect 
firmly first the other end of the AC power cord to M50.2’s AC Mains 
input socket.

Set the POWER switch at the rear panel to ON and then press Standby 
button on the top side of the front panel to power up the M50.2.

CONNECT TO WI-FI

On your tablet or smartphone, look for the Wi-Fi network (hotspot) 
matching your M50.2’s unique network ID, and join it. The network ID 
is listed as the product name (i.e. M50.2) immediately followed by the 
last four digits in the MAC (Machine Access Control address (example: 
M50.2-001A). 

Open a web browser on your tablet or smartphone, enter 

http://10.1.2.3

 and press “Go” or ENTER. 

A Control Panel page should appear. Select “Configure WiFi” and you will 
be redirected to “Configure Wireless” page.

Select your home network or applicable wireless network name (SSID) 
from the “Configure wireless” drop down menu

Enter your home network’s Wireless Password (Passphrase, WEP/WAP 
key as applicable) in the field “Enter password or key (if protected)”.

The Password (Passphrase, WEP/WAP key as applicable) is the same 
Password that was setup or generated during the configuration of your 
home router or gateway. An incorrect password entered in the “Configure 
wireless” menu screen will simply cause the unit to timeout and return to 
Hotspot Mode.

Trying multiple passwords will not damage the device in any way. If you 
are not sure what is your Password, login to your router and locate the 
Password in the applicable setup screen for Wireless Configuration section. 
Refer to your router’s documentation for further information.

Select a “Player name” from the drop down list or use the on-screen 
keyboard to create a customized room name in the field “Custom 
name”.

Press “Update” and wait for the Status indicator to turn solid blue.  This 
indicates successful connection to your home Wi-Fi network.

Reselect your home Wi-Fi network from your tablet or smartphone’s 
main network settings. 

INTRODUCTION

GETTING STARTED

^

5

ENGLISH

FR

ANÇ

AIS

ESP

AÑOL

IT

ALIANO

DEUT

SCH

NEDERL

ANDS

SVENSK

A

РУ

ССКИЙ

Содержание M50.2

Страница 1: ...ENGLISH FRANÇAIS ESPAÑOL ITALIANO DEUTSCH NEDERLANDS SVENSKA РУССКИЙ NAD M50 2 Owner s Manual M50 2 Digital Music Player ...

Страница 2: ...gainst voltage surges and built up static charges Article 810 of the National Electrical Code ANSI NFPA 70 provides information with regard to proper grounding of the mast and supporting structure grounding of the lead in wire to an antenna discharge unit size of grounding conductors location of antenna discharge unit connection to grounding electrodes and requirements for the grounding electrode ...

Страница 3: ...or television reception which can be determined by turning the equipment off and on the user is encouraged to try to correct the interference by one or more of the following measures Reorient or relocate the receiving antenna Increase the separation between the equipment and receiver Connect the equipment into an outlet on a circuit different from that to which the receiver is connected Consult th...

Страница 4: ...on the back of the cabinet For your future convenience we suggest that you record these numbers here Model no Serial no IMPORTANT SAFETY INSTRUCTIONS acturer bol within an equilateral he presence of the product s enclosure constitute a risk of eral triangle is intended ortant operating s in the literature ELECTRIC SHOCK OR MOISTURE AND SES SHOULD NOT BE pace around the unit ctions than is equal to...

Страница 5: ...ront panel to power up the M50 2 CONNECT TO WI FI 1 On your tablet or smartphone look for the Wi Fi network hotspot matching your M50 2 s unique network ID and join it The network ID is listed as the product name i e M50 2 immediately followed by the last four digits in the MAC Machine Access Control address example M50 2 001A 2 Open a web browser on your tablet or smartphone enter http 10 1 2 3 a...

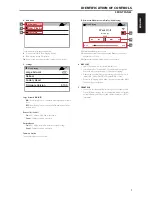
Страница 6: ... Powering up rebooting Solid green Hotspot mode Solid red Booting up Solid red Cannot boot up drive error Solid white Indexing Solid blue Connected to network ready to use with BluOS App 3 DISPLAY TOUCH PANEL DISPLAY Display visual information about current music or media source Touch control functions are also displayed depending upon the source or media SAMPLE DISPLAY SCREEN A Large Album Artwor...

Страница 7: ...lable for selection 13 Elapsed time and remaining time of current music 4 DISC SLOT Insert CD or audio disc face down into this slot Select Audio Disc from the BluOS Controller App s navigation drawer to select the loaded disc for playback or ripping Depending upon Rip Play options settings the loaded disc will Always Rip Always Play CD or Prompt for Rip or Play Refer also to Ripping menu under Se...

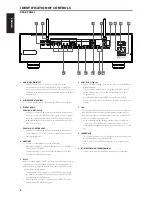
Страница 8: ...RS 232 serial cable not supplied to any Windows compatible PC to allow remote control of the M50 2 via compatible external controllers Refer to the NAD website for information about RS232 Protocol documents and PC interface program 6 USB 1 USB 2 Type A Connect USB mass storage device to any or both of these USB Type A input terminals Typical USB mass storage device compatible with M50 2 include po...

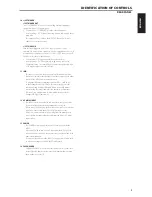
Страница 9: ...u select Player IR remote Simply select the function desired from the IR Remote Menu point an IR remote control at the IR repeater and press the button to perform that function Once programmed a check mark will appear in the Configure IR Trigger function list 12 AC MAINS INPUT The M50 2 comes supplied with two separate mains power cords Select the mains power cord appropriate for your region Befor...

Страница 10: ...ops Launch the BluOS Controller App and explore everything from your streaming music services internet radio stations networked music collections and favorites with quick and easy single search discovery Visit https support bluesound com for more information about setup and operation guidelines of your M50 2 OPERATION 10 ENGLISH FRANÇAIS ESPAÑOL ITALIANO DEUTSCH NEDERLANDS SVENSKA РУССКИЙ ...

Страница 11: ...11 ENGLISH FRANÇAIS ESPAÑOL ITALIANO DEUTSCH NEDERLANDS SVENSKA РУССКИЙ ...

Страница 12: ...onal a division of Lenbrook Industries Limited No part of this publication may be reproduced stored or transmitted in any form without the written permission of NAD Electronics International While every effort has been made to ensure the contents are accurate at the time of publication features and specifications may be subject to change without prior notice M50_2_eng_OM_v02 Feb 2017 ...

Отзывы: