


INSTRUCTION
MANUAL
TSUBAKI
TSUBAKI
TSUBAKI
TSUBAKI
EEEE&M
&M
&M
&M
CO.
CO.
CO.
CO.
WARNING
WARNING
WARNING
WARNING
CAUTION
CAUTION
CAUTION
CAUTION
■
■
■
■
SHOCK RELAY
SHOCK RELAY
SHOCK RELAY
SHOCK RELAY
TSB
TSB
TSB
TSBS
SS
SA
AA
A Series
Series
Series
Series
E
E
E
EH
H
H
HF
F
F
FS
S
S
SA
A
A
A05
05
05
05....0601
0601
0601
0601-
--
-4
44
4
20
20
20
201
11
13
33
3....1
11
12
22
2.... 1
1
1
1
11
NABRICO DF-1 ND ELECTRIC WINCH Owner’s Manual
OM-DF1-017-G
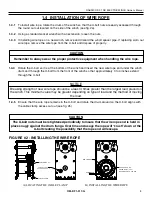
2.1 OPERATING THE WINCH
2.1.1 Powered Operation
2.1.1.1
To reel the wire rope onto the winch drum, depress and hold the “IN” button located on the
control box or remote operator station. Make certain that the locking pawl is disengaged by
rotating the locking pawl handle to the up position and inserting the T handle locking pin to
secure in place (see fig. #3a).
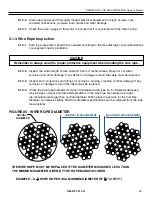
2.1.1.2
Observe the wire rope as it winds onto the winch drum. If it becomes loose, uneven or
overlapped, stop the operation and rewind before continuing. Continued operation with
undesirable wire rope lay can damage the rope and shorten its life.
2.1.1.3
To reel the wire rope off the winch drum, depress and hold the “OUT” button located on the
control box or remote operator station. Some tension should be kept on the wire rope during
unreeling to minimize rope fouling on the drum.
2.1.1.4
To stop the wire rope, release the “IN” or “OUT” button; this will automatically engage the
electric brake located on the winch motor. As with any electric brake, there is a slight delay
(approx. 0.03 seconds) between the “IN” or “OUT” button release and brake set.
2.1.1.5
After the winch is stopped and the brake is set, the locking pawl handle can be rotated down
so the locking pawl is free to engage thus dogging the winch down (see fig. #3b).
NOTICE
Breaking in the winch occurs during the first 30 to 60 minutes. During break-in, mating
surfaces become polished and clearances increase. This is desirable for efficient operation of
the bearings and gears.
CAUTION
Length of winch operation should not exceed the 15 minute duty cycle rating.
FIGURE #3 - LOCKING PAWL DISENGAGE/ENGAGE
Содержание DF-1 Series
Страница 1: ...OM DF1 017 G NABRICO DF 1 ND Electric Winch Owner s Manual ...
Страница 2: ...THIS PAGE IS INTENTIONALLY LEFT BLANK ...
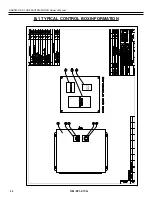
Страница 20: ...20 NABRICO DF 1 ND ELECTRIC WINCH Owner s Manual OM DF1 017 G B 1 TYPICAL CONTROL BOX INFORMATION ...
Страница 21: ...21 NABRICO DF 1 ND ELECTRIC WINCH Owner s Manual OM DF1 017 G ...
Страница 22: ...22 NABRICO DF 1 ND ELECTRIC WINCH Owner s Manual OM DF1 017 G ...
Страница 23: ...23 NABRICO DF 1 ND ELECTRIC WINCH Owner s Manual OM DF1 017 G ...
Страница 25: ... A 25 NABRICO DF 1 ND ELECTRIC WINCH Owner s Manual OM DF1 017 G ...
Страница 26: ... 72 61 26 NABRICO DF 1 ND ELECTRIC WINCH Owner s Manual OM DF1 017 G ...
Страница 27: ... 1 1 2 3 Ω 27 NABRICO DF 1 ND ELECTRIC WINCH Owner s Manual OM DF1 017 G ...
Страница 28: ... 63 2 M4 Attachment 28 NABRICO DF 1 ND ELECTRIC WINCH Owner s Manual OM DF1 017 G ...
Страница 29: ... 1 1 1 1 1 1 2 2 2 2 29 NABRICO DF 1 ND ELECTRIC WINCH Owner s Manual OM DF1 017 G ...
Страница 30: ... uto uto uto uto eset eset eset eset 30 NABRICO DF 1 ND ELECTRIC WINCH Owner s Manual OM DF1 017 G ...
Страница 31: ... 31 NABRICO DF 1 ND ELECTRIC WINCH Owner s Manual OM DF1 017 G ...
Страница 32: ... 1 1 1 1 2 2 2 2 3 3 3 3 32 NABRICO DF 1 ND ELECTRIC WINCH Owner s Manual OM DF1 017 G ...
Страница 34: ...34 NABRICO DF 1 ND ELECTRIC WINCH Owner s Manual OM DF1 017 G C 2 PARTS BREAKDOWN SHAFT MOUNTED ...
Страница 36: ...36 NABRICO DF 1 ND ELECTRIC WINCH Owner s Manual OM DF1 017 G ...
Страница 57: ...57 NABRICO DF 1 ND ELECTRIC WINCH Owner s Manual OM DF1 017 G D 2 PARTS BREAKDOWN FLANGE MOUNTED ...


