background image


-   8   - 

FUNZIONAMENTO


OPERATION 


PER REGOLARE LA CALIBRAZIONE 
IMPORTANTE:  ottenere  sempre  tre  (3)  
risultati  di  test  del  campione  da 
misurare.  Fare  la  media  di  questi  tre  (3) 
risultati.  Confrontare  questa  media  con 
la  media  di  tre  (3)  prove  da  3  risultati 
ciascuna dal tester. 
 

1.  Ogni  scala  di  grano  può  essere  adattata 
individualmente  fino  al  5,0%  con  incrementi 
di 0,1% per ottenere risultati più vicini ad un 
tester di precisione (ad esempio una bilancia 
termica). 
 
2.  Per  prima  cosa  selezionare  il  grano  da  
regolare. 
 
3. Testare il grano selezionato, utilizzando il campione di 
esempio  a  cui  si  desidera  calibrare.  Una  volta  che 
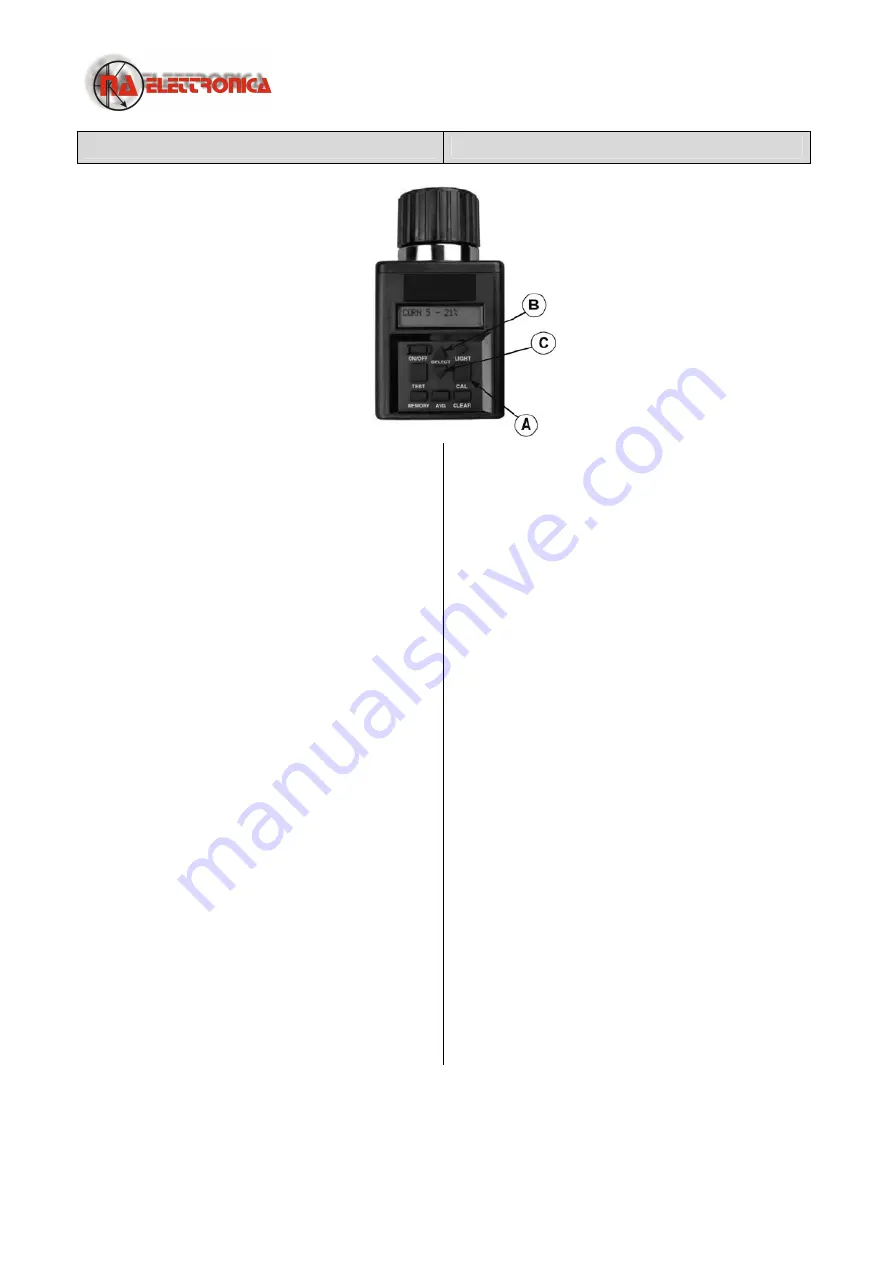
l'umidità  valida,  appare  premere  il  tasto  CAL  (A).  NOTA: 
la  calibrazione  di  un  tipo  di  grani  dato  non  può  essere 
eseguita  a  meno  che  un  valido  di  test  umidità  (con  uno 
strumento  campione tipo bilancia termica) non  sia  stato 
eseguito. 
 
4.  Una  volta  premuto  il  pulsante  CAL  (A)  il  tester 
visualizzerà  la  lettura  di  umidità  ottenuta  ed  il  corrente 
offset di scarto applicato a tale intervallo di umidità. 
 
5.  Premere  il  tasto  freccia  SU  (B)  per  aumentare  la 
quantità di regolazione o premere il tasto freccia GIÙ (C) 
per  abbassare.  Il  tester  aggiungerà  o  sottrarrà  fino  al 
5,0%  con  incrementi  di  0,1%  alla  gamma  di  umidità 
corrente. 
 
6.  Dopo  il  grado  di  aggiustamento  è  stato  selezionato, 
premere il tasto CAL (A) per tornare alla modalità test. 
 

NOTA:  la  regolazione  non  può  essere  fatta  per  la 
calibrazione  di  fabbrica  se  il    tester  mostra  letture  di 
umidità "sotto il limite" o " SOPRA IL LIMITE" del  campo 
di lettura. 

 
IMPORTANTE:  Questo  tester  incorpora  un    Multi-Point 
di taratura per ogni grano. Pertanto, una volta preso un 
test  valido  e  una  volta  fatta  una  calibrazione, 
l’aggiustamento  avrà  effetto  solo  per  la  gamma  di 
umidità del campione testato.


TO ADJUST CALIBRATION 
IMPORTANT:  Always  obtain  three  (3) 
test results from the grain elevator for 
the  sample  being  compared.  Average 
these  three  (3)  results.  Compare  this 
average  with  the  average  of  three  (3) 
tests by the moisture tester. 


1.  Each  grain  scale  can  be  individually 
adjusted  up  to  5.0%  by  increments  of 
0.1% to more  closely  match the results 
of an elevator tester. 
 
 
2. First select the grain to be adjusted. 
 

3.  Test  the  grain  selected,  using  the  sample  you  wish  to 
adjust  to.  Once  valid  moisture  appears,  press  the  CAL 
button  (A).  NOTE:  Calibration  of  given  grain  cannot  be 
performed  unless  a  valid  mois-  ture  test  has  been 
performed. 
 
 
4. Once CAL button (A) is pressed, tester will now display 
the  obtained  moisture  reading  and  the  current  offset 
applied to that moisture range. 
 
 
5. Press the UP arrow (B) to raise the adjustment amount 
or  press  the  DOWN  arrow  (C)  to  lower.  The  tester  will 
add or subtract up to 5.0% by increments of 0.1% to the 
current moisture range. 
 
 
6. After the adjustment amount has been selected, press 
the CAL button (A) to return to grain tester mode. 
 

NOTE:  Adjustment  can  NOT  be  made  to  factory 
calibration to produce moisture readings in a tester that 
shows “BELOW LIMIT” or “ABOVE LIMIT” readings. 


IMPORTANT:  This  tester  incorporates  Multi  Point 
Calibration for each grain. Therefore, once a valid test is 
taken  and  an  adjustment  is  made,  the  adjustment  will 
only affect the moisture range of the sample tested. 


Содержание HTG-300

Страница 1: ...MANUALE D USO OPERATORS MANUAL HTG 300 TESTER GRANO GRAIN MOISTURE TESTER...

Страница 2: ...a non si applica ad alcun prodotto che stato riparato esternamente da altra fabbrica non autorizzata di riparazione alterandone quindi le funzioni La garanzia precedente esclusiva ed in vece di tutte...

Страница 3: ...eration Operating Conditions 4 Operational Messages 4 Operating Procedure Preheating 5 Normal Operation 6 To Display Temperature in the Cell 7 To Average Test Results 7 To Adjust Calibration 8 Moistur...

Страница 4: ...cell and grain MUST be free of any condensation or surface moisture Moisture on grain or in test cell will cause high readings Very hot or cool grain will pick up moisture when it warms or cools The p...

Страница 5: ...sar visualizzate per circa 10 secondi OPERATING PROCEDURE PREHEATING IMPORTANT If the temperature of the grain sample is 20 F 11 C more or less than the temperature of the unit preheat the tester and...

Страница 6: ...la cella di prova riempire con un campione fresco e ripetere il test NOTA Prendere almeno tre letture di grani nuovi dal campione raccolto e fare la media i risultati OPERATING PROCEDURE NORMAL OPERA...

Страница 7: ...lo della media premere il pulsante AVG La media attuale sar visualizzata Quindi premere il tasto CLEAR C e il tester visualizzer quindi 0 0 0 Questo indica che la media stata cancellata TO DISPLAY TEM...

Страница 8: ...del campo di lettura IMPORTANTE Questo tester incorpora un Multi Point di taratura per ogni grano Pertanto una volta preso un test valido e una volta fatta una calibrazione l aggiustamento avr effetto...

Страница 9: ...0 20 0 20 0 21 0 22 0 22 0 35 0 Moisure Range Grains Low Limit High Limit ALFALFA BARLEY BEET BUCKWHEAT CANARY CLOVER PURPLE CLOVER WHITE CORN HIGH MOISTURE CORN LOW MOISTURE DACTYL FESCUE FLAX LINSE...

Страница 10: ...essere necessario calibrare il tester con il tester campione utilizzando un campione di grani in entrambi i tester Registrare la correzione di calibrazione necessario Sar valido per tutte le prove in...

Страница 11: ...fino a quando la parola LINGUA viene visualizzata 3 Quando LINGUA visualizzata premere il pulsante TEST B La lingua selezionata viene visualizzata Premere la freccia verso l alto o verso il basso A p...

Страница 12: ...kward through the grain function menu The grains are listed in alphabetical order followed by other tester functions NOTE To use other functions included with the tester push SELECT button A up or dow...

Страница 13: ...left battery A powers the backlight circuit The right battery B powers the system 2 The tester will flash a BATTERY LOW message if system battery needs replacing when unit is turned on It will not say...

Страница 14: ...sultati dei test potrebbero non essere accurati Sostituire la batteria Soluzione 5 pu essere necessario ricalibrare l unit dalla fabbrica Restituire il tester al proprio rivenditore per la riparazione...

Страница 15: ...ation when ordering parts and when filing warranty claims Modello Nr __________________________________________________________ Model No Serie Nr ______________________________________________________...

Страница 16: ...e si prega di contattare For manufacturer information and customer service please contact N A ELETTRONICA S R L Via Toscana 11 d 40069 Zola Predosa BO ITALY tel 0039 051 758213 fax 0039 051 6185939 E...

Отзывы: