


140916130400
8
8
Preparing the Unit for
Use
If using a water input source
through
a low voltage
pump,
refer to
the pump instruction manual.
Typically, connect the pump inlet to the water supply
(for example, bucket of water) and connect the pump
outlet to the appliance cold water inlet connection.
Connect the pump to the power supply (for example,
vehicle 12V system) and switch it on.
It is recommended to use a shower hose no less than
2 meters long.
This unit is not to be permanently plumbed into
a
mains water system.
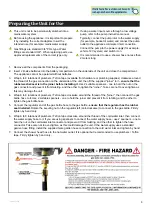
Before using the appliance, it is important to prepare
it
by installing the
correct
adaptors to suit
the
intended use
(for example, mains water supply)
.
Gas fittings are standard 3/4" POL type. Water
fittings are standard 3/4". When replacing parts, use
approved replacements of the correct type only.
1.
Remove all the components from the
packaging
.
2.
Insert
2
D
-size
batteries into the battery
compartment
on the underside of the unit
and close the
compartment
.
The appliance cannot be operated without batteries.
3.
Wrap 6 to 8 rotations of
plumbers
/
Teflon tape (available from hardware or plumbing
supplies
)
clockwise around
the thread of the gas
connection on the underside of the unit
, then f
it the
supplied "join
er
"
to
it -
ensure that the
rubber washer/seal is in the joiner before installing it
. U
s
e
2
suit
ab
le
spanner
s - one to hold the nut on the
gas
connector and prevent it from twisting, and the other to tighten the
"joiner"
.
T
ak
e
care not to over
-
tighten as
this
may
damage
the
unit
.
4.
Wrap 6 to 8 rotations of plumbers
/
Teflon tape clockwise around the thread of the "joiner", then connect the gas
bottle hose to it. Use 2 suitable spanners - one to hold the joiner and prevent it from rotating, and the other to
tighten the gas bottle hose
.
5.
Connect the regulator end of the gas bottle hose to the gas bottle
-
ensure that the
regulator
has the rubber
seal installed
.
Rotate the
securing
nut on the regulator left (anti-clockwise) to connect to the gas bottle.
Firmly
tighten by hand only.
6.
Wrap 6 to 8 rotations of plumbers
/
Teflon tape clockwise around the thread of the cold water inlet, then connect
the water supply hose to it. If you are using spanners to connect the water supply hose - use 2 spanners - one
to
hold the nut on the cold water inlet connector and prevent it from twisting, and the other to tighten the hose
connector. Take care not to over-tighten as this could damage the unit.
If
the water supply uses a standard
garden hose
fitting,
install the
supplied
male garden hose connection
to the cold water inlet and tighten by hand
.
7.
Connect the shower head hose to the
hot water outlet.
It is optional but recommended to use plumbers / Teflon
tape. Firmly
tighten
by hand only
.
Содержание TRG-16
Страница 7: ...140916130400 6 6 ...
Страница 8: ...140916130400 7 7 Parts Identification ...
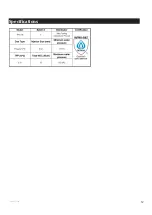
Страница 13: ...140916130400 12 12 Specifications ...