background image

- 1 -

CAUTION

PLEASE READ CAREFULLY THE FOLLOWING SAFETY GUIDELINES BEFORE OPERATION.

Do not use the patio heater for indoors, as it may cause personal injury or property damage.

This outdoor heater is not intended to be installed on recreational vehicles and/or boats.

Installation and repair should be done by a qualified service person.

Improper installation, adjustment, alteration can cause personal injury or property damage.

Do not attempt to alter the unit in any manner.

Never replace or substitute the regulator with any regulator other than the factory-suggested replacement.

Do not store or use gasoline or other flammable vapors or liquids in the heater unit.

The whole gas system, hose, regulator, pilot or burner should be inspected for leaks or damage before

use, and at least annually by a qualified service person.

All leak tests should be done with a soap solution.  Never use an open flame to check for leaks.

Do not use the heater until all connections have been leak tested.

Do not transport heater while it’s operating.

Do not move the heater after it has been turned off until the temperature has cooled down.

Keep the ventilation opening of the cylinder enclosure free and clear of debris.

Do not paint the radiant screen, control panel or top canopy reflector.

Control compartment, burner and circulation air passageways of the heater must be kept clean.

Frequent cleaning may be required as necessary.

The LP tank should be turned off when the heater is not in use.

Check the heater immediately if any of the following occurs:

-

The heater does not reach temperature.

-

The burner makes popping noise during use (a slight noise is normal when the burner is extinguished).

-

Smell of gas in conjunction with extreme yellow tipping of the burner flames.

The LP regulator/hose assembly must be located out of pathways where people may trip over it or in

area where the hose will not be subject to accidental damage.

Any guard or other protective device removed for servicing the heater must be replaced before operating the heater.

Adults and children should stay away from high temperature surface to avoid burns or clothing ignition.

Children should be carefully supervised when they are in the area of the heater.

Cl

To change the gas cylinder in a amply ventilated area, away from any ignition

source (candle, cigarettes, other flame producing appliances, ...);

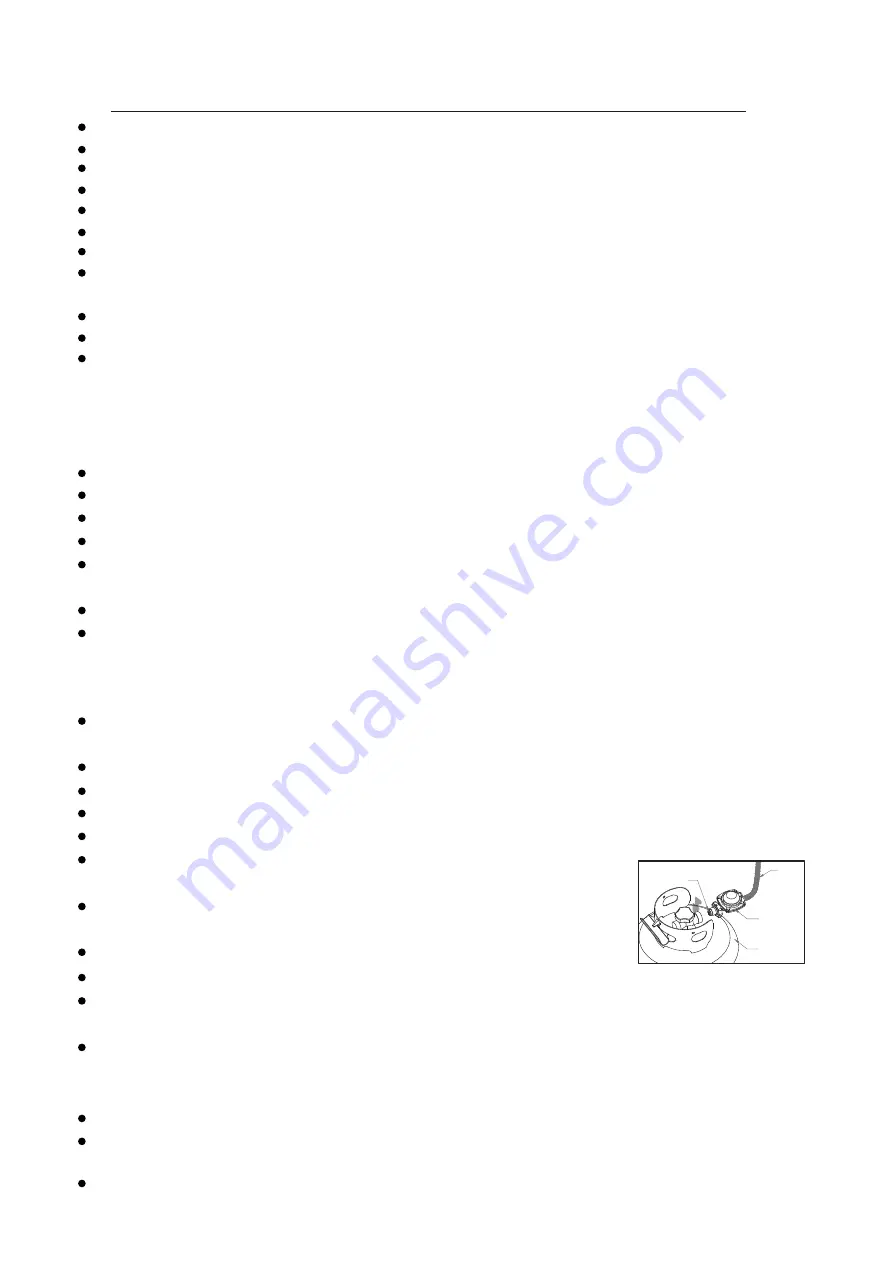
To check that the regulator seal is correctly fitted and able to fulfill its function

showed as photo right;

To not obstruct the ventilation holes of the cylinder housing;

To close the gas supply at the valve of the gas cylinder or the regulator after use;

In the event of gas leakage, the appliance shall not be used or if alight, the gas supply

shall be shut off and the appliance shall be investigated and rectified before it is used again;

To check the hose at least once per month

ˈ

 each time the cylinder is changed

ˈ

or each time before long time no use.

If it shows signs of cracking, splitting or other deterioration it shall be exchanged for new hose of the same length and of the

equivalent quality;

The use of this appliance in enclosed areas can be dangerous and is PROHIBITED;

Read the instructions before using this appliance. The appliance must be installed in accordance with the instructions and

local regulations.

For connection of hose and regulator,and connection of regulator and hose, please refer to photo showed above.

othing or other flammable materials should not be hung on the heater or placed on or near the heater.

T

Regulator connection: tighten connection and perform another leak test. If bubbles continue appearing 

should be returned to hose’s place of purchase. If leak is at Regulator/Cylinder Valve connection: disconnect, 

reconnect, and perform another leak check. If you continue to see bubbles after several attempts, cylinder 

valve is defective and should be returned to cylinder’s place of purchase.

urn off the gas valve immediately if smell of gas is detected. Turn Cylinder Valve OFF.If leak is at Hose/

Hose/ Regulator connection and
Regulator / Cylinder connection

seal

hose

regulater

cylinder

Содержание MY4323

Страница 1: ...ÎNCĂLZITOR DE TERASĂ CU TUB DE CUARȚ MANUAL DE UTILIZARE MY4323 MY4324 Păstrați pentru referințe ulterioare ...

Страница 2: ... aparate 2 Buteliile care nu sunt conectate la acest aparat nu trebuie depozitate în apropierea acestui aparat sau a altor aparate AVERTIZARE 1 Acest aparat trebuie utilizat numai în exterior sau în spații mari și foarte bine ventilate 2 Spațiul mare și ventilat trebuie să aibă minimum 25 din suprafață spațiu deschis 3 Aria suprafeței este suma suprafețelor pereților AVERTIZARE Orice instalare reg...

Страница 3: ... valva buteliei de gaz sau regulatorul înainte de a deplasa aparatul Tuburile sau furtunurile de alimentare trebuie schimbate la intervalele de timp specificate Utilizați numai tipul de gaz sau tipul de butelie specificate de producător Butelia utilizată pentru acest încălzitor trebuie să aibă următoarele caracteristici Achiziționați numai butelii cu următoarele dimensiuni 30 5 cm diametru x 57 1 ...

Страница 4: ...lui 2 Cerințe cu privire la alimentarea cu gaz 2 Testare scurgeri gaz 2 Utilizare și depozitare 3 Curățare și întreținere 4 Prezentarea aparatului și specificații 4 Instrucțiuni de montare 6 Probleme în funcționare 12 Reciclarea Echipamentelor 12 ...

Страница 5: ...este utilizat Verificați încălzitorul imediat în cazul în care vă confrutați cu una dintre următoarele situații Încălzitorul nu atinge temperatura dorită Arzătorul emite niște sunete ca niște pocnituri în timpul utilizării astfel de zgomote sunt normale când stingeți arzătorul Miros de gaz și margini galbene ale flăcării arzătorului Ansamblul format din regulatorul de gaz furtun trebuie amplasat în ...

Страница 6: ...liile lovite ruginite sau deteriorate pot fi periculoase și trebuie să fie verificate de furnizorul acestora Nu utilizați butelii cu valva de conectare deteriorată Butelia trebuie așezată astfel încât să asigure preluarea vaporilor din cilindrul funcțional Nu conectați o butelie nereglată la încălzitor TESTAREA SCURGERILOR DE GAZ Conexiunile de gaz ale încălzitorului sunt testate la scurgerile de gaz...

Страница 7: ... de aprindere de pe ecranul emițător În momentul în care flacăra pilot este aprinsă apăsați butonul de control timp de 30 de secunde 5 După apăsarea butonului de control timp de 30 de secunde rotiți butonul de control la poziția LOW Pentru a mări temperatura rotiți butonul către HIGH Avertizare Verificați înainte de utilizare ca suprafața tubului din sticlă să nu fie spartă OPRIREA ÎNCĂLZITORULUI 1 Î...

Страница 8: ...sau corozive Curățați depunerile de pe arzător pentru a îl menține curat și în condiții sigure de utilizare Acoperiți arzătorul cu capacul de protecție original atunci când nu utilizați încălzitorul PREZENTAREA APARATULUI ȘI SPECIFICAȚII Reflector Plasă protecție partea superioară Roată Plasă de protecție tip romb Cutie de control Spațiu depozitare butelie Bază 4 ...

Страница 9: ...șire a regulatorului așa cum este prezentat în tabelul de mai sus C Tabel cu tipuri de injectoare CATEGORIE APARAT I3 28 30 37 I3B P 30 I3B P 50 I3B P 37 TIP DE GAZ Butan Propan Butan propan sau amestec al acestora Butan propan sau amestec al acestora Butan propan sau amestec al acestora PRESIUNE GAZ 28 30 mbar 37 mbar 30 mbar 50 mbar 37 mbar INTRARE TOTALĂ CĂLDURĂ Hs Qn 11kW 800g h DIMENSIUNI INJ...

Страница 10: ...u textul de scurgere de gaz Piese componente PIESĂ DESCRIERE CANTITATE A Reflector 1 B Plasă protecție parte superioară 1 C Plasă 1 D Corp încălzire 1 E Furtun gaz 1 F Spațiu depozitare butelie 1 G Bază 1 Spațiu depozitare butelie Roată Bază Reflector Plasă protecție parte superioară Plasă Corp încălzire Furtun gaz 6 ...

Страница 11: ...EA APARATULUI KIT DE INSTALARE dimensiuni reale Piuliță fluture 3 buc Șaibă mică plată ø6 9 buc Cui 3 buc Șurub M5 X 10 11 buc Șurub M8 X 16 2 buc Piuliță flanșă M8 2 buc Șurubelniță Philips 1 buc Cheie 1 buc 7 ...

Страница 12: ...prin utilizarea a 4 șuruburi M5 X 10 Piese utilizate Șurub M5 X 10 x 4 Șurubelniță Philips x 1 2 Asamblați corpul de încălzire Fixați corpul de încălzire pe spațiul pentru depozitarea buteliei prin utilizarea a 4 șuruburi M5 X 10 Piese utilizate Șurub M5 X 10 x 4 Șurubelniță Philips x 1 8 ...

Страница 13: ...asa Fixați plasa pe corpul de încălzire cu ajutorul a 3 șuruburi M5 X 10 Piese utilizate Șurub M5 X 10 x 3 Șurubelniță Philips x 1 4 Asamblați plasa de protecție din partea superioară direct pe corpul de încălzire 9 ...

Страница 14: ... partea de sus a plasei prin utilizarea a 3 șaibe ø6 la partea de jos și 3 șaibe ø6 la partea de sus b Așezați reflectorul pe cui și fixați l prin utilizarea a 3 piulițe fluture și 3 șaibe Piese utilizate Piuliță fluture x 3 Șaibă ø6 x 9 Cui x 3 10 ...

Страница 15: ...eri gaz Acest test trebuie efectuat înainte de prima utilizare anual sau de fiecare dată după înlocuirea sau repararea componentelor sistemului de gaz Nu fumați în timpul efectării acestui test și îndepărtați toate sursele de aprindere Vezi diagrama de testare pentru zonele care trebuie verificate Rotiți toate butoanele de control ale arzătoarelor în poziția oprit Opriți alimentarea cu gaz Utilizați...

Страница 16: ...ul Așezați corect ansamblul flăcării pilot Amplasați corect În cazul în care problemele existente nu pot fi soluționate pe baza informațiilor din tabelul de mai sus luați legătura cu un centru de service autorizat pentru a le remedia Versiunea în limba engleză este de referință RECICLAREA ECHIPAMENTELOR Acest simbol prezent pe produs sau pe ambalaj semnifică faptul că produsul respectiv nu trebuie t...

Страница 17: ...INSTRUCTION MANUAL QUARTZ GLASS TUBE PATIO HEATER MY4323 MY4324 Please read the manual carefully before operating your product Retain it for future reference ...

Страница 18: ...icinity of this or any other applianceˊ 2 An LP cylinder not connected for use shall not be stored in the vicinity of this or any other applianceˊ WARNlNG 1 For use outdoors or in amply ventilated areas 2 An amply ventilated area must have a minimum of 25 of the surface area open 3 The surface area is the sum of the walls surface WARNING Improper installation adjustment alteration service or maint...

Страница 19: ...s cylinder or the regulator before moving the appliance The tubing or the flexible hose must be changed within the prescribed intervals Use only the type of gas and the type of cylinder specified by the manufacturer The LP tank used with your patio heater must meet the following requirements Purchase LP tanks only with these required measurements 30 5cm diameter x 57 1 cm tall with 23kg capacity m...

Страница 20: ...TENTS Caution 1 Heater Stand and Location 2 Gas Requirements 2 Leakage Test 2 Operation and Storage 3 Cleaning and Care 4 Parts and Specifications 4 Assembly Parts and Procedures 6 Problems Check List 12 Recycling 12 ...

Страница 21: ...ctive device removed for servicing the heater must be replaced before operating the heater Adults and children should stay away from high temperature surface to avoid burns or clothing ignition Children should be carefully supervised when they are in the area of the heater Cl To change the gas cylinder in a amply ventilated area away from any ignition source candle cigarettes other flame producing...

Страница 22: ...g of liquid petroleum gases A dented rusted or damaged tank may be hazardous and should be checked by your tank supplier Never use a tank with a damaged valve connection The tank must be arranged to provide for vapor withdrawal from the operating cylinder Never connect an unregulated tank to the heater LEAKAGE TEST Gas connections on the heater are leak tested at the factory prior to shipment A co...

Страница 23: ...trol knob to OFF position fully close gas valve wait 5 minutes then repeat steps 2 4 of the Lighting Instructions NOTE If the pilot light ignites but does not stay lit turn heater control knob to OFF position fully close propane gas valve wait 5 minutes then repeat steps 2 3 Now using a lighter ignite the pilot light through the ignition hole on the emitter screen Once the pilot light is lit depre...

Страница 24: ...ble or corrosive Remove debris from the burner to keep it clean and safe for use Cover the burner unit with the optional protective cover when the heater is not in use PARTS AND SPECIFICATIONS 4 1830 mm 890 mm 770 mm 565 mm 460 mm Reflector Upper Protective Mesh Rhombic Protective Mesh Control Box Tank housing Base Wheel ...

Страница 25: ...able above C Table of injector APPLIANCE CATEGORY TYPES OF GAS Butane Propane GAS PRESSURE 28 30mbar 37 mbar 30 mbar 50mbar 37mbar TOTAL HEAT INPUT Hs Qn 11kW 800g h INJECTOR SIZE The markingˈ for exampleˈ 1 70 on the injectorˈindicates that the size of injector is 1 70mm 1 70 mm for main burner 0 18 mm for pilot burner 1 35 mm for main burner 0 18 mm for pilot burner 1 48 mm for main burner 0 18 ...

Страница 26: ...tion for leakage test Parts List Upper Protective Mesh N O I T P I R C S E D T R A P QUANTITY A Reflector 1 B 1 Mesh C 1 D Heating Body E Gas Hose F 1 1 G H 1 Base Cylinder Housing Wheel 1 1 Reflector Upper Protective Mesh Heating Body Cylinder Housing Base Wheel A B D F G Mesh C Gas Hose E H ...

Страница 27: ...BLY PARTS HARDWARE CONTENTS shown actual size AA BB DD EE CC Wing nut Qty 3 Washer Φ6 Qty 9 Screw M5 X 10 Qty 11 Stud Qty 3 Philips screwdriver Qty 1 FF GG Wrench Qty 1 HH Bolt M8 X 16 Qty 2 M8 Flange nut Qty 2 ...

Страница 28: ...cure the tank housing to the base using 4pcs screw M5X10 x 1 Philips screwdriver DD x 4 Screw M5 X 10 F DD 1 Hardware Used 2 2 Assemble the heating body Secue the heating body to the tank housing using 4pcs screw M5X10 D DD DD GG x 4 x 1 Philips screwdriver Screw M5 X 10 ...

Страница 29: ...re Used 3 3 Assemble the mesh Secure the mesh to the Heating Body using 3pcs screw M5X10 C DD DD GG x 3 x 1 Philips screwdriver Screw M5 X 10 4 4 Assemble the upper protective mesh to the heating body directly B ...

Страница 30: ...tor a Screw 3pcs stud to the top of mesh using 3pcs washerΦ6 to the bottom and 3pcs washerΦ6 to the top b Put the reflector on the stud and secure them using 3pcs wing nut and 3pcs washer AA BB CC A x 3 x 3 x 9 AA BB Wing nut Washer Φ6 CC Stud ...

Страница 31: ... injury or death Leak tes ng This must be done before ini al use annually and whenever any gas Components are replaced or serviced Do not smoke while performing this test and remove all sources of igni on See Leak Tes ng Diagram for areas to check Turn all burner controls to the off posi on Turn gas supply valve on Brush a half and half solu on of liquid soap and water onto all joints and connec on...

Страница 32: ...our supplier or distributor to solve it urner will not light Pressure is low Tank near empty Refill LPG tank Opening blocked Remove and clean Control not ON Turn valve to ON Thermocouple bad Replace thermocouple Pilot light assembly bent Place pilot properly Not in correct location Position properly and retry Recycling Correct disposal of this Product Waste Electrical Electronic Equipment WEEE You...

Отзывы: