background image


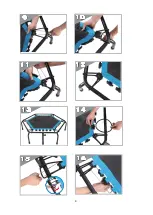
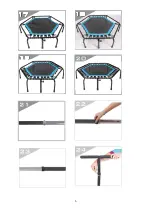
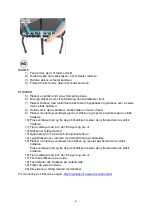
11) Remove the tool by twisting it to the right and pulling it out.  

12) The band is now fully fitted. 

13) Repeat steps 5 to 12 on all 6 trampoline legs. 

14) Place a band over the frame with the metal clamp underneath.  

15) Insert the assembly tool through the lower part of the band and fit it into the buckle 

groove.   

Press the tool down and away from yourself until the band slides down to the outer 

edge of the buckle.  

16) Remove the tool by twisting it to the right and pulling it out.  

17) Secure all bands down one side.  

18) Secure all bands on the other side.  

19) Repeat for the remaining two sides.  

20) All sides are now fully fitted with bands.  

When fitting bands, refer also to: 

http://mylnasport.no/service/instruction/


HANDLE  

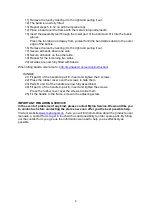
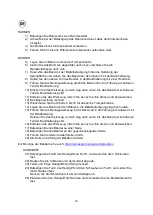
21) Fit part D of the handle to part E, insert and tighten the 4 screws.  

22) Press the rubber cover over the screws to hide them.  

23) Parts D and E of the handle are now fully assembled.  

24) Fit part C of the handle to part E, insert and tighten the screws.  

    Press the rubber cover over the screws to hide them.  

25) Fit the handle to the frame, screw in the adjusting screw. 


IMPORTANT REGARDING SERVICE 
In the event of problems of any kind, please contact Mylna Service. We would like you 
to contact us before contacting the store so we can offer you the best possible help. 

Visit our websit

www.mylnasport.no

 - here you will find information about the products, user 

manuals, a contact form to get in touch with us and possibility to order spare parts. By filling 

out the contact form you give us the information we need to help you as effectively as 

possible. 


Содержание 372 700

Страница 1: ...Art nr 372 700 Model 5650SH...

Страница 2: ...nd 1 B1 Square foot for handlebar post stand 1 C T Shaped handlebar 1 C1 Rubber grip for handelbar 2 D Supporting tube upper for the handlebar post stand 1 E Supporting tube under T shaped handlebar 1...

Страница 3: ...3 MONTERINGSANVISNING MONTERINGSANVISNINGAR ASSEMBLY INSTRUCTION MONTAGEANLEITUNG ASENNUSOHJE...

Страница 4: ...4...

Страница 5: ...5...

Страница 6: ...n 10 Press verkt yet ned og fra deg inntil strikken festes i den ytterste delen av strikk holderen 11 Fjern verkt yet ved vri det til h yere og dra ut 12 Strikken er ferdig montert 13 Gjenta steg 5 ti...

Страница 7: ...du kontakter butikken s vi kan tilbyde dig den bedst mulige hj lp Bes g vores hjemmeside www mylnasport com her vil du finde information om de produkter brugermanualer en kontakt formular for at komm...

Страница 8: ...CE Om det skulle uppst roblem av n got slag kontakta Mylna Service Vi skulle vilja att ni kontaktar oss innan du kontaktar butiken s att vi kan erbjuda dig b sta m jliga hj lp Bes k v r hemsida www my...

Страница 9: ...sport no service instruction HANDLE 21 Fit part D of the handle to part E insert and tighten the 4 screws 22 Press the rubber cover over the screws to hide them 23 Parts D and E of the handle are now...

Страница 10: ...ontiert 13 Wiederholen Sie die Schritte 5 bis 12 f r alle sechs Trampolinbeine 14 Legen Sie das Band ber den Rahmen die Metallbefestigung zeigt nach unten 15 F hren Sie das Montagewerkzeug in das Band...

Страница 11: ...vassa ja pid metallikiinnike edess 7 Aseta kuminauha metallikiinnikkeell kiinnikkeen taakse trampoliinin kankaaseen ja kuminauha pidikkeen sisimm n osan yli 8 Pid kuminauhan ylin osa sen pidikkeess k...

Страница 12: ...tavalla ja toivoisimme ett olette yhteydess meihin suoraan ennen asiointia myyj n kanssa Tutustu sivuihimme www mylnasport fi Sielt l yd t mm Tuotetietoa ohjekirjoja ja yhteydenottolomakkeen T t kautt...

Отзывы: