background image


Mar 24, 2009 (Version 4)                                        www.myeclubtv.com                                                            Page 5/24 


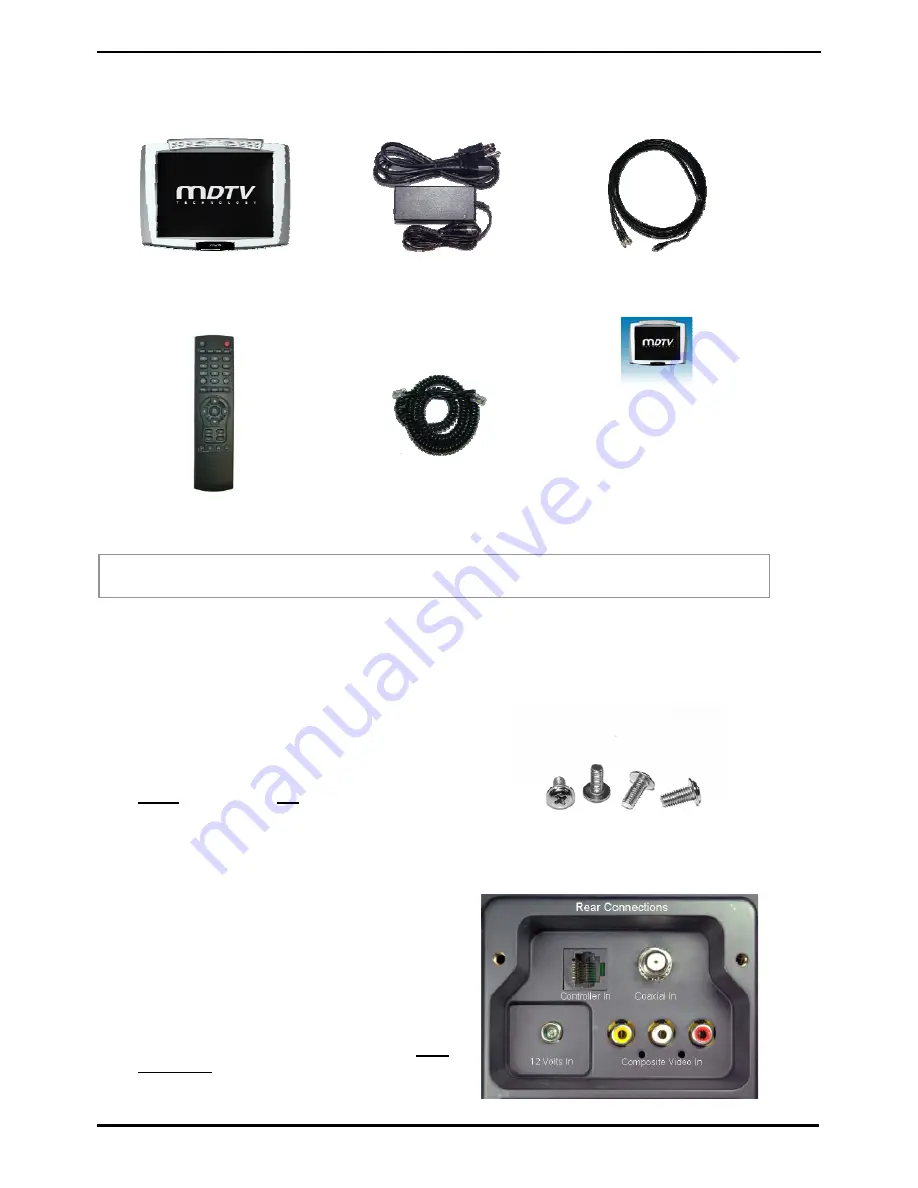
Screen 

Power adapter & AC power 

cord 

Combined coaxial/power cable 


MYE Entertainment 

MYE PERSONAL DIGITAL TV SYSTEM 

M15TV-NAQ2 


Owners Manual


IR remote control 

Screen controller coiled cord 

with 8-pin modular plugs 

Owners Manual 


In The Box… 

The shipping carton for the screen should contain the following components: 

IMPORTANT! REPORT ALL DAMAGES AND SHORTAGES IMMEDIATELY! 

Mounting the Screen 

Once the mount has been assembled and the cabling routed through the equipment or universal stand, the 

screen must be attached to the mounting plate.   


ƒ


Unplug the power adapter from the power source. 
 

ƒ


Use the four screws (included) to fasten the screen 
to the mount. Using screws other than those 
supplied, may result in damage to the screen. It is 

highly

 recommended 

not

 to use a power tool when 

tightening these screws, as this may result in 
damage to the screen! Use a #2 Phillips 
screwdriver, taking care not to over-tighten! 


Screen mounting Screws 

ƒ


Fasten the F-connector of the coaxial cable on to 
the fitting on the rear of the screen. 

It is important 

that care be taken with this connector, as 
over-tightening will result in serious damage to 
the screen.

 This connector should be started using 

only fingers and then tightened to 20 inch-pounds of 
torque, slightly more than finger-tight. 
 

ƒ


Push the 12-volt connector on to 12-volt jack on the 
rear of the screen. Tighten the locking collar 

only 

finger tight

 in order to prevent the connector from 

vibrating loose during normal use. 


Содержание M15TV-NAQ2

Страница 1: ...Mar 24 2009 Version 4 www myeclubtv com Page 1 24 MYE Entertainment MYE PERSONAL DIGITAL TV SYSTEM M15TV NAQ2 Owners Manual ...

Страница 2: ...ness 10 2 3 Sharpness 11 2 4 Color 11 2 5 Tint 11 2 7 Aspect Ratio 12 2 8 Settings 12 3 Audio Menu 13 15 3 1 Audio Language 13 3 2 Base 14 3 3 Treble 14 3 4 Balance 14 3 5 Digital Audio Output 15 3 6 Setting 15 4 Setting Menu 16 18 4 1 Set Time 16 4 2 Sleep Mode Timer 16 4 3 Advanced Video Mode 17 4 4 Set Password 17 4 5 Parental Control 17 4 6 Close Caption Options 18 4 7 Closed Caption 18 5 Cust...

Страница 3: ...components as they are removed from the box prior to installation The surface of the work area should be clean so as not to damage the screen and associated components WARNING Do not open monitor enclosure There are no user serviceable parts inside Any changes or modifications made to this product that are not approved by MYE Entertainment will void the user s warranty and authorization to operate...

Страница 4: ...dures as prescribed by MYE Entertainment there is a possibility of causing interference with other services In order to determine whether or not this product is generating harmful interference try performing the following steps Try turning off the product by unplugging it from the AC power receptacle Try powering the product from another AC power receptacle Relocate or turn the antenna of the rece...

Страница 5: ...s included to fasten the screen to the mount Using screws other than those supplied may result in damage to the screen It is highly recommended not to use a power tool when tightening these screws as this may result in damage to the screen Use a 2 Phillips screwdriver taking care not to over tighten Screen mounting Screws Fasten the F connector of the coaxial cable on to the fitting on the rear of...

Страница 6: ... Sub menu pages are Channel Video Audio Setup 3 Push the X key to enter a Sub Menu Tuning Band Cable Mode DTV Signal Auto CH Search Manual CH Setting Channel Label Options Menu Language Menu Language 1 Use ST keys on remote to select Tuning Band 2 Push OK key to enter change setting 3 AIR CABLE HRC IRC AUTO CABLE MAIN MENU ACCESS To access all MENU functions you MUST enter MENU mode Enter MENU and...

Страница 7: ...gth weak normal strong 1 Use ST keys on remote to select Cable Mode 2 Push OK key to enter change setting VSB QAM NONE Cable Mode set to NONE will scan analog channels only Input Signal Level Requirements Common sources of television signal are cable satellite or over the air antenna systems Many of these choices will provide signal in analog digital or both even both formats In order to provide h...

Страница 8: ...al CH 2 Push OK to move to channel list 3 Use ST keys on remote to select channel 4 Push OK to enter set options Channel Default Auto Default Channel Def Auto Def Viewable Not Viewable Favorite See Section 5 for definitions and use Depending on the content provided by the cable or satellite company there may be some content received that is inappropriate for your intended viewing audience Once cha...

Страница 9: ...te to select channel 4 Use Volume to move to first character entry 5 Use Channel to select character 6 Use Volume to move to next character entry Analog channels are shown as because there is no channel info in analog 1 Use ST keys on remote to select Menu Language 2 Push OK key to enter change setting English Spanish French Enter MENU and Sub menu page Enter MENU and Sub menu page ...

Страница 10: ...etting 3 Use the WX keys to adjust level Video Menu contains 3 video presets Soft Standard Vivid and 1 user adjustable option User 1 Use ST keys on remote to select Video Menu 2 Push X key to enter Video Mode 3 Push OK key to change setting Soft Standard Vivid User 1 Use ST keys on remote to select Brightness 2 Push OK key to enter change setting 3 Use the WX keys to adjust level 2 VIDEO MENU Ente...

Страница 11: ...etting 3 Use the WX keys to adjust level 1 Use ST keys on remote to select Color 2 Push OK key to enter change setting 3 Use the WX keys to adjust level 1 Use ST keys on remote to select Sharpness 2 Push OK key to enter change setting 3 Use the WX keys to adjust level Enter MENU and Sub menu page Enter MENU and Sub menu page Enter MENU and Sub menu page ...

Страница 12: ...values which were previously set will reset to factory default 1 Use ST keys on remote to select Aspect Ratio 2 Push OK key to enter change setting 16 9 4 3 1 Use ST keys on remote to select Settings 2 Push OK key to enter change setting 3 Push EXIT to set exit MENU Enter MENU and Sub menu page Enter MENU and Sub menu page ...

Страница 13: ... set to Default In some digital channels audio language is not English although English is set as audio language It can be regarded as an error in terms of broadcasting information but there will be no problem in functioning Audio Menu contains 4 audio presets Standard Music Movie Sports and 1 user adjustable option User 1 Use ST keys on remote to select Audio Menu 2 Push X key to enter Audio Mode...

Страница 14: ...e setting 3 Use the WX keys to adjust level 1 Use ST keys on remote to select Treble 2 Push OK key to enter change setting 3 Use the WX keys to adjust level 1 Use ST keys on remote to select Bass 2 Push OK key to enter change setting 3 Use the WX keys to adjust level Enter MENU and Sub menu page Enter MENU and Sub menu page Enter MENU and Sub menu page ...

Страница 15: ...utput 2 Push OK key to enter change setting AC 3 PCM When you exit the menu all audio related values which were previously set will be reset to the factory settings 1 Use ST keys on remote to select Settings 2 Push OK key to enter change setting 3 Push EXIT to set exit MENU Enter MENU and Sub menu page Enter MENU and Sub menu page ...

Страница 16: ...vanced Video Menu Set Password Parental Control Closed Caption Options Display Closed Caption 1 Use ST keys on remote to select Set Time 2 Push OK to enter Set Time 3 Use ST keys to select setting Time Zone Year Date Time 4 Push X key to adjust 1 Use ST keys on remote to select Sleep Timer 2 Push OK to enter change setting 30 60 90 min Enter MENU and Sub menu page Enter MENU and Sub menu page ...

Страница 17: ...Push OK to enter change setting 1 Use ST keys on remote to select Set Password 2 Push OK to enter old password 3 Use number keys to enter old password Factory Set password is 0 0 0 0 4 Confirm password 1 Use ST keys on remote to select Parental Control 2 Push OK to enter to password window 3 Use number keys to enter password 4 View Parental Control settings MPAA TV RATING 5 Use TSWX select rating ...

Страница 18: ...ns 3 Factory setting is Automatic 4 Press OK to enter change to Custom 5 Use ST keys to select Custom CC function Size Text Color Text Opacity Background Color Background Opacity Edge Effect Edge Color 6 Press OK to enter change selected function 1 Use ST keys on remote to Display Closed Caption 2 Push OK to enter change setting On Off Enter MENU and Sub menu page Enter MENU and Sub menu page ...

Страница 19: ... Press VOLT to 0 2 With the VOLUME level bar OSD still present enter code 1 5 9 3 on the number keypad 3 Custom Features menu OSD will appear Detect Vibration Channel Default Time Channel Default Auto Default Auto Power On Manual Channel Setting Set Factory Default Reset 1 Press CHST to select DETECT VIBRATION 2 Press VOLS only to select desired vibration monitoring time in minutes 1 8 3 Press EXI...

Страница 20: ...ssign a channel as a Default Channel when the TV is first turned On C ustom Features 1 Press CHST to CHANNEL DEFAULT TIME 2 Press VOLS only to enter change setting Off 10 20 30 40 50 60 seconds 1 Press CHST to select CHANNEL DEFAULT 2 Press VOLS only to select ON 3 Press CHT to select MANUAL CH SETTING 4 Press VOLS only to enter 5 Manual Channel Setting menu OSD will appear 6 Press CHST to select ...

Страница 21: ...n C ustom Features 1 Press CHST to select AUTO DEFAULT 2 Press VOLS only to select ON 3 Press CHT to select MANUAL CH SETTING 4 Press VOLS only to enter 5 MANUAL CHANNEL SETTING menu OSD will appear 6 Press CHST to select desired default channel 7 Press VOLS only to select AUTO DEFAULT a This channel is now assigned as the default channel when the TV vibration detect sensor is turned to ON 8 The A...

Страница 22: ...wable Channel Default Auto Default Ch Def Auto Def 6 DISPLAY Displays input source information 7 NUMBER KEY 0 9 100 Direct Channel Number Access 8 PRE CH Changes to last tuned program 9 MENU Activates deactivates main menu OSD 10 SOURCE Changes input source 11 STWX Navigates the Main Menu when menu is activated 12 OK Selects changes the value of selected sub menu item 13 VOL Changes volume level 1...

Страница 23: ...CING AFTER AUTHORIZATION FROM THE CUSTOMER REPAIRS ARE WARRANTED FOR 90 DAYS MYE ENTERTAINMENT S OBLIGATIONS UNDER THIS WARRANTY ARE LIMITED AS SET FORTH BELOW WARRANTY PERIODS AND COVERAGE M15TV NAQ2 1 YEAR PARTS LABOR CONDITIONS AND RESTRICTIONS THIS WARRANTY IS VALID ONLY IN ACCORDANCE WITH THE FOLLOWING CONDITIONS THE WARRANTY APPLIES TO THE MYE ENTERTAINMENT PRODUCT ONLY 1 WHILE IT REMAINS IN...

Страница 24: ... FAILS OF ITS ESSENTIAL PURPOSE FOR ANY PRODUCT DESCRIBED ABOVE THAT FAILS TO CONFORM TO ITS WARRANTY MYE ENTERTAINMENT WILL PROVIDE AT THEIR OPTION ONE OF THE FOLLOWING 1 REPAIR 2 REPLACEMENT OR 3 REFUND OF THE PURCHASE PRICE MYE AND OR ITS SUPPLIERS SHALL HAVE NO OBLIGATION OR LIABILITY WHETHER ARISING IN CONTRACT INCLUDING WARRANTY TORT INCLUDING ACTIVE PASSIVE OR IMPUTED NEGLIGENCE AND STRICT ...

Отзывы: