background image

6

7

7

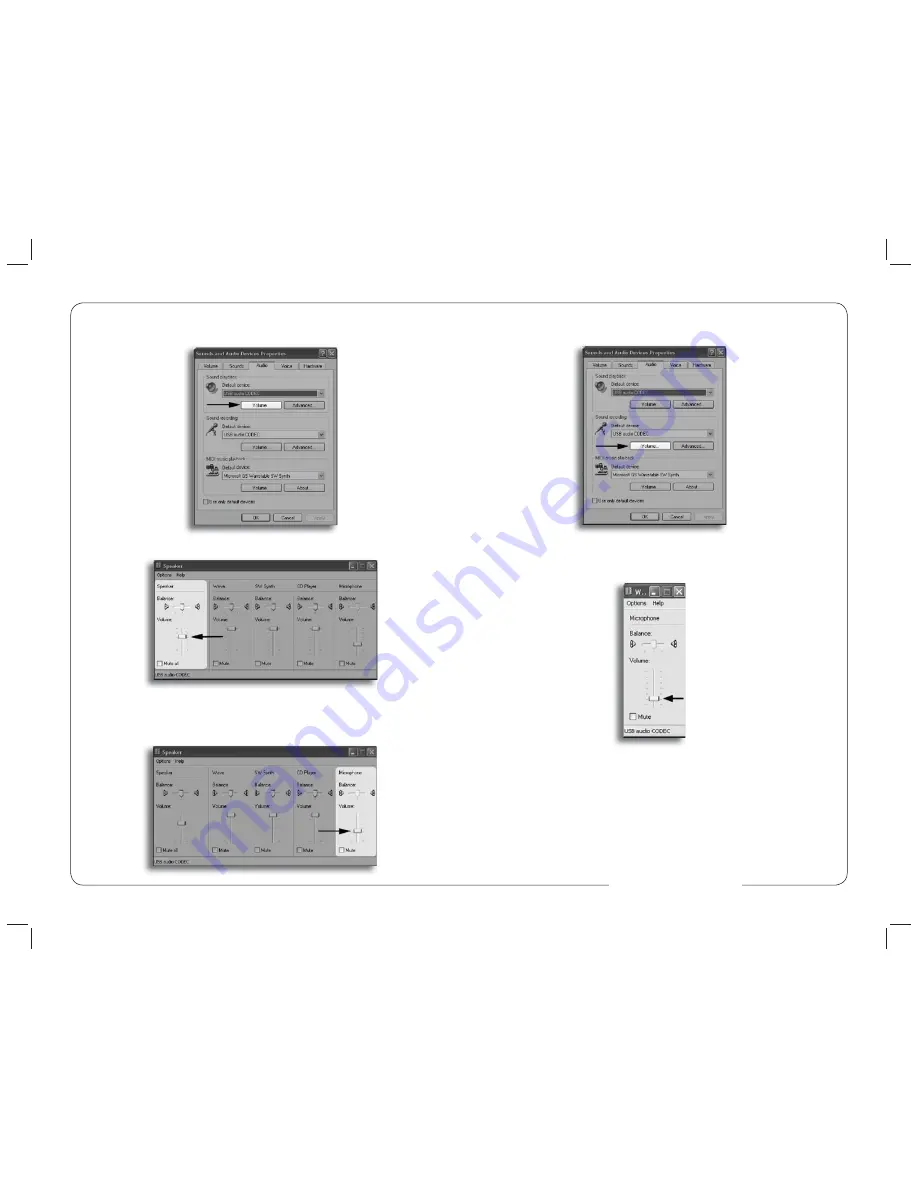
. To adjust the volume of the microphone signal that goes to the computer and 

is recorded click on the 

Volume

 button under sound recording.

8

. Adjust the level by moving the 

Microphone

 fader up or down. The gain of 

the microphone is very sensitive. For most applications the gain will be set 
towards the bottom of the fader. 

Your computer is now setup to use the MXL® Studio 1 USB microphone with 
most recording applications. Some applications will require additional settings 
to be changed within the program. Please see your recording software’s manual 
for proper setup.  

4

. To adjust the headphone volume click on the 

Volume

 button under Sound 

playback.  

Figure #5

5

. The master volume can be changed by moving the 

Speaker

 fader up or down.

6. 

To adjust the volume of the microphone signal directly to the headphones 

adjust the 

Microphone

 fader up or down (this does not effect the volume of the 

microphone signal being recorded).

Fi

Fi

Fi

Fi

F

gu

gu

gu

gu

re

 #

5

www.mxl-usb.com

Содержание studio 1

Страница 1: ...t promptly contact the company you purchased it from for assistance The original dated sales receipt will be necessary for any warranty claim Do not send any unit directly to us without prior authorization from our service department Warranty coverage is limited to repair or replacement at our option of the microphone and does not cover incidental damages due to use of this unit nor damage caused ...

Страница 2: ...k you for your purchase of this outstanding MXL microphone A Little Background Information MXL condenser microphones use what is known as a cardioid pickup pattern which is more sensitive to sound waves arriving at the front of the microphone as opposed to those arriving from the sides or rear Unlike other MXL models this microphone benefits from being a USB Universal Serial Bus device meaning thi...

Страница 3: ...ecure the microphone to the desktop stand by screwing the black mounting ring into the microphone s base The microphone should now sit securely in the desktop stand 4 Adjustments can be made to the angle of the microphone by loosening the thumbscrew on the side of the stand adapter 5 At this point attach the end of the USB cable that matches the microphone s connector The other end of the cable wi...

Страница 4: ...SB hub USB hubs have been known to interfere with the performance of various USB devices PLEASE NOTE Audio and video recording can be very taxing to a computer s resources For this reason you should close any and all running applications that are non essential Please take the following steps to get connected If open close your audio recording application You will open it after the 1 microphone is ...

Страница 5: ...anel 2 Double click the Sound icon 3 Select the Playback tab Highlight the speaker icon labeled as USB AUDIO CODEC and click Set Default To make further adjustments to the playback volume double click on the speaker icon labeled USB AUDIO CODEC 8 5 3 Click on the Audio tab and select USB audio CODEC as the default device for Sound playback and Sound Recording www mxl usb com ...

Страница 6: ...crophone with most recording applications Some applications will require additional settings to be changed within the program Please see your recording software s manual for proper setup 4 To adjust the headphone volume click on the Volume button under Sound playback Figure 5 5 The master volume can be changed by moving the Speaker fader up or down 6 To adjust the volume of the microphone signal d...

Отзывы: