background image

RJ-900X series OPERATION MANUAL

Before using

3-59

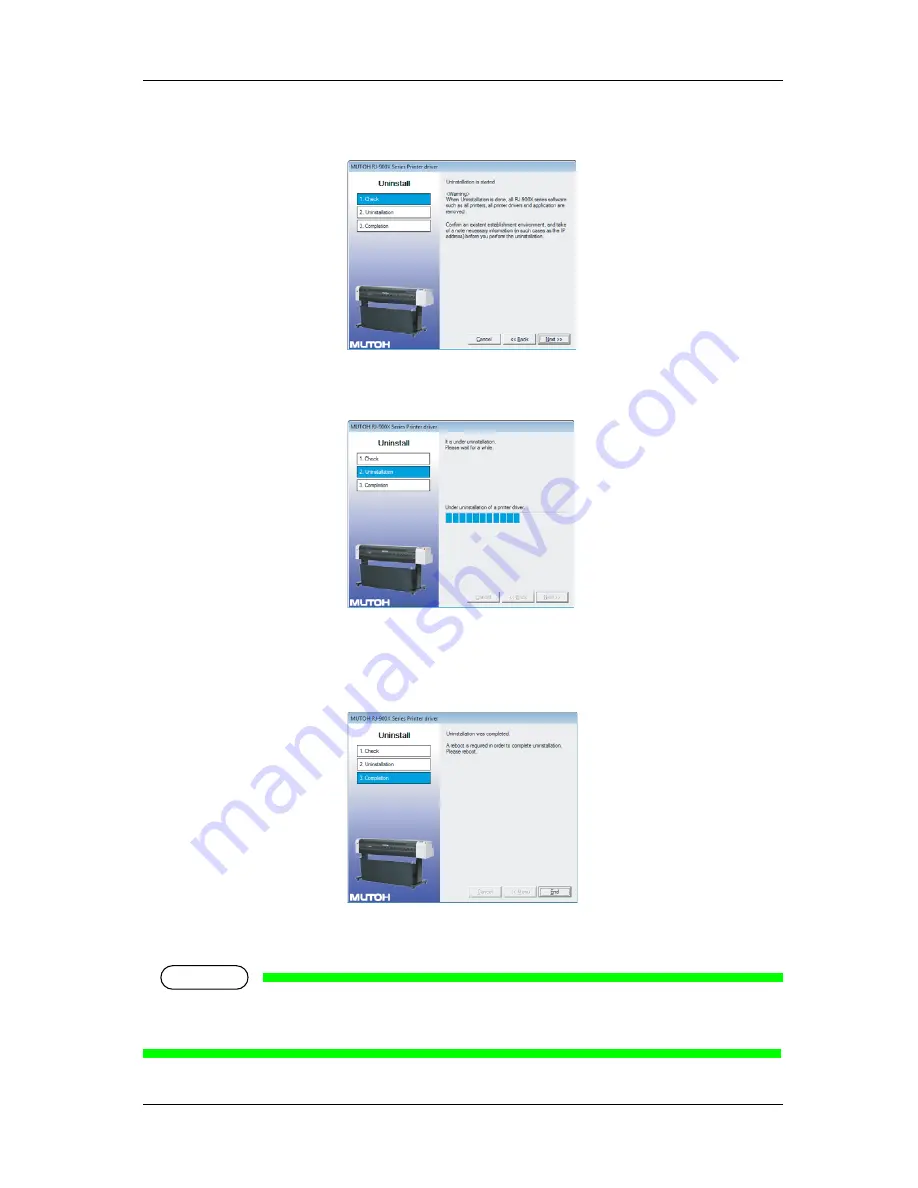
9. Check the precautions before uninstallation, and then click "Next".

Uninstallation starts.

The next screen is displayed.

10. Click "End".

This completes the printer driver installation.

NOTE

• The printer driver is completely deleted from the system after Windows is restarted.When 

upgrading the printer driver, make sure to restart Windows.

Содержание DrafStation RJ-900X

Страница 1: ...OPERATION MANUAL Rev RJ900XE A 02 Full Color Inkjet Printer RJ 901X RJ 900X Read This Manual Before Using The Printer...

Страница 2: ......

Страница 3: ...may cause harmful interference to radio communications Operation of this equipment in a residential area is likely to cause harmful interference in which case the user will be required to correct the...

Страница 4: ...ered trademarks or product names NOTE NOTE No part of this product or publication may be reproduced copied or transmitted in any form or by any means except for personal use without the permission of...

Страница 5: ...ship of the product the seller produced However if the cause of failure is uncertain decide the action after due mutual consultation Details concerning the warranty are written in the warranty certifi...

Страница 6: ...ration NOTE NOTE 1 Safety instructions to 3 Before using must be read before using the printer Read 5 Maintenance through 7 Appendix as necessary Section Description 1 Safety instructions This chapter...

Страница 7: ...s injury may be caused Used for dangerous situations that may cause slight or medium injury or when all or parts of products are damaged It is used for special cautions and for information that needs...

Страница 8: ...RJ 900X series OPERATION MANUAL 6...

Страница 9: ...Product overview 2 1 Features 2 2 2 2 Name of the parts and functions 2 3 2 2 1 Front section RJ 901X 2 3 2 2 2 Front section RJ 900X 2 4 2 2 3 Rear section RJ 901X 2 5 2 2 4 Rear section RJ 900X 2 6...

Страница 10: ...er 3 41 3 7 1 Printer Driver 3 41 3 7 2 Installing the Printer Driver for Network Connection 3 41 3 7 3 Installing the Printer Driver for USB Connection 3 50 3 7 4 Uninstalling the Software 3 56 3 7 5...

Страница 11: ...ode Auto Cleaning 4 48 4 5 1 8 5 Pre printing Mode Auto Cleaning 4 48 4 5 1 8 6 Cleaning Types 4 48 4 5 1 8 7 Spitting Pass Count Menu 4 49 4 5 1 9 Consumption Menu 4 49 4 5 1 10 Cleaning Menu 4 50 4...

Страница 12: ...eshooting 6 12 6 2 Error messages 6 14 6 2 1 Status messages 6 14 6 2 2 Error message display and remedies 6 15 6 2 3 Data error display and remedies 6 16 6 2 4 Command error display and remedies 6 17...

Страница 13: ...er explains about the printer installation warning terms which the operator needs to know caution items and warning labels stuck on the printer main unit WARNING When performing installation and opera...

Страница 14: ...f the following warning terms and follow the contents instructions in this manual Warnings Meaning It is used in cases where if it is not avoided it would lead to dangerous situations where death or s...

Страница 15: ...ning rods Heavy current might flow whenever a lightning strikes Water pipe and faucet The earth might not work if a plastic pipe is connected in the middle of the metal pipe Do not insert or drop meta...

Страница 16: ...n between opening and closing the media cover Do not use volatile solvents such as thinner benzene or alcohol These could damage the paint Be careful that moisture does not enter the printer There is...

Страница 17: ...t an earth wire to the earth connection which meets the following standards Earth terminal of power socket Earth wire with copper plate which is buried at 650 mm or more deep in the ground Set the rol...

Страница 18: ...ng labels be careful about the following points NOTE Check whether all the warning labels can be read If the letters or illustrations on the label are not clear remove the dirt from the label Use clot...

Страница 19: ...label Check whether all operation procedure labels can be read If the letters or illustrations on the label are not clear remove the dirt from the label Use cloth water and neutral detergent for remo...

Страница 20: ...Safety instructions RJ 900X series OPERATION MANUAL 1 8...

Страница 21: ...RJ 900X series OPERATION MANUAL Product overview 2 1 2 Product overview This chapter explains about the features of the printer along with the names and functions of each part...

Страница 22: ...r the black ink which is abundantly used in line drawings Conventional printers had difficulty in achieving affinity for tracing paper bond paper etc This printer achieving this feature and also has i...

Страница 23: ...g are performed 3 Front cover It is the cover for protecting user from coming in contact with the driving mechanism during the printer operation It is opened and closed during Razor blade replacement...

Страница 24: ...y and various function setting are performed 3 Front cover It is the cover for protecting user from coming in contact with the driving mechanism during the printer operation It is opened and closed du...

Страница 25: ...le plug is correctly inserted in the socket 2 Network interface connector It is the connector which connects the network interface cable 3 USB connector It is the connector which connects the USB2 0 1...

Страница 26: ...socket 2 Network interface connector It is the connector which connects the network interface cable 3 USB connector It is the connector which connects the USB2 0 1 1 cable 4 Scroller receiver Scrolle...

Страница 27: ...of each operation key and status display along with the functions are explained TIP For details on the operation method of operation panel refer to the followings When performing menu setting from ope...

Страница 28: ...le of subsequent receiving data is ignored Ink dry timer wait Ink dry timer wait is canceled and the media is discharged Returns to the previous menu hierarchy Change in the setup value becomes invali...

Страница 29: ...mp Green Lamp ON Media is set to sheet media Lamp OFF Media is set to roll media 13 Color lamp Green Lamp ON Color mode is set to Color Lamp OFF Color mode is set to Monochrome 14 Black white lamp Gre...

Страница 30: ...Error requiring a restart 2 2 6 Indicator Display In the following situations Indicator is displayed to show the conditions of ink and cartridges on LDC display In the normal operation 2 3 1 Normal Du...

Страница 31: ...dicator display No Indicator to display the conditions of ink cartridges 1 80 to 100 of ink remaining 2 60 to 80 of ink remaining 3 40 to 60 of ink remaining 4 20 to 40 of ink remaining 5 Less than 20...

Страница 32: ...p pertaining to printing can be done on the operation panel Although the essential setting for normal printing is performed on printer driver or application the same setting can also be performed from...

Страница 33: ...of the following operation is done the operation panel shifts to Normal display Menu key on operation panel is pressed In the Setup menu leave the keys untouched for three minutes NOTE For details on...

Страница 34: ...Product overview RJ 900X series OPERATION MANUAL 2 14...

Страница 35: ...RJ 900X series OPERATION MANUAL Before using 3 1 3 Before using This chapter explains the steps of basic installation before using the printer...

Страница 36: ...ention to the following points while handling power cable Do not do anything forcefully on the power cable Do not keep heavy objects on the power cable Do not bend twist or pull the power cable by for...

Страница 37: ...the power socket AC 100 V 120 V or AC 220 V 240 V Do not use complex multiple plugs on the same socket This could generate heat and might cause fire Make sure to use dedicated power socket with earth...

Страница 38: ...he power socket for safety Make sure to connect an earth wire to the earth connection which meets the following standards Earth terminal of power socket Earth wire with copper plate which is buried at...

Страница 39: ...e Power key on Operation panel to turn ON the printer The Power lamp on Operation panel lights up in blue The printer starts the initial operation When the initial operation is complete the printer en...

Страница 40: ...turn OFF the printer 3 The Power lamp on Operation panel is turned off NOTE If Operation panel is in the following status the power is ON The Power key is pressed in The Power lamp lights up Press th...

Страница 41: ...d on Operation panel and the printer may stop operating If operation stops refer to 6 Troubleshooting and deal with the problem After turning OFF the printer wait for ten seconds or longer to turn it...

Страница 42: ...manufacturer product This printer has been adjusted for use of genuine ink cartridges In case of using ink cartridge which is not a product of the original manufacturer Printing might become blurred...

Страница 43: ...ink cartridge firmly to the end of the slot Install all four colors of ink cartridge The slot for the ink cartridge is specified for the color of the ink cartridge Match the color marked by the side...

Страница 44: ...After ink replenishment is completed the operation panel displays Paper End NOTE If the printer is used just after initial filling completion the following phenomena may occur Printed line becomes bl...

Страница 45: ...ler enclosed in this printer for roll media loading NOTE It is possible to load the following roll media in the scroller enclosed in this printer RJ 901X two inches diameter media tube outer diameter...

Страница 46: ...maged 1 When using roll media of three inch diameter media tube the optional three inch attachment should be used to the movable flange and fixed flange 2 Set the roll media in the scroller so that th...

Страница 47: ...ge is on the ink cartridge slot side NOTE The roll media fixing belt provided with the optional scroller prevents the roll media from getting loosen when the roll media in the printer is not used Put...

Страница 48: ...Before using RJ 900X series OPERATION MANUAL 3 14 No Name 1 Roll media 2 Roll media fixing belt 2 1...

Страница 49: ...ut tray in the direction in which the media is delivered For using media eject tray refer to 4 3 Media eject tray setting 1 Turn ON the power of the printer CAUTION Do not operate media loading lever...

Страница 50: ...l is pressed and Roll is selected Roll media lamp lights up NOTE If Sheet is selected in the operation panel when loading the roll media the media will not be correctly loaded 3 Push the media loading...

Страница 51: ...en perform loading after properly winding the media If it is not straight when loading the new roll media cut the front edge of the roll media For roll media cutting method refer to 4 6 3 Cut media 5...

Страница 52: ...and slant of the media NOTE Confirm that the right edge of the roll media do not go over right gets beyond the loading mark There is a possibility that the print quality gets affected Do not match the...

Страница 53: ...e front edge of the roll media For roll media cutting method refer to 4 6 3 Cut media If the length of the edge to be cut is set on the media setup menu the roll media edge is automatically cut after...

Страница 54: ...rinter RJ 901X Media width A4 size to A1 plus size 210 mm to 610 mm Media length Maximum 1200 mm RJ 900X Media width A4 size to A0 plus size 210 mm to 1080 mm Media length Maximum 1600 mm Set the shee...

Страница 55: ...age portion and the pressurizing roller portion touch each other there is a possibility that the printer may break down Printer initializes Operation panel displays Paper End 2 Press the Back key of o...

Страница 56: ...efore using RJ 900X series OPERATION MANUAL 3 22 3 Push the media loading lever backward Operation panel displays Lever Up 4 Open the front cover No Name 1 Media loading lever No Name 1 Front cover 1...

Страница 57: ...ark and align the front edge to step of the platen respectively NOTE If the sheet media right end shifts either to the right or the left from the loading mark it would become as media loading error wi...

Страница 58: ...7 Pull the media loading lever forward 8 Close the front cover Operation panel displays Media type setup menu TIP To change the media type follow 3 4 5 Setting media type and set the media type No Nam...

Страница 59: ...arms This may prevent getting creases Follow the procedure below to release Pressure arms 1 Raise Media loading lever 2 Push the release switches of Pressure arms further in that are holding the side...

Страница 60: ...elease NOTE The media may still get creases even when more Pressure arms are released 3 4 5 Setting media type Setting of media type is explained Set the media type as shown in the following procedure...

Страница 61: ...d Operation panel displays Media Checking and media initial operation starts NOTE If the following operations are performed on the media type setup menu the printer shifts to the media initial operati...

Страница 62: ...g the roll media wind back the roll media tightening with the scroller and the media slackness is tightened 7 To use Media ejection tray you have to set it first 4 3 Media eject tray setting This comp...

Страница 63: ...ON and more than A3 size of roll media or sheet media is loaded 3 4 2 Loading roll media 3 4 3 Loading sheet media 2 Confirm that the printer functions normally 3 Press the Menu key on the operation...

Страница 64: ...key on the operation panel and select the item to print from the followings and press the Enter key Setup Print NozzleCheck Palette Print Maintenance 6 Start Printing for the selected item TIP Please...

Страница 65: ...RATION MANUAL Before using 3 31 3 5 1 Setup Print It is used for checking the setup item of the current printer NOTE Keep the printed setup print at hand TIP Refer to the following for printing proced...

Страница 66: ...there is any clogging head missing or blurred prints NOTE If the nozzle check result indicates that the checked points are blurred or missing clean the head 5 2 3 Head cleaning Perform the nozzle chec...

Страница 67: ...RJ 900X series OPERATION MANUAL Before using 3 33 3 5 3 Palette Print Palette printing is performed as a color demonstration TIP Refer to the following for printing procedure 3 5 TestPrint...

Страница 68: ...ive denoting the residual life is 100 As the parts life is getting nearer the number of marks decreases one by one 20 When all marks disappear the parts life has ended Replace parts referring to the f...

Страница 69: ...memory of size as large as possible 3 6 2 Selecting cables The printer is equipped with network interface and USB interface for connecting with the PC Network interface cable and USB cable are require...

Страница 70: ...to your PC as shown in the following procedure 1 Turn OFF both printer and PC 2 Insert the network interface cable connector into the network interface connector located on the back of the printer 3 P...

Страница 71: ...he USB cable The procedure of USB cable connection is explained Connect the printer to your PC as shown in the following procedure NOTE Do not connect USB cable before installing the printer driver It...

Страница 72: ...your PC This printer supports USB 2 0 If the connection is made in the following environments the speed may decrease to the level measured in USB 1 1 When your PC does not support USB 2 0 When a USB h...

Страница 73: ...y on Operation panel to change the display to the Setting menu Menu Test Print is displayed on Operation panel 3 Press the key or key on Operation panel to display the Network menu Menu Network is dis...

Страница 74: ...t The settings are saved in the 4th segment and the display returns to the previous menu NOTE Be sure to set the IP address after consulting the network administrator Allocate the IP addresses that do...

Страница 75: ...network connection 3 7 2 Installing the Printer Driver for Network Connection For USB connection 3 7 3 Installing the Printer Driver for USB Connection TIP For the latest information on the functions...

Страница 76: ...rinter driver with the user account that has the administrator authority 4 Ensure that the computer has started up correctly and insert the CD ROM on which Drivers and Manuals CD ROM is written into t...

Страница 77: ...nter Driver 7 If the confirmation message for executing the program is displayed click Run 8 If the following message is displayed due to the setting for user account control click Yes NOTE If you cli...

Страница 78: ...900X series OPERATION MANUAL 3 44 9 Select the printer model you want to use and then click Install NOTE If you click Cancel printer driver installation is cancelled 10 Select Install the driver and...

Страница 79: ...lick I agree Go to the next screen b When disagreeing with the contents Click Cancel Installing the printer driver is cancelled Go to the next screen 12 Click Network a When installing the printer dri...

Страница 80: ...ess set for the printer Example 192 168 1 1 NOTE For the IP address set for the printer refer to Network Setting Menu 4 5 1 7 Network Menu Proceed to step 15 14 The output ports that were installed in...

Страница 81: ...47 b To add a new port 1 Click Add a port 2 Select MUTOH Network Port and then click New port Proceed to step 13 15 Set the printer name and then click Next If you do not need to change the printer n...

Страница 82: ...problem click Next Installing the printer driver starts 17 While installing the driver Windows security warning may be displayed If it is displayed click Install Once the printer driver has been insta...

Страница 83: ...RJ 900X series OPERATION MANUAL Before using 3 49 NOTE If you click Menu the first screen of the installer is displayed...

Страница 84: ...le first by mistake check 6 1 1 1 If you have connected using the USB cable before installing the driver 2 Turn the computer ON 3 Ensure that the computer has started up correctly and insert the CD RO...

Страница 85: ...r executing the program is displayed click Run 7 If the following message is displayed by setting the User Account Control click Yes NOTE If you click No printer driver installation is cancelled Go to...

Страница 86: ...ation is cancelled 9 Select Installing driver and then click Next Go to the next screen 10 Printer Driver License Agreement is displayed a When agreeing with the contents Click Agrees Go to the next s...

Страница 87: ...to be installed are displayed Check the displayed content and if there is no problem click Next 13 During installation if the Windows security warning is displayed click Install 14 Installer is in th...

Страница 88: ...connected the USB cable first by mistake check 6 1 1 1 If you have connected using the USB cable before installing the driver If the printer has not been fully prepared click Connect later Installing...

Страница 89: ...click Next b Select Install the software automatically and then click Next Once the printer driver has been installed the following screen is displayed 16 Click End This completes the printer driver...

Страница 90: ...re save the current print settings a Start the printer driver b On the Option tab of the printer setting click Save the setting parameters and then create a setting file NOTE Saved print settings are...

Страница 91: ...RJ 900X series OPERATION MANUAL Before using 3 57 4 Click the language you want to use 5 Click Install the printer driver 6 If the confirmation message for executing the program is displayed click Run...

Страница 92: ...ng message is displayed due to the setting for user account control click Yes NOTE If you click No printer driver installation is cancelled Go to the next screen 8 Click Uninstall NOTE If you click Ca...

Страница 93: ...lation and then click Next Uninstallation starts The next screen is displayed 10 Click End This completes the printer driver installation NOTE The printer driver is completely deleted from the system...

Страница 94: ...ngs that you use often as the default print setting for application software 1 From the category of Control Panel select Display devices and printers TIP If displayed with icons select Devices and Pri...

Страница 95: ...RJ 900X series OPERATION MANUAL Before using 3 61 3 Change the settings as required and then click OK...

Страница 96: ...dvanced settings Direction Prtint Dscharge direction Always prioritize the driver Basic settings Advanced settings Effect Effect Always prioritize the driver Basic settings Advanced settings Ink amoun...

Страница 97: ...sions Margin decision Depending on the setting When the computer memory is set the driver is prioritized Scales Scales Always prioritize the driver Option Mirror Mirror Always prioritize the driver Op...

Страница 98: ...o print using the LPR port follow the procedure below to add an LPR port 1 For Windows 7 Windows 8 1 Select Start Control Panel Control Panel is displayed 2 Select Programs Programs is displayed 3 Sel...

Страница 99: ...or in Print and Document Service and then click OK 5 Set the LPR port as follows Server name or IP address that provides LPD Enter the IP address that is allocated to the printer Printer name or print...

Страница 100: ...2 For Windows Vista 1 Select Start Control Panel Control Panel is displayed 2 Select Programs Programs is displayed 3 Select Turn Windows features on or off Windows Features is displayed 4 Check LPR...

Страница 101: ...hat provides LPD Enter the IP address that is allocated to the printer Printer name or print queue of the server MLP1 in single byte uppercase alphanumeric letters 3 For Windows XP 1 Select Start Cont...

Страница 102: ...ies OPERATION MANUAL 3 68 3 Select Add Remove Windows Components Windows Components Wizard is displayed 4 Check Other Network File and Print Services and the select Details Other Network File and Prin...

Страница 103: ...d then click OK Installing the LPR port starts 6 Click Finish 7 Set the LPR port as follows Server name or IP address that provides LPD Enter the IP address that is allocated to the printer Printer na...

Страница 104: ...Before using RJ 900X series OPERATION MANUAL 3 70...

Страница 105: ...RJ 900X series OPERATION MANUAL Handling the printer 4 1 4 Handling the printer This chapter explains how to handle the printer...

Страница 106: ...cover is opened printing will be interrupted When the front cover is closed the printer restarts printing but high printing quality is not assured 1 Create print data Create print data with applicatio...

Страница 107: ...r NOTE If failures or malfunctions of the printer occur by using media that is not dedicated media The printer will not be covered by the warranty and repair expenses will be paid by the customer For...

Страница 108: ...on print side can cause blurs and blots Do not touch the print side Moisture and oil on your hands may affect the printing quality Do not leave media for a long time with media set Some media has a te...

Страница 109: ...media a c b d Printable Area Media feeding direction Normal a 3mm b 3mm c 3mm d 3mm Type1 a 25mm b 5mm c 5mm d 5mm Type2 a 5mm b 5mm c 5mm d 5mm Margin Setting Printer Driver a c b d Normal a 3mm b 3...

Страница 110: ...you to avoid the head rub Follow the procedure below to change the head height NOTE If the head height adjustment lever is raised the high printing quality will not be guaranteed Do not open the fron...

Страница 111: ...ERATION MANUAL Handling the printer 4 7 2 Change the head height by moving the head height adjustment lever orange 3 Shut the front cover No Name 1 Head height adjustment lever No Name 1 Front cover 1...

Страница 112: ...ng The setting procedure of media eject tray optional is described The media eject tray supplied with the dedicated stand can be used to eject media smoothly by preventing the printed media from spott...

Страница 113: ...ter driver refer to the attached help file The file will be displayed by clicking HELP on the printer driver setup screen 4 4 2 Printer driver setup items The printer driver setup items are described...

Страница 114: ...rinter 2 Setting information display box Displays the information set for each item 3 Printing direction setting You can make settings for the printing direction 4 Media setting Make the following med...

Страница 115: ...condition list If you save the data with a new printing condition name the new printing condition is added to the list 5 Print quality You can make settings for the printing quality 6 Color correction...

Страница 116: ...ings for the joined printing function 5 Mirror Make settings for the mirror function 6 Copy count Set the number of copies 7 Data rasterizing by computer Make the settings for eliminating the memory s...

Страница 117: ...saves and initializes the settings No Name Description 1 Load Recalls all settings from the specified file MTP 2 Save Saves the current settings as a file MTP 3 Version Displays the version informatio...

Страница 118: ...d nozzle check No Name Description 1 Head Cleaning Performs head cleaning 5 2 3 Head cleaning 2 Nozzle Check Performs nozzle check printing 3 5 2 NozzleCheck 3 Setup Print Setup list printing is perfo...

Страница 119: ...up item Description Testprint Menu Test print can be performed MediaSet Menu Various settings on printing media can be set Command Menu Various condition setup of printer command is performed PenSetup...

Страница 120: ...Media jams Favorable printing quality cannot be obtained due to blots blurs and dirt of ink End detection of roll media cannot be performed etc The problems caused by the use of user media will not be...

Страница 121: ...o detect the media size Vert Set when fixed form sheet media are set vertically Hori Set when fixed form sheet media are set horizontally TIP If you are using a cut sheet media other than the dedicate...

Страница 122: ...set to 0 mm media margin is 3 mm ManageRoll Invalid Management of remaining quantity of roll media is not performed Roll1 Remaining quantity of roll media is set It can be set within the range of 0 m...

Страница 123: ...the print head nozzles Since only the half of the print head nozzles are used printing speed becomes a half of Wave Set up this menu to improve the print quality compared with Fine Fuzz If used when...

Страница 124: ...gth and measured distance of the data as the set values 4 5 1 2 3 Media Feed Compensation Menu Initial Change Confirm Print Micro Print Micro Change AdjustPrint Pattern A Performs accuracy adjustment...

Страница 125: ...The printing joint will shade off as the wave form Performs the printing at slower speed than Wave Fine Fog The printing joint will shade off Set this when there is horizontal unevenness in Fine Fuzz...

Страница 126: ...cally cuts the media after printing OFF The media is not cut after printing Off CutMethod 2steps Lo 1 Sets the media cut method when using the roll media 2steps Cuts the media twice Hi Lo Changes the...

Страница 127: ...el Operation panel shifts to the Setup menu display b Press the key on Operation panel Menu Media Set is displayed on Operation panel c Press the Enter key on Operation panel Type Coated Media is disp...

Страница 128: ...dia feed compensation improves To change the feeding length press the key or key on Operation panel to change the set value b Press the Enter key on Operation panel Printing is displayed on Operation...

Страница 129: ...e Press the Enter key on Operation panel The initial adjustment value is saved PF Adjust Initial Change is displayed on Operation panel 5 Performs Confirm Print a Press the key or key on Operation pan...

Страница 130: ...r the confirmation adjustment printing the media is cut 4 6 3 Cut media 6 Measure the distance between the two pluses in the confirmation adjustment print using a ruler Then confirm that the distance...

Страница 131: ...nel in the same way as in Step 1 b Press the key or key on Operation panel to select PF Adjust Micro Print c Press the Enter key on Operation panel Printing is displayed on Operation panel Starts micr...

Страница 132: ...e according to the printing result in Step 7 The optimum adjusted value has the least white lines or overlapping images Use the number on the top left of the printing result as the adjusted value 0 in...

Страница 133: ...a necessary adjust pattern Media type setting Color setting Print Mode Pattern A Pattern B Pattern C MonoTrac Common to monochrome and color High speed Standard High quality Col Trac Common to monoch...

Страница 134: ...Setup menu display b Press the key on Operation panel Menu Media Set is displayed on Operation panel c Press the Enter key on Operation panel Type Coated Media is displayed on Operation panel d Press...

Страница 135: ...s Adjust pattern A Pattern B Prints Adjust pattern B Pattern C Prints Adjust pattern C Initialization Initializes the adjusted value for the selected item 4 5 1 2 5 Initializing Adjust Print 4 Press t...

Страница 136: ...the selected head height differs from the actual height a message to change the head height is displayed Printing starts after the head height has been changed 4 2 5 Head height adjustment 7 Check the...

Страница 137: ...ng the printer 4 33 8 Press the key or key on Operation panel and enter the number selected in step 7 9 Press the Enter key on Operation panel To print other patterns repeat the procedure from step 1...

Страница 138: ...nel Menu Media Set is displayed on Operation panel c Press the Enter key on Operation panel Type Coated Media is displayed on Operation panel d Press the key or key on Operation panel to select the me...

Страница 139: ...y on Operation panel Init Pattern A is displayed on Operation panel 4 Press the key or key on Operation panel to select the pattern to initialize Head Height Low is displayed on Operation panel 5 Pres...

Страница 140: ...0X series OPERATION MANUAL 4 36 6 Press the Enter key on Operation panel Initializes the selected adjusted value To initialize other adjusted values repeat the procedure from step 1 This completes adj...

Страница 141: ...printing is set 0 010 mm Position P1 The initial print position on printing is set P1 Initial point of scaling LL Bottom left point of hard clip Full Bottom left point of media LL Full Terminator Norm...

Страница 142: ...white set the color mode of the panel to Monochrome the pen tone to Effective and each pen tone to 100 Setup item Setting value Description PenPrior Panel For pen setup width color tone it specifies...

Страница 143: ...mm Pen3 0 18 mm Pen4 0 25 mm Pen5 0 35 mm Pen6 0 50 mm Pen7 to Pen15 0 25 mm Pen0Color to Pen15Color 0 1 2 3 4 5 to 255 when color is set Pen color line color to pen number of print data received from...

Страница 144: ...ordinate origin and page size specified command decide which media size can hold the data from the max value MAX and minimum value MIN of real data and place the data with fitting the center of area i...

Страница 145: ...lowing example example When the data is received in order of 1 A3 2 A2 3 A3 layout as shown in the right drawing Actual printing is performed in order of 2 A2 1 3 A3 data When the Layout item is set t...

Страница 146: ...0 Scaled or trimmed factor of print data is set NOTE If raster data including extremely thin line is printed by changing the scale the data might not be printed properly In this case print it by setti...

Страница 147: ...255 255 255 225 IP address of the printer is set SubnetMask 0 0 0 0 to 255 255 255 0 to 255 255 255 225 Subnet mask of the printer is set Gateway 0 0 0 0 to 192 168 1 254 to 255 255 255 225 IP address...

Страница 148: ...setup item is always displayed OFF AlwaysOFF ErrorDisplay On The display method to the operation panel when the slight error has occurred is set Off Initial Yes The setting is returned to default Whe...

Страница 149: ...to cleaning during printing 4 5 1 8 4 Printing Mode Auto Cleaning Before Printing Make the setting for auto cleaning before printing 4 5 1 8 5 Pre printing Mode Auto Cleaning Printing Time Before Prin...

Страница 150: ...Use Take up unit NOTE If Take up unit is set to ON the printer operation complies with Take up unit On Ink Capacity K C M Y 110ml Make settings for the ink amount per color K C M Y Make the setting b...

Страница 151: ...ings of the Command Menu is returned to factory default No Pen Yes The settings of the PenSetup Menu is returned to factory default No Layout Yes The settings of the Layout Menu is returned to factory...

Страница 152: ...eaning during printing 0 min Auto cleaning is not performed Other Set the time and then proceed to the next setting item 4 5 1 8 6 Cleaning Types Setup item Setting value Description Before printing O...

Страница 153: ...o the ink residual quantity is not correctly detected and the printing cannot be done Do not keep using the parts which have reached the lifespan without changing The problems caused by doing so will...

Страница 154: ...wing for operation procedures 5 2 3 Head cleaning Setup item Description Short Discharges smaller amount of ink compared to Normal Normal Select this mode normally Long Used when Print head does not i...

Страница 155: ...st Print is displayed on Operation panel Operation panel shifts to the Setup menu display 3 Press the key or key on Operation panel to select a setup item and press the Enter key The settings will be...

Страница 156: ...panel Press the key or key on Operation panel to change the set value 5 To save the changed set value press the Enter key on Operation panel The set value is saved and the next setting item is display...

Страница 157: ...N MANUAL Handling the printer 4 53 6 Press the Menu key or Cancel key on Operation panel to exit from the setup The previous setup menu is displayed When the main menu is displayed the screen returns...

Страница 158: ...ng to the following procedure feed media NOTE When sheet media is set even if the Forward feed key or Backward feed key on the operation panel is pressed media feed cannot be performed 1 Check that th...

Страница 159: ...tically after printing Roll media can be cut at any position According to the following procedure cut roll media 1 Check that the operation panel is Normal 2 Check that the media loading lever is retu...

Страница 160: ...If it is not straight when loading the new roll media cut the front edge of the roll media If Cut length at the top in 4 5 1 2 MediaSet Menu is set the media is cut at the length that was set at the m...

Страница 161: ...n the printer driver is given priority over the setting set from Operation panel For setting the printer driver refer to 4 4 Setting the printer driver TIP For details of print mode refer to 7 1 2 Pri...

Страница 162: ...ou can change the set value for media feed compensation Follow the procedure below to change the set value for media feed compensation 1 Confirm that the printer is in one of the following conditions...

Страница 163: ...saved during operation be sure to select Backup to save the setting that you have changed If the printer returns to the Normal condition without Backup being selected the changed setting is not saved...

Страница 164: ...the procedure below to pause or restart printing NOTE If the printing is paused the print quality can not be guaranteed 1 Check that the printer is in operation 2 Press the key on Operation panel The...

Страница 165: ...RJ 900X series OPERATION MANUAL Maintenance 5 1 5 Maintenance This chapter describes the daily maintenance of the product...

Страница 166: ...tridge for replacement b If the operation panel displays Ink End This message will be displayed when the ink in the ink cartridge runs out You can check which cartridge needs replacing with the indica...

Страница 167: ...by the customer 3 Replacing steps Replace ink cartridges in accordance with the following steps CAUTION While handling ink cartridges be careful that the ink does not come into contact with your eyes...

Страница 168: ...ge at the time of replacement only Inserting or removing the ink cartridge except at the time of replacement may result in incorrect printing 1 Check that the power to the printer is turned ON 3 2 1 T...

Страница 169: ...g it to the printer 4 Attach the new ink cartridge 5 Check that the operation panel returns to Normal NOTE The printer restarts printing when replacing ink cartridges during printing 5 1 2 Replacing r...

Страница 170: ...ith the following steps 1 When the power of the printer is turned ON check that the operation such as printing is not performed CAUTION Be careful to see that fingers are not caught in between opening...

Страница 171: ...MANUAL Maintenance 5 7 3 Lift both end of the scroller and manually rewind the roll media 4 Remove the scroller from the printer and place it on a horizontal place No Name 1 Roll media 2 Scroller No...

Страница 172: ...ovable flange side by dropping it to the floor Doing so may damage the left end of the scroller due to the shock 6 Remove roll media from the scroller 7 For loading other roll media follow the instruc...

Страница 173: ...RJ 900X series OPERATION MANUAL Maintenance 5 9 8 When you do not set roll media attach the movable flange to the scroller to set the scroller to the printer No Name 1 Scroller 2 Movable flange 2 1...

Страница 174: ...a displays Paper Cut Error on the operation panel b If fuzz etc appears on the cut section 2 Type Our genuine razor blade that can be used for the prrnter is as follows 3 Replacing steps Replace razor...

Страница 175: ...ect Menu Utility Utility menu is displayed 4 Press the key or key on Operation panel to select Replace Cutter and press the Enter key Cutter replacement menu is displayed 5 Press the key or key on Ope...

Страница 176: ...er change position result in a head clogging 7 Gently push the knob of the cutter and rotate cutter holder lever to the illustrated direction simultaneously NOTE Do not strongly press or suddenly rele...

Страница 177: ...the razor blade with hard objects or do not drop the razor blade There is a possibility that razor blade edge may become blunt or get chipped off NOTE Used cutter should be put in a vinyl bag etc and...

Страница 178: ...ly NOTE Do not strongly press or suddenly release the cutter knob Spring is inserted in the cutter holder so razor blade may spring out Do not push the cutter holder to the end Razor blade may damage...

Страница 179: ...MANUAL Maintenance 5 15 11 Shut the front cover 12 Press the Enter key on the operation panel Carriage section returns to the original position This completes the replacing procedure of the razor blad...

Страница 180: ...inting operation continues Prepare a waste fluid box for replacement before the waste fluid box is full b If FullWasteInkTank is displayed on the operation panel The waste fluid box is full Printing o...

Страница 181: ...ration panel NOTE Used waste fluid box should be put in a vinyl bag etc and dispose of it in compliance with local ordinance and instructions of local authorities 3 Install a new waste fluid box to th...

Страница 182: ...5 18 5 Select Exchange Tank Yes and press the Enter key on the operation panel NOTE If the waste fluid box is not replaced press the Enter key on the operation panel with Exchange Tank No displayed T...

Страница 183: ...onges when replacing the ink cartridge K 2 Type Flushing box sponges are included in the following ink cartridges 3 Replacing steps Follow the steps below to replace Flushing box sponges NOTE During t...

Страница 184: ...key Utility menu is displayed 4 Press the key or key on Operation panel to select Replace Cutter Cutter replacement menu is displayed 5 Press the key or key on Operation panel to select Replace Cutter...

Страница 185: ...he Flushing box sponge holder Then remove Flushing box sponge holder NOTE Used Flushing box sponge should be put in a plastic bag etc and disposed in compliance with local ordinance or instructions fr...

Страница 186: ...new Flushing box sponge holder to each Flushing box NOTE Make sure you put Flushing box sponge holder until it clicks in place Doing so may damage Print head 9 Close Front cover No Name 1 Flushing box...

Страница 187: ...RJ 900X series OPERATION MANUAL Maintenance 5 23 10 Press the Enter key on Operation panel Print head returns to its original position Flushing box sponge replacement is completed...

Страница 188: ...the electric socket and contact MUTOH local dealer CAUTION Be sure to turn OFF the power and disconnect the power plug when cleaning the printer Do not use volatile solvents such as thinner benzene o...

Страница 189: ...n inside the printer according to the following steps 1 Open the front cover 2 For pressurizing roller remove paper powder and dust using a soft brush NOTE Do not blow paper powder inside the printer...

Страница 190: ...oard wipe out paper powder and ink using a damp and tightly squeezed soft cloth 4 For grid roller wipe off the dirt of the unpainted silver color area of the center section with damp and tightly squee...

Страница 191: ...l 2 Check that the media loading lever is returned to the front side 3 Press the Cleaning key on the operation panel for at least 2 seconds Cleaning minutes is displayed on the operation panel Start h...

Страница 192: ...nted media after Head cleaning 2 Cleaning procedures Follow the procedure below to clean Cleaning wiper NOTE Use a non woven cloth commercial product to clean Cleaning wiper Other material of cloth ma...

Страница 193: ...ect Menu Utility and press the Enter key Utility menu is displayed 4 Press the key or key on Operation panel to select Replace Cutter Cutter replacement menu is displayed 5 Press the key or key on Ope...

Страница 194: ...utter After Replacing Cutter ENTER is displayed on Operation panel CAUTION When cleaning Cleaning wiper Do not touch Cleaning wiper and Head cap unit Head cleaning may not be performed correctly becau...

Страница 195: ...g wiper a Front side of Cleaning wiper Remove the ink and dust in the horizontal direction b Back side of Cleaning wiper Remove the ink and dust in the upper direction No Name 1 Cleaning wiper 2 Polyn...

Страница 196: ...nce RJ 900X series OPERATION MANUAL 5 32 8 Close Front cover 9 Press the Enter key on Operation panel Print head returns to its original position This completes cleaning Cleaning wiper No Name 1 Front...

Страница 197: ...lity that ink inside the printer may leak Moreover normal operation after shifting to these positions cannot be guaranteed 1 Pre transfer steps When using a dedicated stand transfer the printer follow...

Страница 198: ...cables NOTE Casters supplied with the dedicated stand are manufactured for a small transfer on the plain area in the room which is different from the casters of transporting equipment When moving the...

Страница 199: ...er transferring the printer to the installation place attach the printer 3 Check the butterfly bolts 2 fixing the stand and the printer are not loosen when using a dedicated stand 4 Attach cables such...

Страница 200: ...nt of purchase 1 Pre transport procedure 1 Turn ON the power of the printer 3 2 1 Turning the power ON 2 Confirm that the printer functions normally 3 Remove all ink cartridges 4 Turn OFF the power to...

Страница 201: ...ve the printer from the stand Installation manual 11 Repack the printer 2 Post transport procedure 1 Perform unpacking assembling and setting the printer Installation manual 2 Set the printer in an av...

Страница 202: ...Maintenance RJ 900X series OPERATION MANUAL 5 38...

Страница 203: ...ooting 6 1 6 Troubleshooting This chapter describes possible troubles during the use of this product and countermeasures If the error not included in any items of this section occurs refer to 6 2 Erro...

Страница 204: ...s 3 3 Installing ink cartridges 3 Is the waste fluid box fully inserted Fully insert the waste fluid box 5 1 4 Replacin g waste fluid box No Possible cause Remedy Reference 1 Is ink cartridge cool and...

Страница 205: ...eference 1 Are printers added Install the printer driver again 3 7 Installing Unistalling Printer Driver 2 Does the CD ROM file name contain INF Correctly specify the CD ROM or the drive which contain...

Страница 206: ...the USB cable before installing the driver 1 For Windows XP Vista 1 If Found new hardware wizard is displayed click Cancel 2 Turn the printer OFF 3 Remove the USB cable 4 Follow the procedure from the...

Страница 207: ...n NOTE Select Connect it later in the step 14 of 3 7 3 Installing the Printer Driver for USB Connection 2 Connect the USB cable 3 Turn the printer ON 4 Displays Devices and Printers of Control Panel 5...

Страница 208: ...ooting 3 For Windows 8 1 Displays Devices and Printers of Control Panel 2 Select RJ 900X displayed as an unspecified device and click Remove device 3 Turn the printer OFF 4 Remove the USB cable 5 Foll...

Страница 209: ...n g waste fluid box No Possible cause Remedy Reference 1 The front cover is open or media loading lever is up Shut the front cover Lower the media loading lever 3 4 Media handling 2 Is the media loade...

Страница 210: ...tings with the computer side environment 3 6 1 System requirements 4 Does the Data lamp on the operation panel turn on after sending graphics data from the computer If the Data lamp does not turn on c...

Страница 211: ...per attached to the pressurizing roller Clean the pressurizing roller 5 2 2 Cleanin g inside the printer 5 Is the printer being used in an environment other than the one specified such as in direct su...

Страница 212: ...the media 4 2 2 Caution s on handling media No Possible cause Remedy Reference 1 Are you using the dedicated media Use the dedicated media 4 2 1 Media 2 Is the media loaded at an angle Set the media s...

Страница 213: ...or float Use the dedicated media If media that is not dedicated is used set the following items in the MediaSet Menu Media Stiffness 4 2 1 Media 4 5 1 2 Media Set Menu No Possible cause Remedy Referen...

Страница 214: ...tiffness 4 2 1 Media 4 5 1 2 Media Set Menu No Possible cause Remedy Reference 1 Is the loading position of the media correct Set the media correctly 5 1 2 Replacin g roll media 3 4 3 Loading sheet me...

Страница 215: ...Set the scroller correctly 3 4 1 Roll media loading 3 Is the nozzle in good condition Perform head cleaning 5 2 3 Head cleaning No Possible cause Remedy Reference 1 Is the ink cartridge within the val...

Страница 216: ...zing data displays a port no 5 Printing Under printing 6 Cleaning minutes Cleaning the head Please wait a while 5 2 3 Head cleaning 7 Ink Refill min Filling the ink Please wait a while 3 3 Installing...

Страница 217: ...a new roll media 5 1 2 Repla cing roll media 5 End Of Roll The roll media has run out Stops operation Reload a new roll media 5 1 2 Repla cing roll media 6 InkNearEnd Ink is running out Continues ope...

Страница 218: ...the operation panel of the printer and operation stops When the cause of the error is solved the printer starts operating again NOTE in the error message is the code no that indicates what type of err...

Страница 219: ...pears on the operation panel of the printer and operation stops When the cause of the error is solved the printer starts operating NOTE in the error message is the code no that indicates what type of...

Страница 220: ...ed on the operation panel Pressing any key on the operation panel stops the beeping For an error requiring a restart operation will return to normal after removing the cause of the error and restartin...

Страница 221: ...ammed When the set media is jammed remove it according to the following procedure 6 3 1 Roll media 1 Turn OFF the power of the printer 3 2 2 Turning the power OFF 2 Open the front cover 3 Change the h...

Страница 222: ...900X series OPERATION MANUAL 6 20 4 Move the carriage section from the top of the media to the right 5 Push the media loading lever backward No Name 1 Carriage section 2 Roll media No Name 1 Media lo...

Страница 223: ...the scroller and manually rewind the roll media 8 Remove a torn piece of paper if a paper dust or a piece of paper remained inside the printer 9 If errors requiring a restart occur temporarily turn o...

Страница 224: ...22 6 3 2 Sheet media 1 Turn OFF the power of the printer 2 Push the media loading lever backward 3 2 2 Turning the power OFF 3 Remove a sheet media from the media feed slot No Name 1 Media loading le...

Страница 225: ...he front cover and remove a torn piece of paper if a paper dust or a piece of paper remained inside the printer 5 If errors requiring a restart occur temporarily turn off the Power key and then turn i...

Страница 226: ...Troubleshooting RJ 900X series OPERATION MANUAL 6 24...

Страница 227: ...RJ 900X series OPERATION MANUAL Appendix 7 1 7 Appendix This chapter describes each printer specification Options Supply and user support...

Страница 228: ...length Sheet media 1200 mm 1600 mm Roll media 50 m Maximum media width 610 mm 1080 mm Maximum print length Sheet media 1180 mm 1580 mm Roll media 18 m Maximum print width 604 mm 1074 mm Print margin S...

Страница 229: ...re 15 C to 28 C Humidity 40 to 60 No condensation Rate of change Temperature Within 2 C per 1 hour Humidity Within 5 per 1 hour Archiving environment Ink unfilled Temperature 10 C to 60 C Humidity 5 t...

Страница 230: ...Lines Lines PrintReso dpi HS360 360 720 Direction BiDir BiDir UniDir ThinOut Black 100 100 70 InkDryTimer 30s 30s 60s Stiffness Soft Soft Soft Setup item High speed color High speed black white Normal...

Страница 231: ...white High quality Color High quality black white Condition Lines Lines Lines Lines Lines Lines PrintReso dpi 360 720 720 1440 Position specified 1440 1440 Direction BiDir BiDir BiDir BiDir BiDir BiDi...

Страница 232: ...lity Color High quality black white Condition Photo Lines Photo Lines Photo Lines PrintReso dpi 720 720 1440 1440 2880 Position specified 2880 Position specified Direction BiDir BiDir BiDir BiDir BiDi...

Страница 233: ...ce table pin No and signal Item Specification Specification Universal Serial Bus Specifications Revision 2 0 Universal Serial Bus Device Class Definition for Printing Devices Version 1 1 Data format N...

Страница 234: ...7 8 7 2 2 Network interface specification Item Specification Network type Ethernet IEEE802 3 Network I F 10BASE T 100BASE TX Automatic transfer type RJ 45 Connector twist pair cable MDI MDI X Automati...

Страница 235: ...RJ 900X series OPERATION MANUAL Appendix 7 9 7 3 Options Supply list For more information about the options and the supply items contact MUTOH local dealer...

Страница 236: ...Appendix RJ 900X series OPERATION MANUAL 7 10...

Страница 237: ...tup menu diagram For details of the Setup menu configuration diagram refer to the followings NOTE For details of each setup item refer to followings 4 5 1 Setup menu items The parts in each list are f...

Страница 238: ...o 1 2steps Hi 1 3steps Lo 3steps Hi Initial Print Initial Change Confirm Print Micro Print Micro Change PatternA PatternB PatternC Initial Lines Photo HS360dpi 360dpi 720dpi 1440dpi 2880dpi UniDir BiD...

Страница 239: ...Timer Merge Quality PenPrior PenTone 0 10 mm 0 13mm 0 18mm 0 25mm 0 35mm 0 50mm 0 60mm 0 70mm 0 80mm 0 90mm 1 00mm 0 1 2 3 4 5 255 When color is set 0 10 20 100 When Black White is set 0 10mm 0 13mm 0...

Страница 240: ...y BiDir Port MAC Address Version MenuMask ErrorDisplay Initial Dump CutterChange On Cleaning Prefeed PrefeedAmount To Setup menu diagram 4 4 No OK No OK No OK No OK No OK No OK No OK On Off MAX MIN Co...

Страница 241: ...Media is set at Spitting Pass Count AutoCL Spitting Take Up Ink Capacity Language Remain Ink K Remain Ink C Remain Ink M Remain Ink Y Remain Roll RemainWasteTank RemainCutterLif Short Normal Long Lon...

Страница 242: ...RJ 900X series OPERATION MANUAL A 6...

Страница 243: ......

Страница 244: ......

Отзывы: