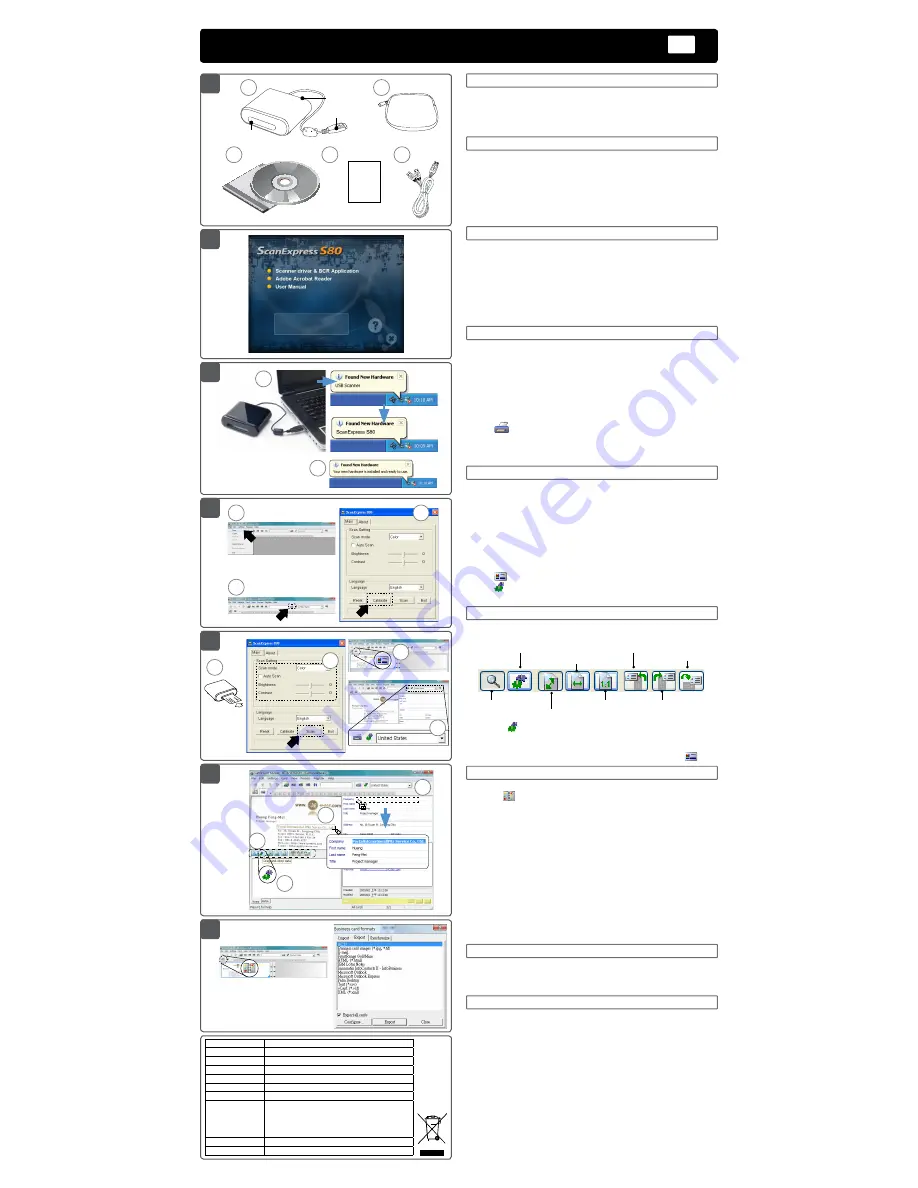
1. Package Contents
1.
Name card scanner
2.
Carry pouch
A: Paper Feed Slot
3.
Installation CD
B: USB Type A plug
4.
Calibration paper
C: Paper withdraw slot
5.
USB extension cable
2. Installing Software
1. Insert the software
Installation CD
into your CD or DVD-ROM drive.
2. Click on
Scanner driver & BCR Application
, then follow the
on screen instructions to complete the scanner driver and BCR
(
Cardiris
) software installation.
ATTENTION:
Please complete the software installation before
connecting the scanner. Don not connect the scanner to PC at this
stage.
3. Installing Hardware
1. With the PC being turned on, connect the scanner's USB plug to the
USB port of your PC.
Note:
Two pop-ups will appear at the right side of task bar after the
computer detects the new hardware being inserted.
2. The Windows Hardware Manager will detect the hardware and start
to install it. Follow on screen instructions to complete installation.
The pop-up message will appear at the right side of task bar when
the hardware installation is complete.
4. Calibrate and clean the scanner
To get high image quality and good recognition results, you must
calibrate the scanner for use at the first time prior to scanning. Please
repeat the calibrate and clean procedures from time to time.
1. Insert the attached calibration and clean paper facing up into the
feed slot of the scanner.
2. Click
Start
>
All programs
>
I.R.I.S. Applications
>
Cardiris
>
Cardiris
.
3. Click
File
>
New
to create a new sheet.
4. Click
(
Scan Cards
) button to bring up the Scan setting dialog
window.
5. Click the
Calibrate
button, then click
OK
to start the calibrating
procedure.
5. Business card scanning
1. Follow Steps 1-4 in the
Calibrate and clean the scanner
section to
bring up the scan dialog window.
Note:
Insert the document facing up into the paper feed slot of the
scanner, making sure the document remains in position. Gently push
forward until the document is grasped by the feed slot.
2. Select the preferred
Scan Mode
,
Auto Scan
, and
Brightness
/
Contrast
, then click the
Scan
to start the scan procedure.
Note:
For more detailed settings above, please refer to Cardiris Help
located in
Help
>
Help Topics
.
3. Click
(
Card view
) button on the upper toolbar.
4. Click (
Recognize cards
) button to start the character recognition.
Make sure the correct country is selected in the country select field.
6. Editing
1. Select and click a function below to adjust the preview of the
scanned card.
Magnifying glass Actual size Rotate right
Drag-and drop data Rotate left Turn
upside
Fit the window
Fit to width
2. Click the (
Drag-and-drop data
) button.
3. Select the area you wish to edit or recognize again using a mouse.
4. Drag and drop the selected square to the target field.
Note:
Drag-and-drop operation works only in the
Card view
(
).
7. Export and Synchronize
• To export and synchronize the data with other softwares, please
switch to
(
Album view
).
1. Click
File
>
Import, Export and Synchronize...
>
Synchronize
tap.
2. Click
Export
tab.
3. Select a preference format you wish to export the scanned name
card, and then click
Export
. The supported formats include as follow:
*.jpg, *.tif, E-mail, FrontRange GoldMine, HTML(*.html), IBM Lotus
Notes, Innomatix InfoContacts II, Outlook, Outlook Express, Palm
Desktop, Text (*.csv), vCard(*.vcf) and XML(*xml).
4. Alternatively, repeat the steps above 1-2 to select
Synchronize
.
5. Select a preference software you wish to synchronize the scanned
name card, and then click
Synchronize
. The supported softwares
include as follow: ACT!, FrontRange GoldMine, IBM Lotus Notes,
Outlook, Outlook Express, Palm Desktop and Pocket PC.
For more BCR functions, please refer to Cardiris Help located in
Help
>
Help Topics
.
8. Troubleshooting
• Check to make sure the USB cable is firmly plugged into the
computer.
• Please calibrate or clean the scanner if the scan result is poor quality.
9. Safety Information and Specification
• Keep away from water or moisture and dusty areas.
• Never store in hot and very cold areas.
• Only use attachments/accessories specified by the manufacturer.
• No objects filled with liquids, such as vases, shall be placed on apparatus.
• Avoid dust contamination when the scanner is not in use.
• When left unused for a long period of time, the unit should be disconnected from
the USB cable and PC.
• Avoid environments where the scanner would be exposed to direct sunlight (or
any other source of excessive heat) for long periods of time.
• Protect the scanner from potential liquid spills such as soda, coffee, tea, etc.
• Be carefully to keep it without dropping it or strong impact.
• Operate the scanner on a level, well-grounded work surface, free of excessive
vibration.
• Don’t open the scanner case alone without technical support because there is
danger of electrical shock.
1
A
B
C
1
2
4
3
5
2
4
5
3
4
5
6
7
2
3
4
1
3
4
2
Scanner Type
Color CIS Sheet feed
Scan Area
A8 size, 54mm (W)
Light Source
LED
Interface
USB 1.1
Scanning Mode
Color mode, Gray Mode, Line Art
Power Consumption 0.7W (standby), 2.3W (during scan), fully USB powered
System Support
Windows XP, Vista
System requirement • Pentium III 300 CPU or above
• 256MB RAM (512MB for Windows Vista / 7)
• 200MB available hard disk space Windows XP / Vista / 7
• CD-ROM Drive
• Available USB Port
Dimension
108mm x 89mm x 32mm
Weight
153g
1
ScanExpress S80
Name Card Scanner
Quick Start Guide
EN
2
1
3