background image

14

•  To get high image quality and good recognition results, please 

perform 

step 1, 2, 3

 in that order prior to use if necessary.

•  Make sure the cleaning and calibration paper, and cleaning stick are 

clean without any dust before use. 

•  Do not  use any solvent to clean the sensor.

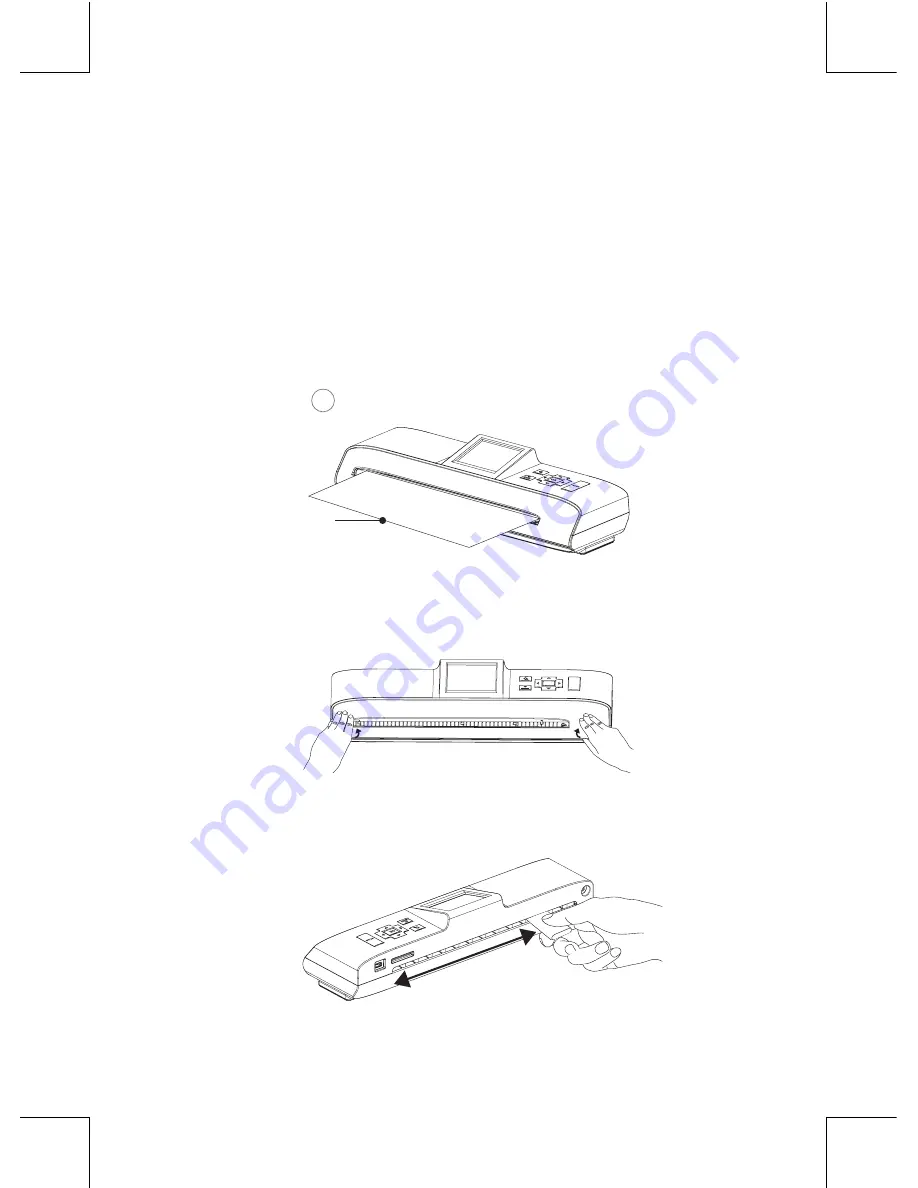
1. Put your thumbs in the feed slot and pull the feed slot cover upwards 

to remove it from the scanner.

2. Insert the thin end of the cleaning stick into the slot of the scanner at 

the rear side. Move the stick from one side to the other slightly a few 
times, then remove it.

Step 2: Using the cleaning stick

Insert the supplied cleaning paper into the feed slot of the scanner, 
then press 

SCAN

SCAN

 )

 button to rolled through and scanned.

Step 1: Using the cleaning paper

Note: 

Do not insert the cleaning stick into the feed slot at the front side 

of the scanner as this may damage the internal component.

Front side

    Cleaning paper

Cleaning and Calibrating the 

Scanner

Rear side

Cleaning stick

MENU

OK

SCAN

A8

A4

A6

Содержание ScanExpress S324

Страница 1: ...or adjust this product please save and read the User Manual completely The style of the product shown in the User Manual may be different from the actual unit due to various models ScanExpress S324 St...

Страница 2: ...Turning the Power on 7 Scan and Playback 8 Scanner Setting 8 Using the Photo Protective Sleeve 9 Scanning Images 9 Playing back and Scanned Images 10 Zoom 11 Playback Setting 12 Transferring the Scann...

Страница 3: ...from the power supply Avoid environments where the scanner would be exposed to direct sunlight or any other source of excessive heat for long periods of time Protect the scanner from potential liquid...

Страница 4: ...reen and then store the scanned images to a MMC or SD memory card It makes your scanning experience easier and more enjoyable You can also transfer the scanned images to your PC via mini USB port Read...

Страница 5: ...Down Moves down in the menus Moves down in the thumbnail mode 7 Right Moves right in the menus Moves to the next scanned image 8 Zoom Zoom the scanned image 9 Left Moves left in the menus Moves to th...

Страница 6: ...USB Power then press OK OK button Connecting to Power Using AC adapter Connect one end to the scanner s DC IN jack and the other end to a power socket Using mini USB cable 1 Connect the mini USB conn...

Страница 7: ...nserting a SD MMC Card Insert your SD or MMC card into the card slot with the gold contacts facing up Rear View Turning the Power on Press Power MENU button to turn on the scanner MENU OK SCAN A8 A6 M...

Страница 8: ...optimization mechanism which will achieve the best color match possible based on the actual color content of the image Note 1 Scanning will take longer than normal with this setting Please be patient...

Страница 9: ...to scan has been laminated Scanning Images Note Please insert a SD MMC card A reminder message will appear if you did not insert a SD or MMC card to the scanner 1 Insert the photo or document facing D...

Страница 10: ...lder When the counter reaches 9999 it will be automatically generated another new folder in a sequential order Note The scanner will enter the playback mode after scanned or press OK OK button 1 Press...

Страница 11: ...ress OK OK button to view the image in full screen 1 Press ZOOM button to zoom in an image Each time of the button is pressed the image will be enlarged in the sequence of x2 x3 x4 and x5 2 Press UP D...

Страница 12: ...n French Italian Spanish Dutch Portuguese Polish Format Deletes all the data stored in the SD MMC card Calibration Select OK to calibrate the scanner Note Refer to page 14 for detailed procedures Fact...

Страница 13: ...nd use the drag and drop method to copy files between the Scanner and the PC Note The Removable Disk on the PC shows the files stored in the SD MMC card which is connected to the scanner Disconnecting...

Страница 14: ...in end of the cleaning stick into the slot of the scanner at the rear side Move the stick from one side to the other slightly a few times then remove it Step 2 Using the cleaning stick Insert the supp...

Страница 15: ...ion process Note The process will take few minutes to finish and then shut down automatically Please turn the power back on again 3 Align the feed slot cover Assembly the edge s two latching tabs with...

Страница 16: ...can Zoom OK Up Down Left Right Dimensions 300 x 86 x 56 2 mm 11 8 x 3 4 x 2 2 Weight 520g 1 1lbs Check to make sure the mini USB cable is firmly plugged into the scanner Please clean and calibrate the...

Отзывы: