background image


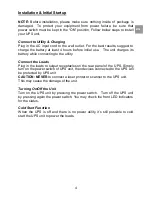
Installation & Initial Startup 


NOTE:

  Before  installation,  please  make  sure  nothing  inside  of  package  is 

damaged.    To  protect  your  equipment  from  power  failure,  be  sure  that 
power s

witch must be kept in the “ON” position. Follow below steps to install 

your UPS unit. 


Connect to Utility & Charging 

Plug in the AC  input cord to  the  wall outlet. For the best results, suggest to 
charge  the  battery  at  least  4  hours  before  initial  use.    The  unit  charges  its 
battery while connecting to the utility.   


Connect the Loads 

Plug in the loads to output receptacles on the rear panel of the UPS. Simply 
turn on the power switch of UPS unit, then devices connected to the UPS will 
be protected by UPS unit.   

CAUTION: NEVER

 to connect a laser printer or scanner to the UPS unit. 

This may cause the damage of the unit.   


Turning On/Off the Unit 

Turn on the UPS unit by pressing  the power switch.    Turn off the UPS unit 
by pressing again the power switch. You may check the front LED indicators 
for the status.   


Cold Start Function 

When  the  UPS  is  off  and  there  is  no  power  utility,  it

’s  still  possible  to  cold 

start the UPS unit to power the loads.


EN 

Содержание PowerMust 424 LCD

Страница 1: ...PowerMust 424 LCD 636 LCD 848 LCD Line Interactive UPS Startup Manual EN...

Страница 2: ...instructions carefully Read this manual thoroughly before attempting to unpack install or operate You may keep this manual for further reference WARNUNG Dies ist eine USV der Klasse C2 In Wohnansiedlu...

Страница 3: ...spray detergent Do not dispose of batteries in a fire as they may explode Do not open or mutilate the battery or batteries Released electrolyte is harmful to the skin and eyes It may be toxic A batte...

Страница 4: ...loss from power interruption This UPS features LCD panel to display the situations of UPS unit Front Panel Overview Power switch Input voltage Output voltage AC mode indicator Load level indicator fla...

Страница 5: ...connecting to the utility Connect the Loads Plug in the loads to output receptacles on the rear panel of the UPS Simply turn on the power switch of UPS unit then devices connected to the UPS will be...

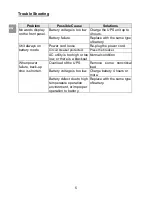
Страница 6: ...cord loose Re plug the power cord Circuit breaker protected Press the breaker AC utility is too high or too low or there is a blackout Normal condition When power failure back up time is shorten Overl...

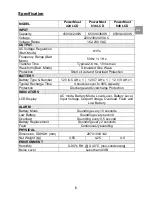
Страница 7: ...2 V 4 5 AH x 1 12 V 7 AH x 1 12 V 9 AH x 1 Typical Recharge Time 4 hours recover to 90 capacity Protection Discharge and Overcharge Protection INDICATORS LCD Display AC mode Battery Mode Load Level Ba...

Страница 8: ...7 PowerMust 424 LCD 636 LCD 848 LCD Line Interaktiv USV Anleitung zur Inbetriebnahme DE...

Страница 9: ...ich f r diese USV von MUSTEK entschieden haben Um diese unterbrechungsfreie Stromversorgung sicher zu betreiben lesen Sie sich die folgenden Anweisungen vollst ndig durch und befolgen Sie sie Lesen Si...

Страница 10: ...W rmequellen aus wie z B Heizl ftern oder fen Ziehen Sie vor dem Reinigen der USV Einheit den Netzstecker Verwenden Sie zum Reinigen keine fl ssigen oder zerst ubenden Reinigungsmittel Werfen Sie die...

Страница 11: ...iebnahme 1 Kommunikationskabel Software CD bersicht Diese kompakte USV sch tzt Ihren PC vor Datenverlust aufgrund von Stromausfall Auf dem LCD Display dieses USV Ger ts wird der Status der USV Einheit...

Страница 12: ...en ist Verbraucher anschlie en Schlie en Sie die Verbraucher an die ausgangsseitigen Netzbuchsen auf der R ckseite der USV an Schalten Sie die USV ein Anschlie end sind alle an die USV angeschlossenen...

Страница 13: ...Netzkabel erneut an Sicherungsautomat ist aktiviert Sicherungsautomat deaktivieren Netzspannung ist zu hoch oder zu niedrig oder es liegt ein Stromausfall vor Dies ist normal Bei einem Stromausfall is...

Страница 14: ...x 1 12 V 9 AH x 1 Typische Ladezeit 4 Stunden auf 90 der Kapazit t Schutz Tiefentladungs und berladeschutz Anzeigen LCD Display AC Modus Batteriemodus Laststufe Batteriestufe Eingangsspannung Ausgang...

Страница 15: ...14 PowerMust 424 LCD 636 LCD 848 LCD UA...

Страница 16: ...15 18 19 20 21 22 MUSTEK UA...

Страница 17: ...16 12 OFF 1 2 3 4 5 UA...

Страница 18: ...17 3 5 x 1 x 1 x 2 USB UA...

Страница 19: ...18 ON 4 UA...

Страница 20: ...19 4 4 UA...

Страница 21: ...erMust 424 LCD PowerMust 636 LCD PowerMust 848 LCD 450 240 650 360 850 480 220 230 240 162 290 10 50 1 2 6 10 12 4 5 A x 1 12 7 A x 1 12 9 A x 1 4 90 10 0 5 2 287 X 100 X 142 3 55 4 25 4 9 0 40 C 0 90...

Страница 22: ...21 PowerMust 424 LCD 636 LCD 848 LCD RU...

Страница 23: ...22 26 27 28 29 30 MUSTEK RU...

Страница 24: ...23 12 OFF 1 2 3 4 5 A RU...

Страница 25: ...24 3 5 x 1 x 1 x 1 x 2 USB RU...

Страница 26: ...25 ON 4 RU...

Страница 27: ...26 4 4 RU...

Страница 28: ...erMust 424 LCD PowerMust 636 LCD PowerMust 848 LCD 450 A 240 650 A 360 850 480 220 230 240 162 290 10 50 1 2 6 10 12 4 5 A x 1 12 7 A x 1 12 9 A x 1 4 90 10 0 5 2 287 100 142 3 55 4 25 4 9 0 40 C 0 90...

Отзывы: