


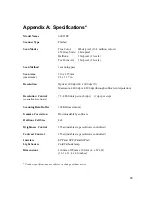


5
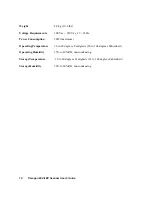
Connecting the Scanner to the PC and Printer
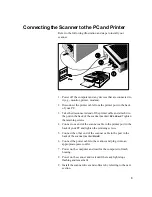
Refer to the following illustration and steps to install your
scanner.
1. Power off the computer and any devices that are connected to
it (e.g., monitor, printer, modem).
2. Disconnect the printer cable from the printer port in the back
of your PC.
3. Take the disconnected end of the printer cable and attach it to
the port in the back of the scanner marked
Printer
. Tighten
the retaining screws.
4. Connect one end of the scanner cable to the printer port in the
back of your PC and tighten the retaining screws.
5. Connect the other end of the scanner cable to the port in the
back of the scanner marked
Host
.
6. Connect the power cable to the scanner and plug it into an
appropriate power outlet.
7. Power on the computer and wait for the computer to finish
booting.
8. Power on the scanner and wait until the ready light stops
flashing and remains lit.
9. Install the scanner driver and software by referring to the next
section.


