Round Table record player
- 5 -
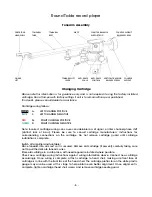
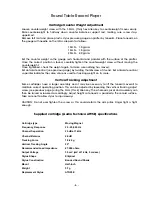
Tonearm Assembly
CARTRIDGE
TONEARM
TONEARM
PIVOT
COUNTER BALANCE
COUNTER WEIGHT
HEADSHELL
TUBE
REST
SUPPORT ROD
RELEASE SCREW
FINGER
TONEARM LIFT ANTI-SKATE ANTI-SKATE VERTICAL TRACKING COUNTER
LIFT
LEVER
SCALE
CONTROL RELEASE SCREW WEIGHT
Changing Cartridge
Please note this information is for guidance only and is not required if using the factory installed
cartridge. Do not tamper with factory settings if unit is to remain within specs published.
If in doubt, please consult dealer for assistance.
Cartridge wiring follows:
WHITE
L+
LEFT CHANNEL POSITIVE
BLUE
L-
LEFT CHANNEL NEGATIVE
RED
R+
RIGHT CHANNEL POSITIVE
GREEN
R-
RIGHT CHANNEL NEGATIVE
Note: Incorrect cartridge wiring can cause considerable loss of signal, or inter channel phase shift
(distinct lack of bass). Please be sure to consult cartridge manufacturers’ instructions for
corresponding connections on the cartridge. Do not remove cartridge guard until cartridge
installation is complete.
Switch off amplifier and turntable!
Place tonearm into arm rest so it is secured. Remove old cartridge (if present) carefully taking care
not to pull the delicate tonearm wires.
Store old cartridge in a safe place, with needle guard reinstated where possible.
Check new cartridge wiring instructions against wiring information above. Connect new cartridge
accordingly. Once wiring is complete, attach cartridge to head shell, making sure front face of
cartridge is in line with the front face of the head shell. The cartridge protractor on the white plastic
gauge may also be used at this stage to help obtain even better alignment. Once alignment is
complete, tighten cartridge/head shell screws and remove cartridge needle guard.


