8.3 Configuring Wireless Networking on the Amazon Fire
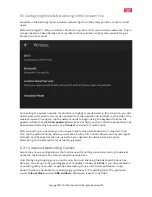
Available in the Settings menu, wireless networking should be pretty painless to use for most
users.
After switching Wi-Fi
On
, your device should do a quick scan for local wireless networks. To join
an open network (identified by a Wi-Fi symbol with no padlock), simply tap and wait for your
Amazon Fire to connect.
Connecting to a secure network, meanwhile, is slightly more detailed. In this situation, you will
need a password, which can only be acquired from the network administrator or the side of the
wireless router. Once again, tap the network name to begin, using the keyboard to enter the
password. Note that the
Show password
checkbox will help you check that the passphrase has
been entered correctly. Once done, tap
Connect
and wait for confirmation.
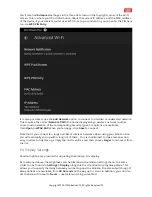
After connecting to a network you can check some further details about it, if required. To do
this, tap the network name, where you will see a status, information about security and signal
strength and the speed of the link, as well as your device’s IP address (useful if you’re
attempting to troubleshoot local networking issues).
8.3.1 Advanced Networking Options
Due to the various configurations that can be used for setting up and connecting to wireless
networks, the Amazon Fire offers some advanced options.
Find this by long-tapping your current connection, and checking the Advanced Options box.
Here you can set up a Proxy, and toggle your IP address mode. Use
Static
if you have problems
connecting with your router, or perhaps attempting to use a Wi-Fi hotspot device or app.
Several fields are available, from specifying your device’s IP to adding that of the preferred
router,
Subnet Mask
and two
DNS numbers
. Otherwise, leave this as DHCP.
Copyright
©
2017 MakeUseOf. All Rights Reserved
®
.

