background image

Chapter – Networking Basics

Multi-Tech Systems, Inc. Wireless Network Adapter User Guide

44

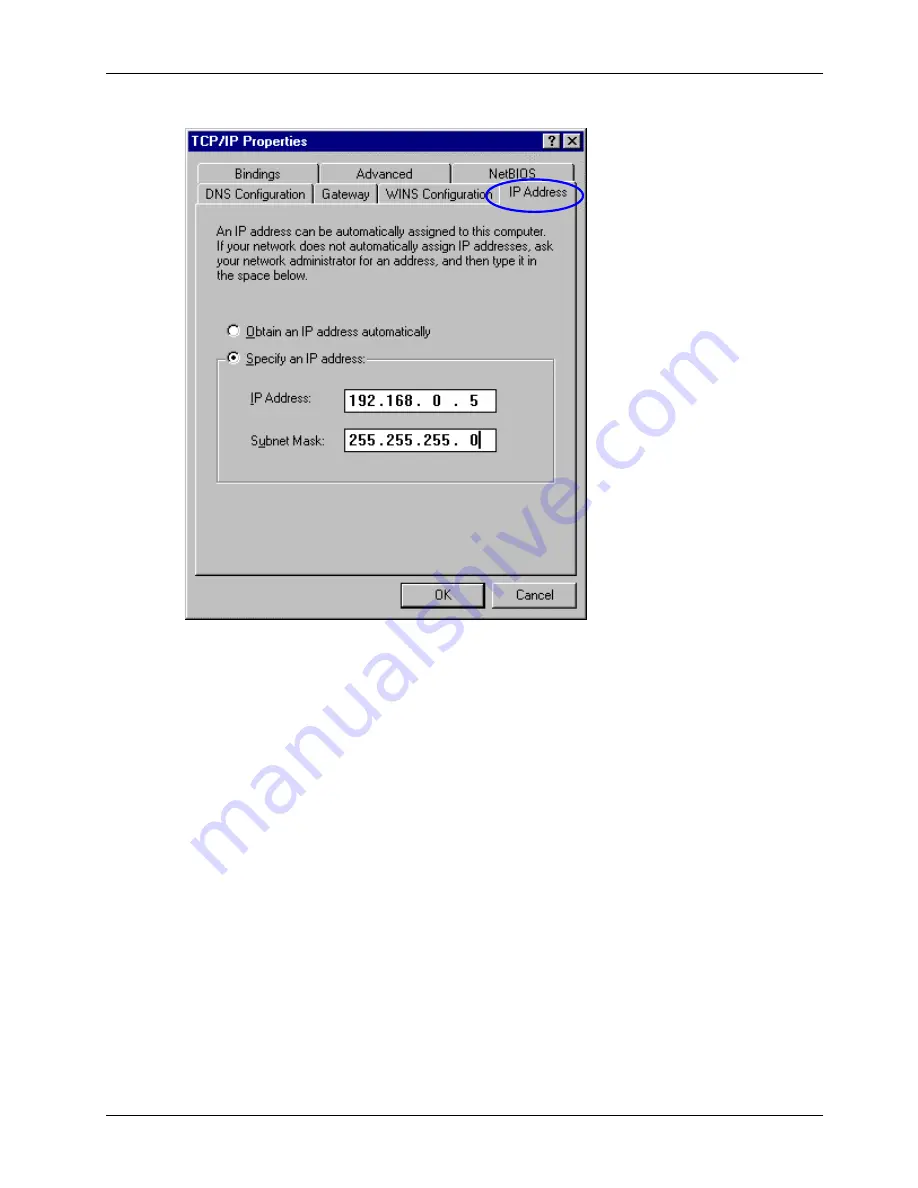
7. The TCP/IP dialog box displays. Choose the 

IP Address tab

.

8. Select 

Obtain an IP Address Automatically

, and click 

OK

.

9. When the 

Network Properties

 dialog box comes back up, click 

OK

.

10. The Windows system will ask you to reboot. Click 

Yes

.

Содержание RF802

Страница 1: ...USB 11Mbps Wireless Network Adapter Model RF802USB User Guide ...

Страница 2: ... 01 Initial Release Patents This Product is covered by one or more of the following U S Patent Numbers 6 151 333 5 757 801 5 682 386 Other patents pending Trademarks Trademark of Multi Tech Systems Inc is the Multi Tech logo Windows is a registered trademark of Microsoft Technical Support Multi Tech Systems has an excellent staff of technical support personnel available to help you get the most ou...

Страница 3: ...NG DRIVER INSTALLATION 24 CHECKING THE WIRELESS ADAPTER CONFIGURATION 27 CHAPTER 5 NETWORKING BASICS 30 COMPUTER IDENTIFICATION 30 SHARING FILES 32 SETTING SHARING LEVELS OF ACCESS 34 TYPES OF ACCESS 34 SHARING PRINTERS 35 SELECTING A SHARED PRINTER 36 HOW TO INSTALL TCP IP 39 CONFIGURING A DYNAMIC IP ADDRESS 42 CONFIGURING A STATIC IP ADDRESS 45 CHECKING TCP IP ADDRESS OF THE WIRELESS ADAPTER 47 ...

Страница 4: ...Chapter 1 Introduction Multi Tech Systems Inc Wireless Network Adapter User Guide 4 Chapter 1 Introduction ...

Страница 5: ... Area Network Note If anything is missing please contact your vendor Wireless Network Basics A wireless network system offers a great number of advantages over a traditional wired system Wireless networks are more flexible are easier to setup and manage and are often more cost effective than their wired equivalent Using radio frequency RF technology wireless networks transmit and receive data over...

Страница 6: ...safe use of the equipment Achieving Optimal Performance Minimize the Number of Barriers The number of walls ceilings and other objects that the wireless signal must pass through limit the range of wireless network communications Position your Access Points Residential Gateways and computers so that the number of barriers is minimized Minimize the Degree of Angles among the Access Points Residentia...

Страница 7: ...c Network Setup 2 The Ad Hoc Network with Internet Sharing Setup 3 The Home Network with Multiple IPs Setup 4 The Home Network with a Residential Gateway Firewall or Router Setup 1 The Ad Hoc Network Use This Setup If You have two or more computers and or laptops and just want to share files and printers Steps 1 Install the Wireless Network Adapter See the Installation section of this User Guide o...

Страница 8: ...less network adapter follow these steps 1 Install the Wireless Network Adapter See the Installation section of this guide or the Quick Start Guide 2 Set Static IP Address for the Wireless Network Adapter See the Networking Basics 3 Check the wireless connection See Configuration Utility and Networking Basics 4 Learn to share printers and file See Networking Basics 5 Install your Internet Sharing S...

Страница 9: ...rator can give you a static IP address for each computer You will also have to setup your Access Point Consult Access Point documentation its installation procedures Steps 1 Using the Ethernet cable provided with your router connect the router to the Cable DSLmodem 2 Connect the Access Point to the Router 3 Install the Wireless Network Adapter See the Installation section of this guide or the Quic...

Страница 10: ...r give you a dynamic IP address for each computer You will also have to setup your Access Point Consult Access Point documentation its installation procedures Steps 1 Using the Ethernet cable provided with your router connect the router to the Cable DSLmodem 2 Connect the Access Point to the Router 3 Install the Wireless Network Adapter See the Installation section of this guide or the Quick Start...

Страница 11: ...Chapter 2 Installation Multi Tech Systems Inc Wireless Network Adapter User Guide 11 Chapter 2 Installation ...

Страница 12: ...are using the installation CD ROM included with your package 2 Connect the RF802USB to your PC 3 Configure your RF802USB 4 Set the network protocol s required to communicate on your network In most instances you will be using the TCP IP protocol Software Installation for Windows 98 Me 2000 These steps provide a quick summary of the software installation process For detailed installation steps with...

Страница 13: ... Network dialog box displays and presents three main tabs Configuration Identification and Access Control 3 Click the Configuration tab 4 Click the Add button 5 The Select Network Component Type dialog box displays 6 Click Protocol and then click the Add button 7 The Select Network Protocols dialog box displays 7a From the list of manufactures click on Microsoft 7b From the Network Protocols list ...

Страница 14: ...dress for your computer 4 You can select either Obtain an IP address automatically or Set your own IP address To obtain an IP address automatically select this option and the address is automatically set up To set your own IP address enter the IP Subnet Masking DSN server and Default Gateway Address values Then click OK 5 You will be returned to the Network Component Type dialog box 6 You can now ...

Страница 15: ...Chapter 3 Configuration Utility Multi Tech Systems Inc Wireless Network Adapter User Guide 15 Chapter 3 Configuration Utility ...

Страница 16: ...the icon is red the Wireless Network Adapter configuration is invalid or incomplete In this case re check your configuration by following the same steps you will use in this chapter to set the initial configuration Icon Tray with a New Icon To start the configuration double click on the Wireless Network Adapter icon The USB 11Mbps Wireless Configuration Utility screen as shown below displays MT1 T...

Страница 17: ...tantaneous wireless Receive and Transmit throughput displayed in bytes per second These values are updated every two seconds Signal Strength The Signal Strength sliding bar displays the quality of the link between the node and its Access Point This bar is active only when the node is in Infrastructure Mode The label under the sliding bar summarizes the quality of the link The values can be No Traf...

Страница 18: ...have to reboot the PC when changes on this screen are made Configuration Utility Screen with Configuration Tab Selected Change Configuration To change the current configuration check the Change Configuration box Station ESS ID Extended Service Set Identifier Wireless Network Identifier is the group name that will be shared by every member of your wireless network You will only be able to connect w...

Страница 19: ...es are available The default is Long Long Preamble The mandatory supported Long Preamble inter operates with the current 1 Mbit s and 2 Mbit s DSSS specification as described in IEEE Std 802 11 Short Preamble The optional Short Preamble is intended for applications where maximum throughput are desired and interoperability with legacy and non short preamble capable equipment is not a consideration ...

Страница 20: ...e of the Keys entered from this panel When an encrypted frame is received it will be accepted only if it decrypts correctly and this will happen only if the receiver has the same WEP Key used by the transmitter Encryption WEP Choose either 64 bit or 128 bit from the drop down list box The default is 128 bit WEP Key Entry Select either a password Passphrase or a key Manual Entry for your WEP encryp...

Страница 21: ...cate with other stations that may or may not use WEP encryption Authentication Type There are two options The default is Open System Open System If the Access Point is using Open System authentication then the wireless adapter will need to be set to the same authentication Shared Key This authentication is available only if WEP encryption is enabled Shared Key authentication supports authenticatio...

Страница 22: ...Network Adapter User Guide 22 About Tab The About Tab shows the driver version number the product version number and the application version number You must use this version number when reporting problems to Tech Support Configuration Utility with About Tab Selected ...

Страница 23: ...Chapter 4 Troubleshooting Multi Tech Systems Inc Wireless Network Adapter User Guide 23 Chapter 4 Troubleshooting ...

Страница 24: ... Network Adapter User Guide 24 Chapter 4 Troubleshooting Verifying Driver Installation To check that the wireless network adapter drivers are loaded properly 1 Select Start Settings Control Panel 2 Double click on System The System Properties screen displays ...

Страница 25: ...s Network Adapter User Guide 25 3 Click on the Device Manager Tab 4 Click on the symbol in front of Network Adapters which changes to a after it is clicked 5 Highlight USB 11MBps Wireless Network Adapter by clicking on it and then click the Properties button ...

Страница 26: ...ting Multi Tech Systems Inc Wireless Network Adapter User Guide 26 6 The USB 11MBps Wireless Network Adapter Properties screen displays Check the Device Status to see if the Wireless Network USB Adapter is working properly ...

Страница 27: ...apter 4 Troubleshooting Multi Tech Systems Inc Wireless Network Adapter User Guide 27 Checking the Wireless Adapter Configuration 1 Select Start Programs USB 11Mbps Wireless Network Wireless configuration ...

Страница 28: ...te the setting of Network Mode It should be set to Infrastructure mode when there is an Access Point in the network Otherwise it should set to Ad Hoc 4 To change any settings check the box labeled Change Configuration and then click the arrow in any drop down list box you would like to change 5 Highlight the desired setting click the Update button and then click OK ...

Страница 29: ...Chapter Networking Basics Multi Tech Systems Inc Wireless Network Adapter User Guide 29 Chapter 5 Networking Basics ...

Страница 30: ...omputers for easy network identification you may need to verify that each computer has a unique name and common workgroup name in order to share files and printers The following directions are for Windows 98 and Me To find comparable directions for other operating systems refer to Windows Help 1 On your Desktop right click the icon Network Neighborhood and select Properties from the menu ...

Страница 31: ...ll result The name can be up to 15 characters with no spaces 4 Type a name the Workgroup box that you would like to assign to the workgroup sharing files and printers All of the computers on your network must have the same Workgroup name 5 The Computer Description box is an optional field You can use it for entering a description that will help you identify this computer on your network 6 Once all...

Страница 32: ...share and even password protect them The steps below show you how to share specific files and folders with other computers on your network 1 On your Desktop right click the icon Network Neighborhood and select Properties from the context menu 2 The Network dialog box displays Most of your computer network settings will be accomplished by using this dialog box This dialog box can also be accessed b...

Страница 33: ... to be able to give others access to my files 5 Click OK on the File and Print Sharing dialog box 6 Click OK on the Network dialog box Note Your system may prompt you to provide the Windows 98 installation CD or to direct Windows to the proper location of the installation files It may also prompt you to reboot Follow any of these directions that may appear ...

Страница 34: ... have access 6 Access Type sets the level of access allowed full read only or depend on password 7 The Passwords field allows you to apply a level of security to your shared drives and folders Other users on your network will be required to enter the password you designate here before they can access the drive or folder You can set two levels of security by adding a second level password Leaving t...

Страница 35: ... to be shared by all other computers on your network If you have more than one printer they can all be shared These steps below will enable you to print using other computers on your network 1 Right click the icon Network Neighborhood on your desktop and select Properties from the context menu 2 The Network Configuration dialog box opens Click the File and Print Sharing button ...

Страница 36: ...y prompt you to provide the Windows 98 installation CD or to direct Windows to the proper location of the installation files It may also prompt you to reboot Follow any of these directions that may appear Selecting a Shared Printer 1 Now that the Shared Printers function is set up you can share any installed printers connected to this computer with other computers on your network Select Start Sett...

Страница 37: ...ify the printer to other computers on the network Comment and Password are optional Then click OK 4 For a computer to access a Network Printer the device driver or software for that printer must be installed and must pointed to the proper location of the printer Go to a computer that does not have the printer connected to it Select Start Settings Printers Double click the Add Printer icon ...

Страница 38: ...rk Printer If you know the name of the computer and the Share Name of the printer you can type it into the Network path or queue name box However it is easier to click the Browse button and navigate to the location of the printer Select the desired printer and click OK Finish the installation by continuing the Add Printer Wizard normally 5 You may now use the Network Printer as if it were connecte...

Страница 39: ...ems Inc Wireless Network Adapter User Guide 39 How to Install TCP IP By default Windows 98 ME will install TCP IP automatically To install it manually follow these steps 1 Select Start Settings Control Panel 2 Double click on the Network icon ...

Страница 40: ...less Network Adapter User Guide 40 3 The Network Configuration dialog box displays Highlight the USB 11Mbps Wireless Network Adapter Click the Add button 4 The Select Network Component Type dialog box displays Select Protocol and then click the Add button ...

Страница 41: ...etwork Adapter User Guide 41 5 The Select Network Protocol dialog box displays Select Microsoft from the column on the left side of the screen and then select TCP IP from the column on the right side of the screen Click OK 6 The TCP IP protocol is now installed ...

Страница 42: ...s was set to obtain IP dynamically through a DHCP server If you need to check or change the settings complete the following steps 1 Select Start Settings Control Panel 2 Double click on Network 3 The Network dialog box displays Highlight TCP IP for USB 11Mbps Wireless Network and then click the Properties button Note If TCP IP is not present see the section on How to Install TCP IP ...

Страница 43: ...ter User Guide 43 4 The TCP IP Properties dialog box displays Choose the IP Address tab Then select Obtain an IP address automatically and then click OK 5 The Network Properties dialog box displays again Just click OK 6 The Windows system will ask you to reboot Click Yes ...

Страница 44: ...twork Adapter User Guide 44 7 The TCP IP dialog box displays Choose the IP Address tab 8 Select Obtain an IP Address Automatically and click OK 9 When the Network Properties dialog box comes back up click OK 10 The Windows system will ask you to reboot Click Yes ...

Страница 45: ...apter User Guide 45 Configuring a Static IP Address 1 Select Start Settings Control Panel 2 Double click on Network 3 Highlight TCP IP for USB 11Mbps Wireless Network and click the Properties button Note If TCP IP is not present see the section on How to Install TCP IP ...

Страница 46: ... 5 Enter an IP Address in the IP Address field The suggested IP Range is 192 168 0 2 to 192 168 0 254 Note IP Addresses must be assigned sequentially to each computer Enter a Subnet Mask number is the Subnet Mask field The suggested Subnet Mask is 255 255 255 0 6 Click OK 7 The Network Properties dialog box displays again Just click OK 8 The Windows system will ask you to reboot Click Yes ...

Страница 47: ...dress of the Wireless Adapter 1 Click the Start button and then click Run 2 The Run dialog box displays Type winipcfg in the Open box and click OK 3 The IP Configuration dialog box displays The IP address will default into the IP Address box 4 Click the More Info button to display additional IP information ...

Страница 48: ...he Start button and then click Run 1 The Run dialog box displays Type command in the Open box Then click OK 1 This takes you to the Run dialog box which is now set to receive a DOS prompt 3 Type ping 192 168 0 1 which is the IP address of the Gateway in this case Then press the Enter key 4 A successful ping will show four replies ...

Страница 49: ...Multi Tech Systems Inc Wireless Network Adapter User Guide 49 Appendixes ...

Страница 50: ...Bm min Receive Sensitivity Nominal Temp Rate 1 Mbps 10 5 BER 87 dBm minimum 5 5 Mbps 10 5 BER 84 dBm minimum 11 Mbps 10 5 BER 81 dBm minimum Extended Temp Rate 1 Mbps 10 5 BER 84 dBm minimum 5 5 Mbps 10 5 BER 81 dBm minimum 11 Mbps 10 5 BER 78 dBm minimum Modulation 11Mbps and 5 5 Mbps CCK 2 Mbps DQPSK I Mbps DBPSK Security 40 bit and 128 bit WEP Encryption Antenna External 1 dBi dipole antenna LE...

Страница 51: ... or faster processor USB port Supported Operating Systems Windows 98 Windows Me Windows 2000 Data Rate 11 CCK 5 5 CCK 2 DQPSK 1 DBSK Key Management Automatic Dynamic Key Allocation ADKA through public key Range Indoor per cell approximately 35 to 100 meters Outdoor per cell approximately 100 to 300 meters Diagnostic LED Power Activity Power Specifications Operating Voltage 5V DC 5 Transmit Power N...

Страница 52: ...vicesà Class à Net à remove USB file related to the RF802USB 5 Click the Start button à Settings à Taskbar Start Menu à Start Menu Program à remove à choose Wireless USB related to the RF802USB à remove 6 Important Restart your computer to make the changes effective before you reinstall the driver Uninstall RF802USB in Windows ME 1 Click the Start button à Settings à Control Panel à Add Remove à R...

Страница 53: ...es à click the Hardware tab à Device Manager 2 Click Network adapter à Then remove Wireless USB adapter RF802USB 3 Click Windows Explorer à C Program Files à Remove Wireless USB adapter RF802USB 4 Start à Run à type regedit command à Local machine à System à Current control set à Enum à remove USB RF802USB Important Restart your computer to make the changes effective before you reinstall the drive...

Страница 54: ... CIRCUMSTANCES WILL ITS LIABILITY EXCEED THE PRICE FOR DEFECTIVE PRODUCTS Repair Procedures for U S and Canadian Customers In the event that service is required products may be shipped freight prepaid to our Mounds View Minnesota factory Multi Tech Systems Inc 2205 Woodale Drive Mounds View MN 55112 Attn Repairs Serial ____________ A Returned Materials Authorization RMA is not required Return ship...

Страница 55: ...ts to the U S A Please include inside the shipping box a description of the problem a return shipping address must have street address not P O Box your telephone number and if the product is out of warranty a check drawn on a U S bank or your company s purchase order for repair charges Repaired units shall be shipped freight collect unless other arrangements are made in advance Please direct your ...

Страница 56: ...tween the equipment and receiver Connect the equipment into an outlet on a circuit different from that to which the receiver is connected Consult the dealer or an experienced radio TV technician for help FCC Caution To assure continued compliance example use only shielded interface cables when connecting to computer or peripheral devices Any changes or modifications not expressly approved by the p...

Страница 57: ... Tab 18 Configuration Utility 16 Configuring a Dynamic IP Address 42 Configuring a Static IP Address 45 Connecting the RF802USB to Your PC or Laptop 13 E Encryption Tab 20 F Federal Communication Commission Interference Statement 56 Four Ways to Use the Wireless LAN Adapter 7 H How to Install TCP IP 39 I Infrastructure 19 Installation of the RF802USB 12 L LED Indicators 7 Link Status Group 17 Long...

Страница 58: ...ple IPs 9 Setup 4 The Home Internet Network with a Residential Gateway Firewall or Router 10 Shared Key 21 Sharing Files 32 Sharing Printers 35 Short Preamble 19 Signal Strength 17 Software Installation for Windows 98 Me 2000 12 Station ESS ID 18 Status Tab 17 T Technical Specifications 50 technical support 2 Troubleshooting 24 TX Rate 19 Tx Rx Rate Information Group 17 Types of Access 34 U Uninst...

Отзывы: