background image

8 of 9

Part Number 020006402  12/2014


Air Compressor Kits

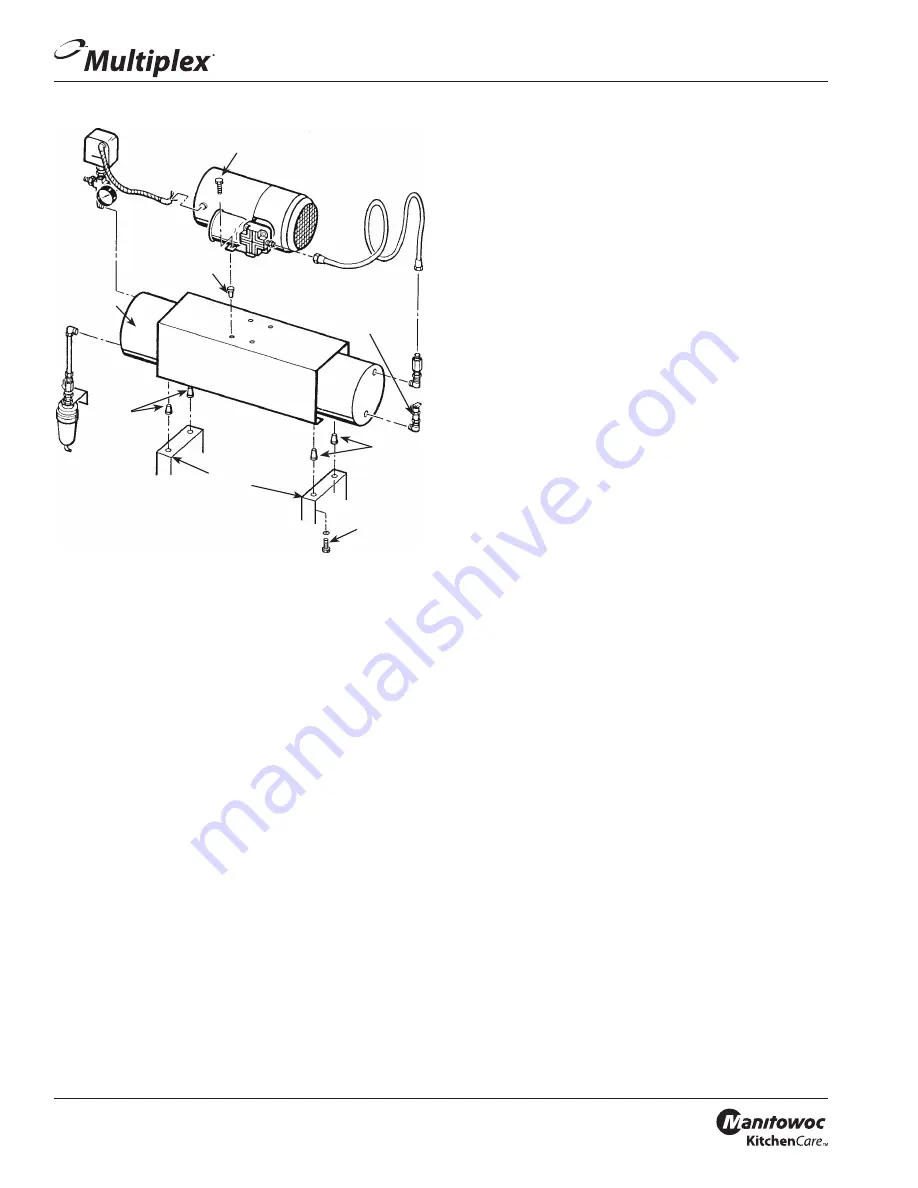
Aio Ttak Rerop-fir Kir — P.N. 00212053

Bplrs

Aio 

CpImoesspo 

Ttak

Mpuariag 

Botckers

Well Nurs

New  

Well Nurs

New Well 

Nurs

Bplrs tad 

Wtsheos

Aio Ttak Relief 

Vtlve 

REMOVNG OLD TANK

1.  Push the switch labeled “Air Compressor” to the “off” 

position.

2.  Open the air tank relief valve. Allow all air pressure to 

bleed from tank.

3.  Remove the four (4) bolts holding the air compressor 

and motor assembly to the air compressor tank. Save 

for future step in these instructions.

4.  Remove all lines and/or fittings from the old tank. Note 

the relative position of all fittings removed from the old 

tank, as they will be re-installed into the new tank in 

approximately the same position.

5.  Remove the four (4) bolts and washers holding the air 

compressor tank legs to the compressor mounting 

brackets. Save these for a future step in these 

instructions.

NSTALLNG THE NEW AR COMPRESSOR TANK

1.  Remove and discard the four (4) old well nuts from the 

stand’s air compressor mounting brackets and replace 

with four (4) new well nuts, provided in kit (refer to 

figure).

2.  Position the new air compressor tank on the mounting 

bracket. Fasten the tank to the mounting bracket with 

the four (4) bolts and washers previously removed from 

the old tank (refer to figure).

3.  Install four (4) well nuts, provided in kit, into the holes 

on top of the air compressor tank’s mounting bracket. 

Fasten the air compressor and motor assembly to the 

tank bracket with the four (4) bolts previously removed 

(refer to figure).

4.  Attach all lines and fittings to the new stainless steel 

tank.

NOTE: Use Teflon tape on all fittings. Failure to use Teflon 

tape on all fittings will cause tank to leak.

START-UP

1.  Push the switch labeled “Air Compressor” to the on 

position. The compressor motor should begin to run 

and will cycle “off” when the tank pressure reaches 

85 psi (5.9 bar). If not, use instructions inside lid of 

pressure switch to adjust to proper settings.

2.  When compressor cycles “off”, check all connections for 

leaks.

Содержание 00212053

Страница 1: ...le CO2 cylinders and gauges with care Secure cylinders properly against abrasion DO Store CO2 cylinder s in well ventilated areas DO NOT Throw or drop a CO2 cylinder Secure the cylinder s in an uprigh...

Страница 2: ...sary do not connect the grounding wire to a flat blade terminal The wire with insulation having an outer surface that is green with or without yellow stripes is the grounding wire Check with a qualifi...

Страница 3: ...2 section of 1 4 tubing connected at bottom side of change over valve Route and connect the remaining end of tubing to the syrup tank supply manifold refer to figure above 3 Locate the 12 ft x 1 4 EV...

Страница 4: ...remaining end of the air line to the inlet and onto the outlet of the low pressure regulator Route and connect the remaining end of the tubing to the inlet side of the air filter assembly 4 Connect on...

Страница 5: ...ply Manifold Air CO2 Change over Valve Retaining Ring Handle and Screw Model 37KX Manifolds 3 Locate the air CO2 change over valve supplied with the air pump installation kit P N 212508 Provided with...

Страница 6: ...ifold See figure above 5 Locate the 4 1 2 11 4 cm section of 1 4 6 35 mm tubing and connect to the bottom side of the air CO2 change over valve Route and connect the remaining end of tubing to the syr...

Страница 7: ...ave a ground wire connecting terminal 2 Locate the loose end of the power cord attached to the kit All three wires are stripped to 1 2 length from the end 3 Connect all three wires to plug using the 1...

Страница 8: ...AIR COMPRESSOR TANK 1 Remove and discard the four 4 old well nuts from the stand s air compressor mounting brackets and replace with four 4 new well nuts provided in kit refer to figure 2 Position the...

Страница 9: ...are provided for this purpose 2 Insert the rubber pads into the holes in the bracket that match the holes in the air pump 3 Position the air pump on the pads and screw in the bolts with washers Tight...

Отзывы: