5
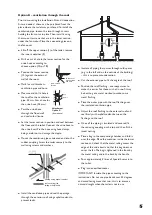
Assembly
1
. Set the toilet in position against the wall.
The floor must be even and
insulated.
2. Measure and make a hole for the ventilation
pipe in the ceiling, with 55 mm diameter. Install
the ventilation pipe with the non-sleeved end
down inside the rubber coupling on the toilet.
3. Measure and make a hole in the roof,
with 55 mm diameter.
4. Push the pipe up through the hole. Seal it well
using asphalt sealant between the pipe and the
roof to prevent any leaks.
5. Insulate the pipe from the ceiling up to the top.
All pipework in cold spaces must be insulated.
6. Cut the exterior pipe to fit the angle of the roof.
7. Place the roof flashing on to the exterior
pipe. (Use soapy water to make it easier).
If you have a tin roof, the best thing to do
is to get a lead worker to create a junction
between the roof and the exterior pipe.
8. Pass the exterior pipe over the ventilation
pipe's insulation. Put on the reduction
coupling.
9. Adjust the roof flashing and seal firmly with
asphalt sealant between the roof flasing and
the roof.
1
0.Fit the insect netting against the stop on the
reducing coupling.
Starting the empty toilet
1
. Pour 2/3 of the bag of MullToa humus starter into the toilet and the whole bag, model 65. About half of the
humus starter will fall through the grating into the tray.
2. Plug into an earthed socket. Open the lid and the motor will start automatically and run for a short while.
Close the lid and the motor will make one turn. Repeat this a couple of times. Turn the handle, Model
1
5, several
times. This will fill the tray and leave aprrox 5-
1
0 cm on top of the grate. The tray will be full until you empty it
the first time.
3. Setting the thermostat. This depends on how many people are going to use the toilet. See recommended
use in the separate sketch under maintenance instructions, page 6.
Roof flashing
25 mm Insulation
Pipe 110 mm
Reducing coupling
Insect netting
MIN. 0,5 m
VENT alternative
18° C
Ventilation pipe
Radiator
25 mm
Insulation
MAX 45°
55mm
VENT
alternative
Nonsleeved end
Sleeved end
Roof flashing
seal of asphalt
Roof (brick, paper or
plate/plastic)
Eng
MT-instruk-alla-sv-eng-fi:Layout 1 14-02-19 11.28 Sida 18
Содержание Separera 30
Страница 1: ...User Manual for Separera 30...


