background image

FREEDOM UNIVERSAL 2.0

4

FREEDOM CORE

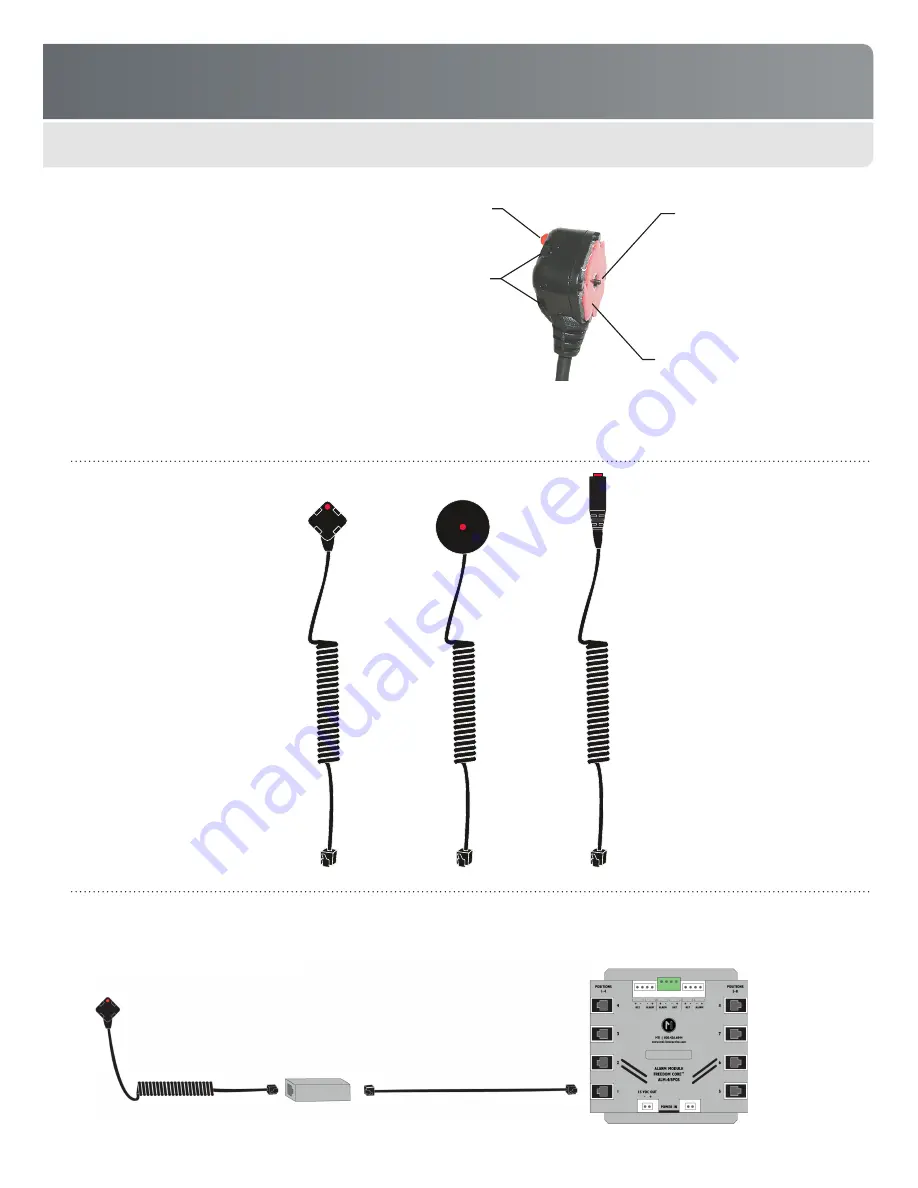
Sensor Cable Details

Sensor cables provide both electronic 
and mechanical security for the 
merchandise. Each cable has a 
RJ-11 connector that plugs into the 
alarm module and a sensor head that 
attaches to the product using VHB


tape.  

When the sensor head is properly 
attached, the product pushes the 
mechanical security switch down. If 
someone attempts to remove the 
cable, the sensor switch lifts up and 
triggers the alarm. The alarm also 
triggers if someone cuts the cable. 

Sensor Cable Options

Sensor cables are available 
in several different 
configurations, allowing you to 
select from a variety of sensor 
heads, cable types and colors. 

You should always select the 

cable that provides the best 
fit for the product(s) you are 
trying to protect.

Optional Extension Cable & Coupler

You can extend the overall operating length of each cable by adding an extension cable and coupler to the system.

Small square 
sensor 

0.50” x 0.50”

Attach to objects 

that have a flat 
mounting surface

Coupler

Extension cable

Available in 3’, 7’ and 14’ lengths

Disc Sensor 

1.5”

Attach to objects 

that have a flat 
mounting surface

Locking RJ 

0.40” x 1.20”

Use where space 
is limited or when 
you want to hide the 
sensor as much as 
possible 

LED

Shows cable’s alarm status

Zip tie slots

Zip ties help secure cable to 

product until the adhesive 

bond cures. Zip ties can then 

be left on to provide additional 

product security if needed. 

VHB tape

Adhesive bond secures sensor head 

to product. You can reuse cables by 
replacing the tape after each use.

Security sensor

Mechanical switch detects whether 
a product is present. When a 
product is properly mounted, it 
pushes this switch down. When the 
switch is up, it triggers the alarm.

Содержание FREEDOM CORE

Страница 1: ... 2008 MTI All Rights Reserved FREEDOM CORE MTI P N 063 0493 00 Rev F Release Date April 2013 PRODUCT MANUAL ...

Страница 2: ...e Coupler 4 Alarm Module Details 5 Alarm Module Kits 6 Installation 7 Installing the Alarm Module 7 Attaching and Removing Sensor Cables 8 OPERATION 10 Using the Keyswitch Learn Function 10 Understanding the LED Indicators 10 Arming the Display 10 Silencing Troubleshooting Alarms 11 Troubleshooting 12 Limited Warranty 13 FREEDOM CORE ...

Страница 3: ...edom Core can be installed as a stand alone system or integrated with certain other MTI Freedom system components This makes it easy to add the Core system to existing displays or create additional configuration options see Alarm Module Details for additional information System at a Glance Sensor cable attached to product Alarm sounder External alarm 12Vdc alarm siren is triggered if a sensor is r...

Страница 4: ...trying to protect Optional Extension Cable Coupler You can extend the overall operating length of each cable by adding an extension cable and coupler to the system Small square sensor 0 50 x 0 50 Attach to objects that have a flat mounting surface Coupler Extension cable Available in 3 7 and 14 lengths Disc Sensor 1 5 Attach to objects that have a flat mounting surface Locking RJ 0 40 x 1 20 Use w...

Страница 5: ...dom Core Core sensors will not work with any other system module Daisy chain alarm key connectors Use to connect other alarm modules in a daisy chain allowing them to share a remote alarm and keyswitch Alarm sensor connectors Cable conveys alarm signals between alarm module and sensor Daisy chain power connector out Use to connect other alarm modules in a daisy chain allowing them to share a commo...

Страница 6: ...FREEDOM UNIVERSAL 2 0 6 FREEDOM CORE MEASUREMENTS 5 89in 149 50mm 6 14in 155 85mm 0 187in 4 75mm 4 89in 124 21mm 4 05in 102 87mm 1 16in 29 46mm ...

Страница 7: ...eyswitch assembly Piezo buzzer Mounting screws Freedom Core 8 Position Expansion Kit MTI P N 185 1383 00 Includes 8 position alarm module Alarm keyswitch link cable Power share link cable A single power supply can power up to eight daisy chained alarm modules 4 or 8 position A single keyswitch or keypad and buzzer can support up to eight linked alarm modules A single power supply can power up to e...

Страница 8: ...ALARM and KEYSWITCH terminal strips on each module You only need to connect one of the modules to the alarm and keyswitch 6 Plug a system power supply into the power input jack Note If you are daisy chaining several alarm modules to share a common power supply connect wires between the white power connectors on each module You only need to connect one of the modules to the power supply 7 Connect t...

Страница 9: ...rence with product operations then tighten ties to secure 6 Repeat steps 2 5 for all products When finished reset the alarm keyswitch to ALARM ON 7 Verify that all sensor cables with products have a solid red LED The system is now armed and ready for use Note Leave zip ties on at least 24 hours so adhesive bond can gain full strength You can then remove the ties or leave them on recommended to pro...

Страница 10: ...es with products have a solid red LED The system is now armed and ready for use Note Leave zip ties on at least 24 hours so adhesive bond can gain full strength You can then remove the ties or leave them on recommended to provide additional product security and help eliminate false alarms To Remove Attaching Removing the Locking RJ Sensor 1 Set keyswitch to DISABLE ALARM 2 Plug RJ sensor into side...

Страница 11: ...the alarm However if you turn the keyswitch from DISARM ALARM to ALARM ON the system resets and now believes the missing product is a normal condition and no alarm sounds Once a product is added back to this puck you must again perform the learn function to re establish this as the new normal condition Arming the Display Turn on power to system Turn keyswitch from DISARM ALARM to ALARM ON This act...

Страница 12: ...d replace it with a new one LED should return to solid red when the alarm condition is resolved 3 Turn keyswitch to ALARM ON LED should be solid red indicating position is again armed and active If the LED is off this indicates the cable is damaged and must be replace or that the cable is not properly mounted 4 Solid red Turn keyswitch to DISARM ALARM Audible alarm quits but LED continues to flash...

Страница 13: ...ensor to lift Choose a better mounting surface e g flatter non textured Clean mounting surface and then reattach sensor to product Ensure that the alarm plunger is fully depressed Secure sensor with tie wraps for at least 24 hours Damaged sensor Replace damage parts Intermittent false alarms Sensor head is not securely mounted to product allowing alarm plunger to lift Choose a better mounting surf...

Страница 14: ...ensors anti skid pads anti rotation brackets VHB adhesive pads X and L brackets CC and DC brackets cable clamps zip ties and installation retrieval and removal tools Unused SmartCables and Secondary Sensors that are demonstrated by Customer to have been faulty upon delivery to Customer will be replaced at Seller s expense provided however Customer shall be responsible for any and all related shipp...

Отзывы: