background image

CONSIGNES DE SÉCURITÉ

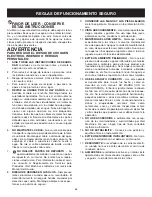
SYMBOLES DE SÉCURITÉ ET INTERNATIONAUX

Ce manuel de l'utilisateur décrit les symboles et pictogrammes de sécurité et internationaux pouvant apparaître sur ce
produit. Consultez le manuel de l'utilisateur pour les informations concernant la sécurité, le montage, le fonctionnement,
l'entretien et les réparations.

SYMBOLE

SIGNIFICATION

SYMBOLE ALERTE DE
SÉCURITÉ

Indique un danger, un avertissement
ou une mise en garde. Ce symbole
peut être combiné à d'autres symbol-
es ou pictogrammes.

AVERTISSEMENT - LISEZ LE
MANUEL DE L'UTILISATEUR

Lisez le manuel de l'utilisateur et suiv-
ez tous les avertissements et con-
signes de sécurité. Vous pourriez à
défaut entraîner des blessures graves
pour vous ou d'autres personnes

PORTEZ DES PROTECTIONS
(TÊTE, YEUX ET OREILLES)

AVERTISSEMENT:

les objets pro-

jetés et les bruits forts peuvent
endommager la vue et l’ouïe. Portez
une visière de norme ANSI Z87.1-
1989 et des protège-oreilles pendant
l'utilisation. la chute d’objets peut
causer des blessures graves à la
tête. Protégez-vous la tête pendant
l'utilisation de l'appareil.

ÉLOIGNEZ LES SPECTATEURS

AVERTISSEMENT :

éloignez les

spectateurs, les enfants et les ani-
maux domestiques en particulier,
d'au moins 15 m (50 pi) de la zone
de coupe. 

SYMBOLE

SIGNIFICATION

DANGER:

Objects thrown up by

machine. 

• N'UTILISEZ PAS LES LAMES

AVERTISSEMENT :

Pour empêcher

des blessures sérieuses aux person-
nes, ne pas attachez pas et utilisez
l'unité avec n'importe quel type de
lames.

Jeter les batteries au nickel-cadmium
dans une poubelle ordinaire peut être
interdit par la legislation locale, de
l’état ou fédérale.

Ne pas mettre en place de batterie
craquelée ou endommagée.

DNe pas mteetre la batterie au feu,
même si elle est sérieusement
endommagée ou complètement hors
d’usage. Une batterie risque d’ex-
ploser si elle est jetée dans le feu.

23

FAMILIARISEZ-VOUS AVEC VOTRE APPAREIL

FIL DE

PROTECTION

DE BORDURES

PARE-DEBRIS

TETE DE COUPE

CARTER MOTEUR

ARBRE DE 

TRANSMISION/CANNE

BATTERY PACK

GÂCHETTE DE CONTACT

MANETTE MARCHE/ARRET

BOUTON DE CONTRÔLE

DE ROTATION

FIL DE NYLON

POIGNEE DE MAINTIEN

RELEASE BUTTON

HARNAIS

CHARGEUR

DE BATTERIE

BOUTON DE REGLAGE

CONSIGNES DE SÉCURITÉ

24


Содержание YARD MACHINES 599

Страница 1: ...Cordless Grass Trimmer Model MTD599 IMPORTANT READ SAFETY RULES AND INSTRUCTIONS CAREFULLY P N 6096 959908 2005 PRINTED IN CHINA Operator s Manual English ...

Страница 2: ...MMER For two years from the date of purchase when this grass trimmer is used and maintained according to the operator s manual Yard Machines will repair any defect in material for workmanship free of charge If this grass trimmer is used for commercial or rental purposes this warranty applies for only 90 days from the date of purchase WARRANTY SERVICE IS AVAILABLE BY RETURNING THIS GRASS TRIMMER TO...

Страница 3: ...y a safety warning may result in property damage or personal injury to yourself or to others Always follow the safety precautions to reduce the risk of fire electric shock and personal injury CAUTION IMPORTANT SAFETY INSTRUCTIONS READ ALL INSTRUCTIONS BEFORE OPERATING Read the instructions carefully Be familiar with the controls and proper use of the unit Do not operate this unit when tired ill or...

Страница 4: ...es Do not wear loose clothing jewelry short pants sandals or go barefoot 11 KEEP AREA CLEAR Keep everyone especially chil dren and pets away from the area of operation Turn off unit immediately if you are approached Never allow children to operate the appliance to be used as a toy or to run unattended at any time 12 AVOID A DANGEROUS ENVIRONMENT Do not use in the presence of flammable liquids or g...

Страница 5: ...ttery even if it is severely damaged or completely worn out The battery may explode in fire 9 Battery leakage may occur under conditions of extreme usage or temperature If liquid comes in con tact with skin wash quickly with soap and water then lemon juice or vinegar If liquid gets in your eyes wash with a strong solution of boric acid and seek medical attention immediately 10 Do not short circuit...

Страница 6: ...eld when needed MINIMUM OPERATING DISTANCE WARNING Keep children bystanders and animals 50 feet 15meters away If approached stop unit immediately SYMBOL MEANING DANGER Objects thrown up by machine DO NOT USE BLADES WARNING To prevent serious personal injury do not attach or operate the unit with any type of blade Must Be Disposed Of Properly Local state or federal laws may prohibit disposal of Nic...

Страница 7: ...TION KNOW YOUR UNIT EDGE GUIDE DEBRIS SHIELD STRING HEAD MOTOR HOUSING SHAFT BATTERY PACK LOCK OFF SWITCH ON OFF SWITCH EDGER CONVERSION BUTTON NYLON LINES ASSIST HANDLE RELEASE BUTTON HARNESS BATTERY CHARGER ADJUSTMENT KNOB ...

Страница 8: ...ghten Fig 3 2 Loosen the adjustment knob C to adjust the assist handle to the most suitable position Fig 4 NOTE The assist handle is ratcheted for variable operat ing positions Adjust to a comfortable position EDGING CONVERSION 1 Grip shaft firmly 2 Push shaft locking button A forward and rotate cut ting assembly until an audible click is heard Fig 5 BATTERY CHARGING To charge the battery pack it ...

Страница 9: ...r by pressing the shaft adjustment button adjust the height of assist handle by loosening the adjustment knob 4 Take a secure hold of the grass trimmer and without letting it touch the grass to be cut push up the safe ty switch then press the trigger on the upper hand grip Let the grass trimmer run for a few seconds and bump the stringhead against the lawn Nylon line will automatically release The...

Страница 10: ...omes in contact with rock brick walls or foundations it will break or fray If string snags fencing it will snap off 6 TRIMMING AROUND TREES Trim around tree trunks with a slow approach so string does not con tact bark Walk around the tree trimming from left to right Approach grass or weeds with the tip of the string and tilt stringhead slightly forward 7 SCALPING Fig 12 Scalping refers to removal ...

Страница 11: ...n and turning the spool head with the other to unlock it Fig 17 Fig 18 The spool carrier and spool will now disassemble easily NOTE There is a spring inside the spool head that could easily be lost Ensure that it is put in a safe place 3 Remove the clear plastic line retaining ring Remove any existing line from the spool 4 Using 0 065 replacement line measure off approxi mately 14 of line Double o...

Страница 12: ...e spool Fig 22 Place the clear plastic line retainer back over the line and spool Fig 23 Pull the lower line up into the lower slot in the clear plastic line retainer Fig 24 Pull the upper line down into the upper slot Fig 25 7 Insert the line through each eyelet in the spool carrier and slide the spool into the carrier Fig 26 NOTE Ensure that the line is within the clear plastic line retainer If ...

Страница 13: ... in particular the guard 3 During operation keep the air slots clean and free of grass 4 Only use a cloth soaked with hot water and a soft brush to clean the string trimmer 5 Do not spray or wet the appliance with water 6 Do not use detergents or solvents as these could ruin the trimmer The parts in plastic can easily be dam aged by chemical agents 7 If the line cutting blade no longer cuts or bre...

Страница 14: ...13 Motor 12V No Load Speed 11 000 min Cutting Line ø0 065 1 65mm Cutting Path 9 230mm Charge Time 16 Hrs Weight 4 9 kg SPECIFICATION ...

Страница 15: ... HOUSING R 7 6041 751001 TERMINAL 25 6SDABB04 18 SCREW 8 6114 959901 TUBE 26 6024 959903 SPRING 9 6036 959901 BUCKLE 27 6228 202004 SPOOL ASS Y 10 6131 959902 COLLAR 28 6228 959902 GUARD ASS Y 11 6SDABB04 06 SCREW 29 6131 959901 GUIDE 12 6056 959908 BATTERY LOCK 30 6SLABB3 5 10 SCREW 13 6024 959901 SPRING 31 6228 BL1201 BATTERY ASS Y 14 6038 959907 HOUSING R 32 6149 959901 STRAP 15 6SDABB04 18 SCR...

Страница 16: ...NOTES 15 ...

Страница 17: ...sold through MTD s authorized channels of export distribution MTD reserves the right to change or improve the design of any MTD Product without assuming any obligation to modify any product previously manufactured No implied warranty including any implied warranty of merchantability or fitness for a particular purpose applies after the applicable period of express written warranty above as to the ...

Страница 18: ...Coupe Herbe Rechargable Modèle MTD599 IMPORTANT LISEZ LES RÈGLES ET CONSIGNES DE SÉCURITÉ SOIGNEUSEMENT P N 6096 959908 2005 FABRIQUÉ Á CHINA Manuel de Utilisation Français ...

Страница 19: ... partir de la date d achat quand ce coupe herbe est utilisé et maintenu selon le manuel de l opérateur Yard Machines réparera n importe quel vice de matériau pour la main d œu vre gratuitement Si ce coupe herbe est utilisé pour des buts commerciaux ou de location cette garantie ne s applique que pendant 90 jours à partir de la date d achat LE SERVICE DE GARANTIE EST DISPONIBLE EN RENVOYANT CE COUP...

Страница 20: ...ez lire les instructions avec soin Familiarisez vous avec les commandes et l utilisation correcte de cet appareil N utilisez pas l appareil si vous êtes fatigué malade ou sous l effet de l alcool de drogues ou de médicaments Les enfants et adolescents de moins de 15 ans ne doivent pas utiliser l appareil exceptés les adolescents assistés d un adulte Inspectez l appareil avant utilisation Remplacez...

Страница 21: ...cernant l entretien s adresser à un Centre de réparation Yard Machines dont le numéro figure sur la couverture arrière de cette Notice d utilisation 8 DANGER POUR LES YEUX Toujours porter des lunettes de sécurité ou tout autre dispositif de protec tion des yeux lorsqu on utilise le coupe herbe Lorsque l on taille des bordures les débris projetés augmentent le risque de blessures Personne ne doit s...

Страница 22: ...argeur le confier à un centre d entretien agréé pour tout entretien ou réparation Un remontage incorrect peut entraîner un risque d élec trocution ou d incencie 10 Pour réduire le risque d électrocution débrancher le chargeur avant d effectuer toute opération d entretien ou de nettoyage Ce risque n est pas réduit par les interrupteurs PRECAUTIONS DE SECURITE POUR L UTILI SATION DU CHARGEUR ET DE L...

Страница 23: ...ont pas été respectées les dommages causés annuleront la garantie et que les réparations seront à la charge du propriétaire Pour des services autres que ceux d entretien à effectuer par l utilisateur s adresser à un Centre de réparation agréé Yard Machines La garantie du fabri cant sera nulle et non avenue si des dommages ou des conditions causés par de mauvaises pratiques d entretien rendent le p...

Страница 24: ...t les bruits forts peuvent endommager la vue et l ouïe Portez une visière de norme ANSI Z87 1 1989 et des protège oreilles pendant l utilisation la chute d objets peut causer des blessures graves à la tête Protégez vous la tête pendant l utilisation de l appareil ÉLOIGNEZ LES SPECTATEURS AVERTISSEMENT éloignez les spectateurs les enfants et les ani maux domestiques en particulier d au moins 15 m 5...

Страница 25: ...ARE DEBRIS TETE DE COUPE CARTER MOTEUR ARBRE DE TRANSMISION CANNE BATTERY PACK GÂCHETTE DE CONTACT MANETTE MARCHE ARRET BOUTON DE CONTRÔLE DE ROTATION FIL DE NYLON POIGNEE DE MAINTIEN RELEASE BUTTON HARNAIS CHARGEUR DE BATTERIE BOUTON DE REGLAGE CONSIGNES DE SÉCURITÉ 24 ...

Страница 26: ...ONTAGE Fig 1 Fig 2 B A INSTRUCTIONS POUR AJUSTER 1 Monter la poignée de maintien A sur l appareil insér er le boulon B dans le bouton de réglage C et ser rer Fig 3 2 Desserrer l écrou C et ajuster la poignée de maintien à une position appropriée Fig 4 REMARQUE La poignée de maintien est conçue pour plusieurs positions ajustez la selon votre confort TRANSFORMATION EN TAILLE BORDURE 1 Saisir fermeme...

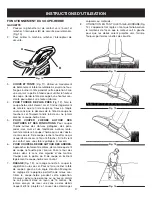
Страница 27: ...et la position de la poignée d aide sont bien correctes avant utilisation ajustez la longueur du coupe herbe en appuyant sur le bouton de réglage de l axe ajustez la hauteur de la poignée d aide en desserrant la molette de réglage 4 Attrapez fermement l extremité du taille herbe et sans le laisser entrer en contact avec l herbe à couper enfoncez l interrupteur de sécurité puis appuyez sur la gâche...

Страница 28: ... cle sans que le fil de coupe vienne le fouetter ce qui risquerait de casser le fil ou l effilocher Si le fil vient en contact avec une clôture grillagée il cassera 6 POUR COUPER L HERBE AUTOUR DES ARBRES Approacher lentement de arbres de manière que le fil de coupe ne fouette pas l écorce Faire le tour des arbres dans le sens des aiguilles d une montre Couper avec la pointe du fil de coupe en inc...

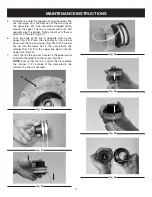
Страница 29: ... bas et faites tourner la tête de bobine de l autre main pour la déverrouiller Fig 17 Fig 18 Le support de bobine et la bobine devraient maintenant se demonter facile ment REMARQUE Il y a un ressort dans la tête de fil faites attention de ne pas le perdre Veillez à le placer en lieu sûr 3 Enlevez le support transparent Sortez tout le fil 4 Utilisez un fil de remplacement de 0 065 d une longueur d ...

Страница 30: ...ig 22 Replacez le support transparent Fig 23 Tirez le fil de dessous et le fixez dans l orifice en dessous du support transparent Fig 24 Tirez le fil de dessus et le fixez dans l orifice en dessus du support transpar ent Fig 25 7 Insérez le fil dans chaque orifice du support de bobine et faites glisser la bobine dans ce support Fig 26 REMARQUE Assurez vous que le fil se trouve bien dans le diviseu...

Страница 31: ... le pare débris 3 Pendant l utilisation garder les ouvertures propres et sans herbe 4 Pour nettoyer le coupe herbe utiliser exclusivement un chiffon trempé dans de l eau chaude et une brosse à poils doux 5 Ne pas asperger ou mouiller l appareil 6 Ne pas utiliser de détergeants ou dissolvants car ils risquent d endommager le coupe herbe Les pièces en plastique sont facilement endommagées par les pr...

Страница 32: ...Moteur 12V Vitesse à vide 11 000 min Taille de ligne ø0 065 1 65mm Diamètre du cercle de coupe 9 230mm Charger le Temps 16 Hrs Poids Net 4 9 kg CARACTÉRISTIQUES 31 ...

Страница 33: ...SDABB04 18 VIS 8 6114 959901 TUBE 26 6024 959903 RESSORT 9 6036 959901 BOUCLE 27 6228 202004 ASSEMBLAGE DE BOBINE 10 6131 959902 COLLIER 28 6228 959902 GARDER L ASSEMBLEE 11 6SDABB04 06 VIS 29 6131 959901 GUIDE 12 6056 959908 SERRURE DE BATTERIE 30 6SLABB3 5 10 VIS 13 6024 959901 RESSORT 31 6228 BL1201 ASSEMBLÉE DE BATTERIE 14 6038 959907 BOITIER R 32 6149 959901 COURROIE 15 6SDABB04 18 VIS 33 601...

Страница 34: ...NOTES 33 ...

Страница 35: ...orer la conception de tout produit MTD sans assumer l obligation de modifier tout produit d une fabrication plus ancienne Aucune garantie implicite y compris toute garantie de valeur marchande ou d adaptation à une fin particulière ne s applique après la période applicable de garantie expresse écrite ci dessus concernant les pièces qui sont identifiées Aucune autre garantie ou caution expresse écr...

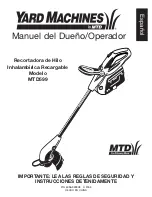
Страница 36: ...Recortadora de Hilo Inhalambirica Recargable Modelo MTD599 IMPORTANTE LEA LAS REGLAS DE SEGURIDAD Y INSTRUCCIONES DETENIDAMENTE P N 6096 959908 2005 HECHO EN CHINA Manuel del Dueño Operador Español ...

Страница 37: ... MACHINE Yard Machine reparará cualquier defecto material o de fabricación de forma gratuita durante un plazo de dos años desde la fecha de compra siempre y cuando la bordeadora haya sido usada y manteni da de acuerdo con el manual de usuario Si esta Bordeadora de césped se usa comercialmente o para alquiler esta garantía estará en vigor durante sólo 90 días desde la fecha de compra SE ACCEDE AL S...

Страница 38: ...ECAUCIÓN INSTRUCCIONES IMPORTANTES DE SEGURIDAD LEA TODAS LAS INSTRUCCIONES DE ANTEMANO Lea las instrucciones detenidamente Familiarícese con los controles y el uso adecuado de la unidad No opere esta unidad si está cansado enfermo o bajo la influencia del alcohol drogas o medicamentos Los niños no debe operar la unidad Los adolescentes deben encontrarse acompañados por un adulto Todos los disposi...

Страница 39: ...OJOS Siempre use lentes protectores cuando opere su recortadora El desorillar aumenta el riesgo de heridas causadas por desechos que vuelan Mantenga siempre a los espec taroes a una distancia segura 9 CONSERVE LAS MANOS Y LOS PIES ALEJADOS de la línea giratoria No opere sin la protección instal ada 10 VISTA ADECUADAMENTE Use siempre pantalones largos zapatos y guantes No usa ropa floja joyas panta...

Страница 40: ... USAR EL CARGADOR Y LA BATERIA 1 No cargue la batería cuando la temperatura sea de menos de 10 C 50 F o de más de 40 C 104 F 2 Nunca trate de conectar dos cargadores juntas 3 El cargador está diseñado para funcionar con la corri ente eléctrica doméstica estándar No trate de usarlo con ningún otro voltaje 4 No introduzca ninguna sustancia extraña en la abertu ra del cargador reservada para la bater...

Страница 41: ...cep ción del mantenimiento del usuario deberá ser real izado por un Centro de Servicio Autorizado Yard Machines Los daños o condiciones causadas por practicas de mantenimiento inadecuadas las cuales hagan que el producto sea inoperable invalidarán la garantía del fabricante 4 PARA LA GARANTIA O EL SERVICIO póngase en contacto con el Centro de Servicio Autorizado de Yard Machines llamando al número...

Страница 42: ...s objetos lanzados y los ruidos potentes pueden dañar los ojos y el oído Utilice protección ocular según la norma ANSI Z87 1 1989 y protec ción auditiva al utilizar esta unidad Utilice casco Utilice una mascara si es necesario DISTANCIA MÍNIMA OPERATIVA ADVERTENCIA Mantenga a niños observadores y animales a 50 pies 15 m Si se aproxima alguien detenga la unidad inmediatamente SÍMBOLO SINGIFICADO PE...

Страница 43: ...E CÉSPED GUARDA DE ORILLA PROTECTOR DESECHOS CABEZA DE HILO CAJA DEL MOTOR FLECHA FIJADOR DEL INTERRUPTOR BOTÔN PARA ROTACIÓN HILO DE NAYLON MANUBRIO AUXILIAR PERILLA GATILLO DE ENCENDIDO APAGADO PAQUETE DE BATERÍA SEGURO DE BATERÍA ARNES CARGADOR DE BATTERIA ...

Страница 44: ... DE ENSAMBLE Fig 1 Fig 2 B A INSTRUCCIONES DE AJUSTE 1 Ensamble el maneral de asistencia A a la unidad inserte el tornillo B a la perilla del maneral C y apri ete Fig 3 2 Afloje la turca C para ajustar el maneral de asisten cia a la mejor posición deseada Fig 4 NOTA El maneral de asistencia es posicionado en varios ángulos de uso Ajústese a una posición confortable TRANSFORMACION A DESORILLADORA 1...

Страница 45: ...sección Conectar el cable 3 Asegúrese de que la longitud de la recortadora de hierba y la posición del mango de asistencia es la conveniente antes de su utilización ajuste la longitud del recortador de hierba pulsando el botón de ajuste del eje ajuste la altura del mango de asistencia soltando el botón de ajuste 4 Sostenga firmemente la cortadora de césped y sin dejarla tocar el césped que va a co...

Страница 46: ...e pero no acerque tanto que toque el objeto ya que el hilo se romperá 6 ORILLAR ALREDEDOR DE ARBOLES Corte alrededor de arboles sin tocar la corteza del árbol utilice la guÌa de corte para que por ningún motivo toque el árbol puede dañar al árbol si le llega a cor tar la corteza del mismo 7 REMOVER VEGETACIÓN Fig 13 Gire la unidad 30 grados hacia la izquierda Ajustando el maneral ten drá mejor con...

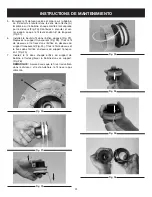
Страница 47: ...acia abajo y gira la cabeza del rotor con la otra mano para separarla Fig 17 Fig 18 El portador del rotor y el rotor ahora se separarán fácilmente NOTA Hay un resorte dentro de la cabeza del rotor que se podría perder fácilmente Asegúrese de colo carlo en un lugar seguro 3 Retire el anillo de retencion de plastico transparente Retire cualquier linea existente del rotor 4 Usando la linea de reempla...

Страница 48: ...que el retenedor de línea de plástico transparente de nuevo sobre la línea y el rotor Fig 23 Jale la linea hasta la ranura inferior en el retenedor de la línea de plástico transparente Fig 24 Jala la línea superior hacia la ranura superior Fig 25 7 Inserte la línea a través de cara ojal en el portador del rotor y deslice el rotor en el portador Fig 26 NOTA Asegúrese que la línea está dentro del re...

Страница 49: ...ras opera la unidad asegúrese de que las ranuras d ventilación están limpias y libres de tierra y pasto 4 Unicamente utilice un trapo húmedo con agua caliente y un cepillo delgado para limpiar su maquina 5 No rocÌe o moje su unidad con agua 6 No utilice detergentes o solventes ya que esto pudiera arruinar su unidad 7 Si la línea de corte ya no corta o se rompe reem plácela contactando un centro de...

Страница 50: ...ESPECIFICACIONES 49 Motor 12V Velocidad no Instalada 11 000 min Reserva del la línea ø0 065 1 65mm Diámetro del Círculo de Corte 9 230mm Cargue Tiempo 16 Hrs Peso neto 4 9 kg ...

Страница 51: ...114 959901 TUBO 26 6024 959903 MUELLE 9 6036 959901 HEBILLA 27 6228 202004 ASAMBLEA DEL CARRETE 10 6131 959902 COLLAR 28 6228 959902 ASAMBLEA DEL PROTECTOR 11 6SDABB04 06 OTRNILLO 29 6131 959901 GUÍA 12 6056 959908 CERRADURA DE LA BATERÍA 30 6SLABB3 5 10 OTRNILLO 13 6024 959901 MUELLE 31 6228 BL1201 ASAMBLEA DE LA BATERÍA 14 6038 959907 CARCASA R 32 6149 959901 CORREA 15 6SDABB04 18 OTRNILLO 33 60...

Страница 52: ...51 NOTAS ...

Страница 53: ...ejorar el diseño de cualquier producto MTD sin adoptar ninguna obligación para modificar cualquier producto fabricado con anteriori dad Ninguna garantía implícita es aplicable después del período de aplicabilidad de la garantía expresa escrita con anterioridad incluyendo cualquier garantía implícita de comerciabilidad o idoneidad para un propósito particular con respecto a las piezas identifi cada...

Страница 54: ...eturn thisproducttothestore Contactyour CustomerServiceAgent Encasdeproblèmesoupourdesquestions NEPASretournerceproduitaupointdevente S adresser aupréposéduServiceàlaclientèleencomposant Paraproblemasopreguntas NOdevolveresteproductoalatienda ContacteasuAgentedeServicioalCliente U S A 1 866 747 9816 CANADA 1 800 668 1238 For Consumer Assistance Please Call L Aide Du Consommateur Necessitez S il Vo...

Отзывы: