


2016 Elite Bubble & Jet Spa Service manual
MSpa website: www.the-mspa.com
-
8
-
2.4
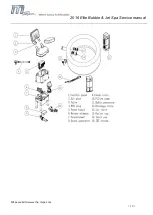
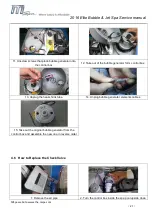
Ensure Well Connection of the Signal Cable between Control Panel and Control Box
Connect the signal line. Find the signal line, loose the cap on the end, and plug into the cable, port on the control panel.
Once the cable is connected properly, the backlight of buttons area will light up on the panel.
2.5
Avoid Air Leakage from Spa Liner Split or Tiny Holes Due to Over-inflation
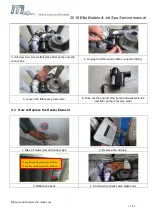
Ensure to ask customers to test the spa pool air pressure with manometer. Testing air pressure is
very critical during the installation process, because any air leakages, pool liner splits due to over
inflation are not covered by the ORPC/MSpa warranty. It is important to advise customers to watch
the MSpa DVD or follow the instruction manual carefully to check and test the air pressure every
single time before inflating or using the spa.
2.6
Try to Repair the Tiny Holes or Split on Spa Liner Instead of Replacing a New Spa Liner
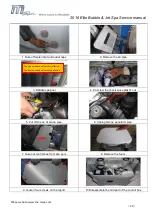
For pool liner air leakage caused by tiny holes or splits, it is suggested to first try to repair with glue and PVC
swatches provided in the repair kit. You can also order the glue and repair swatches from the spare part list.
With the repair material, most pin holes and splits can be repaired easily within 10 minutes.
Spa Tub and Air Bladder Repair
Use the enclosed repair patch to repair any puncture:
1. Clean and dry the area to be repaired thoroughly
2. Apply the glue to the PVC patch and quickly attach it onto the damaged surface
3. Smooth the surface to remove any air bubbles and allow it dry for 5-10 minutes
NOTE:
Glue is not included
Inflate
: Only unscrew this square
stopper for inflation
Deflate
: Unscrew the black stopper
for deflation of the spa pool


