background image

Hardware Setup  

MS-S0121   

2-3

Hardware Setup  

MS-S0121   

CPU (Central Processing Unit)

When nstallng the CPU, make sure that you nstall the cooler to prevent over-

heatng. If you do not have the CPU cooler, consult your dealer before turnng on 

the computer.

Important

Overheating

Overheating will seriously damage the CPU and system. Always make sure the 

cooling fan can work properly to protect the CPU from overheating. Make sure 

that you apply an even layer of thermal paste (or thermal tape) between the CPU 

and the heatsink to enhance heat dissipation.

Replacing the CPU

While replacing the CPU, always turn off the power supply or unplug the power 

supply’s power cord from the grounded outlet first to ensure the safety of CPU.

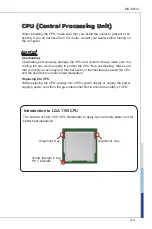
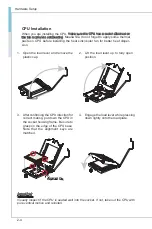
Introduction to LGA 1155 CPU

The surface of LGA 1155 CPU. Remember to apply some thermal paste on t for 

better heat dsperson.

Alignment  Key

Yellow trangle s the 

Pn 1 ndcator

Alignment  Key

Содержание MS-S0121

Страница 1: ...MS S0121 v1 X Server Board...

Страница 2: ...tion Intel is a registered trademark of Intel Corporation Windows is a registered trademark of Microsoft Corporation AMI is a registered trademark of Advanced Micro Devices Inc Award is a registered t...

Страница 3: ...inserting any add on card or mod ule All cautions and warnings on the equipment should be noted Never pour any liquid into the opening that could damage or cause electrical shock If any of the follow...

Страница 4: ...unsorted household waste Please use the public collection system to return recycle or treat them in compliance with the local regulations Taiwan For better environmental protection waste batteries sh...

Страница 5: ...elevision recep tion which can be determined by turning the equipment off and on the user is encouraged to try to correct the interference by one or more of the measures listed below Reorient or reloc...

Страница 6: ...ehr als kommunale Abf lle entsorgt werden MSI hat europaweit verschiedene Sammel und Recyclingunternehmen beauftragt die in die Europ ische Union in Verkehr gebrachten Produkte am Ende seines Lebenszy...

Страница 7: ...r de producten die de merknaam MSI dragen en verkocht zijn in de EU Deze goederen kunnen geretourneerd worden op lokale inzamelingspunten SRPSKI Da bi za titili prirodnu sredinu i kao preduze e koje v...

Страница 8: ...h sb rn ch MAGYAR Annak rdek ben hogy k rnyezet nket megv dj k illetve k rnyezetv d k nt fell pve az MSI eml kezteti nt hogy Az Eur pai Uni EU 2005 augusztus 13 n hat lyba l p az elektromos s elektron...

Страница 9: ...1 Mainboard Specifications 1 2 Mainboard Layout 1 4 2 Hardware Setup 2 1 Quick Components Guide 2 2 CPU Central Processing Unit 2 3 Memory 2 6 Storage 2 8 Power Supply 2 9 Rear Panel I O 2 10 Connecto...

Страница 10: ......

Страница 11: ...1 accommodates the Intel Sandy Bridge Ivy Bridge processor in the LGA1155 package and supports up to 4 DDR3 1066 1333 1600 DIMM slots to provide the maximum of 32GB memory capacity In the advanced lev...

Страница 12: ...U 2 SATA 6Gb s ports SATA1 2 4 SATA 3Gb s ports SATA3 6 C202 SKU 6 SATA 3Gb s ports SATA1 6 System Management Aspeed AST2150 BMC controller with IPMI 2 0 1 5 compliance Graphics Aspeed AST2150 graphic...

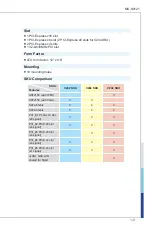
Страница 13: ...r 12 x 9 6 Mounting 10 mounting holes SKU Comparison SKUs Features C202 SKU C204 SKU C204 SKU AST2150 with IPMI V AST2150 with VGA V V SATA 6 Gb s 0 2 2 SATA 3 Gb s 6 4 4 PC1_E1 PCIE x16 slot x8 signa...

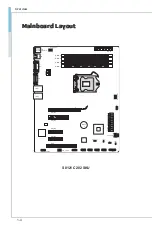
Страница 14: ...JUSB3 JUSB4 JBAT1 JFP1 JTPM1 JLAN1 JLAN2 Top mouse Bottom keyboard COM2 VGA1 SYS_FAN2 CPU_FAN1 COM2 PCI_E1 PCI_E2 PCI_E4 PCI_E5 PCI1 JSPI1 JPWR2 JPWR1 DIMM1 DIMM3 DIMM2 DIMM4 SYS_FAN3 SATA1_2 SATA3_4...

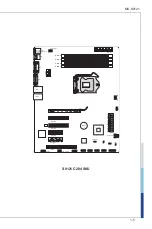
Страница 15: ...JBAT1 JFP1 JTPM1 JLAN1 JLAN2 Top mouse Bottom keyboard COM2 VGA1 SYS_FAN2 CPU_FAN1 COM2 PCI_E1 PCI_E2 PCI_E4 PCI_E5 PCI1 JSPI1 JPWR2 JPWR1 DIMM1 DIMM3 DIMM2 DIMM4 SYS_FAN3 SATA1_2 SATA3_4 SATA5_6 USB...

Страница 16: ......

Страница 17: ...lation be careful in holding the com ponents and follow the installation procedures For some components if you install in the wrong orientation the components will not work prop erly Use a grounded wr...

Страница 18: ...nel I O p 2 10 JBAT1 p 2 16 DIMM Slots p 2 6 JFP1 p 2 14 JUSB1 4 p 2 13 JPWR1 p 2 9 CPU p 2 3 JPWR2 p 2 9 SATA1 6 p 2 12 SYS_FAN3 p 2 11 CPU_FAN1 p 2 11 PCI E Slot p 2 17 JCI1 p 2 14 JTPM1 p 2 15 COM2...

Страница 19: ...erly to protect the CPU from overheating Make sure that you apply an even layer of thermal paste or thermal tape between the CPU and the heatsink to enhance heat dissipation Replacing the CPU While re...

Страница 20: ...load lever and remove the plastic cap 1 Lift the load lever up to fully open position 2 After confirming the CPU direction for correct mating put down the CPU in the socket housing frame Be sure to g...

Страница 21: ...ooler Turn over the mainboard to confirm that the clip ends are correctly inserted 7 Finally attach the CPU Fan cable to the CPU fan connector on the mainboard 8 Important Confirm if your CPU cooler i...

Страница 22: ...lots DIMM4 Channel B DIMM3 Channel A DIMM2 Channel B DIMM1 Channel A Recommended Memory Population Number of DIMMs installed 1 2 3 4 DIMM4 ch B V DIMM3 ch A V V DIMM2 ch B V V V DIMM1 ch A V V V V Not...

Страница 23: ...f the DIMM slot will automatically close when the memory module is properly seated Manually check if the memory module has been locked in place by the DIMM slot clips at the sides Important You can ba...

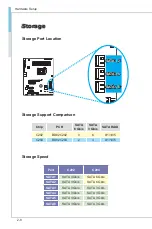
Страница 24: ...omparison Chip PCH SATA 6 Gb s SATA 3 Gb s SATA RAID C202 BD82C202 0 6 0 1 10 5 C204 BD82C204 2 4 0 1 10 5 Storage Speed Port C202 C204 SATA1 SATA 3 Gb s SATA 6 Gb s SATA2 SATA 3 Gb s SATA 6 Gb s SATA...

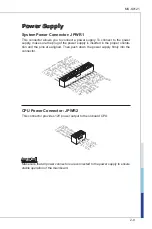
Страница 25: ...3 3 V 1 5 G r o u n d 3 G r o u n d 1 6 P S O N 4 5 V 1 7 G r o u n d 5 G r o u n d 1 8 G r o u n d 6 5 V 1 9 G r o u n d 7 G r o u n d 2 2 5 V 1 0 1 2 V 2 0 R e s 8 P W R O K 2 3 5 V 1 1 1 2 V 2 1 5...

Страница 26: ...vices directly to the connector VGA Port The DB15 pin female connector is provided for monitor LAN The standard RJ 45 LAN jack is for connection to the Local Area Network LAN You can con nect a networ...

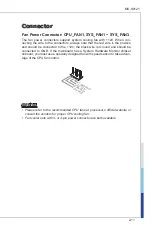
Страница 27: ...he black wire is Ground and should be connected to GND If the mainboard has a System Hardware Monitor chipset onboard you must use a specially designed fan with speed sensor to take advan tage of the...

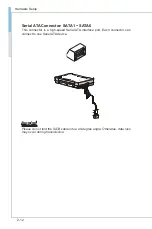
Страница 28: ...onnector SATA1 SATA6 This connector is a high speed Serial ATA interface port Each connector can connect to one Serial ATA device Important Please do not fold the SATA cable into a 90 degree angle Oth...

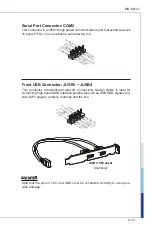
Страница 29: ...S I N Front USB Connector JUSB1 JUSB4 This connector compliant with Intel I O Connectivity Design Guide is ideal for connecting high speed USB interface peripherals such as USB HDD digital cam eras MP...

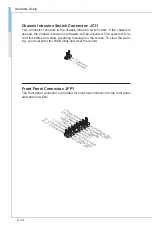
Страница 30: ...e on the screen To clear the warn ing you must enter the BIOS utility and clear the record 1 C I N T R U 2 G r o u n d Front Panel Connector JFP1 The front panel connector is provided for electrical c...

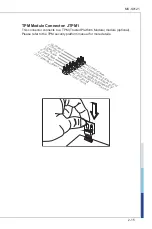
Страница 31: ...manual for more details 1 0 N o P i n 1 4 G r o u n d 8 5 V P o w e r 1 2 G r o u n d 6 S e r i a l I R Q 4 3 3 V P o w e r 2 3 V S t a n d b y p o w e r 1 L P C C l o c k 3 L P C R e s e t 5 L P C a...

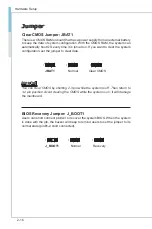
Страница 32: ...guration set the jumper to clear data JBAT1 Normal Clear CMOS 1 1 1 Important You can clear CMOS by shorting 2 3 pin while the system is off Then return to 1 2 pin position Avoid clearing the CMOS whi...

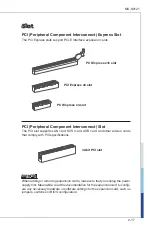
Страница 33: ...Interconnect Slot The PCI slot supports LAN card SCSI card USB card and other add on cards that comply with PCI specifications 32 bit PCI slot Important When adding or removing expansion cards make s...

Страница 34: ......

Страница 35: ...for optimal use Users may need to run the Setup program when An error message appears on the screen at system startup and re quests users to run SETUP Users want to change the default settings for cu...

Страница 36: ...rs before you respond and you still wish to enter Setup restart the system by turning it OFF and On or pressing the RESET button You may also restart the system by simultaneously pressing Ctrl Alt and...

Страница 37: ...nd a right pointer symbol appears to the left of certain fields that means a sub menu can be launched from this field A sub menu contains additional op tions for a field parameter You can use arrow ke...

Страница 38: ...f the onboard Northbridge and South bridge Boot Use this menu to specify the priority of boot devices Security Use this menu to set supervisor and user passwords Save Exit This menu allows you to load...

Страница 39: ...hese items show the firmware and hardware specifications of your system Read only System Date This setting allows you to set the system date The date format is Day Month Date Year System Time This set...

Страница 40: ...3 6 BIOS Setup BIOS Setup Advanced Launch PXE OpROM Launch Storage OpROM Use these settings to launch the PXE option ROM storage option ROM RTC Wake Settings...

Страница 41: ...y the Trusted Computing Group TCG TPMs are special purpose integrated cir cuits ICs built into a variety of platforms to enable strong user authentica tion and machine attestation essential to prevent...

Страница 42: ...D Maximum This feature allows you to circumvent problems with older operating systems that do not support the Intel Pentium 4 processor with Hyper Threading Tech nology When enabled the processor will...

Страница 43: ...currently requested cache line Intel Virtualization Technology Virtualization enhanced by Intel Virtualization Technology will allow a platform to run multiple operating systems and applications in i...

Страница 44: ...3 10 BIOS Setup BIOS Setup BMC Information This menu shows BMC information and hardware monitor status SATA Configuration SATA Mode This setting specifies the SATA controller mode...

Страница 45: ...is no I O ALPM automatically sets the SATA link back to an active power state once I O requests are queued to that link ALPM is only available on SATA controllers that use the Advanced Host Controlle...

Страница 46: ...Mode Extensions SMX This setting enables disables the Secure Mode Extensions Intel TXT LT Support Intel TXT Trusted Execution Technology can only be enabled disabled if SMX is enabled VT and VT d supp...

Страница 47: ...figuration Serial Port 1 Configuration Serial Port This setting enables disables the specified serial port Change Settings This setting is used to change the address IRQ settings of the specified seri...

Страница 48: ...tween the host system and terminal s This setting specifies the type of terminal device for console redirection Bits per second Data Bits Parity Stop Bits This setting specifies the transfer rate bits...

Страница 49: ...S S0121 Chipset North Bridge VT d Intel Virtualization Technology for Directed I O Intel VT d provides the ca pability to ensure improved isolation of I O resources for greater reliability security an...

Страница 50: ...eboot after a power failure or interrupt occurs Available settings are Power Off Leaves the computer in the power off state Power On Leaves the computer in the power on state Last State Restores the s...

Страница 51: ...isplay the full screen logo during the boot up sequence hiding normal POST messages When it is disabled the BIOS will display the normal POST messages instead of the full screen logo Please note that...

Страница 52: ...sers will be prompted for Administrator password only when they enter BIOS Setup User Password User Password controls access to the system at boot and access to the BIOS Setup utility Users will be pr...

Страница 53: ...changes to CMOS and reset the system Discard Changes and Reset Abandon all changes and reset the system Save Changes Save all changes and continue with the Setup Utility Discard Changes Abandon all ch...

Страница 54: ...3 20 BIOS Setup BIOS Setup Event Logs Change Smbios Event Log Settings Smbios Event Log This setting enables disables the Smbios event log...

Страница 55: ...Smbios event logs Erasing is done prior to any logging activation during reset When Log is Full This setting offers options for reactions to a full Smbios event log View Smbios Event Log View System...

Страница 56: ...BIOS Setup BIOS Setup Server Mgmt System Event Log Note All values changed here do not take effect until the computer is restarted SEL Components This setting enables disables system event log compon...

Страница 57: ...t logs When SEL is Full This setting offers options for reactions to a full system event log BMC Network Configuration Configuration Source This setting selects whether to configure LAN channel parame...

Страница 58: ......
Страница 59: ...2 4 1 This chapter provides information on system drivers and utilities Important Please note that firmware update assumes technician level experience 4 Drivers Utilities...

Страница 60: ...ve The installation will auto run simply click the driver or utility and follow the on screen instructions to complete the installation Important Please visit the MSI website to get the latest drivers...

Страница 61: ...S S0121 4 3 MS S0121 Manual A user s manual in PDF format can be acquired through this menu Download Website Visit the MSI website for technical guides BIOS updates driver updates and other informatio...

Отзывы: