background image


2-15 


Getting  Started


u w

v

x

v

y

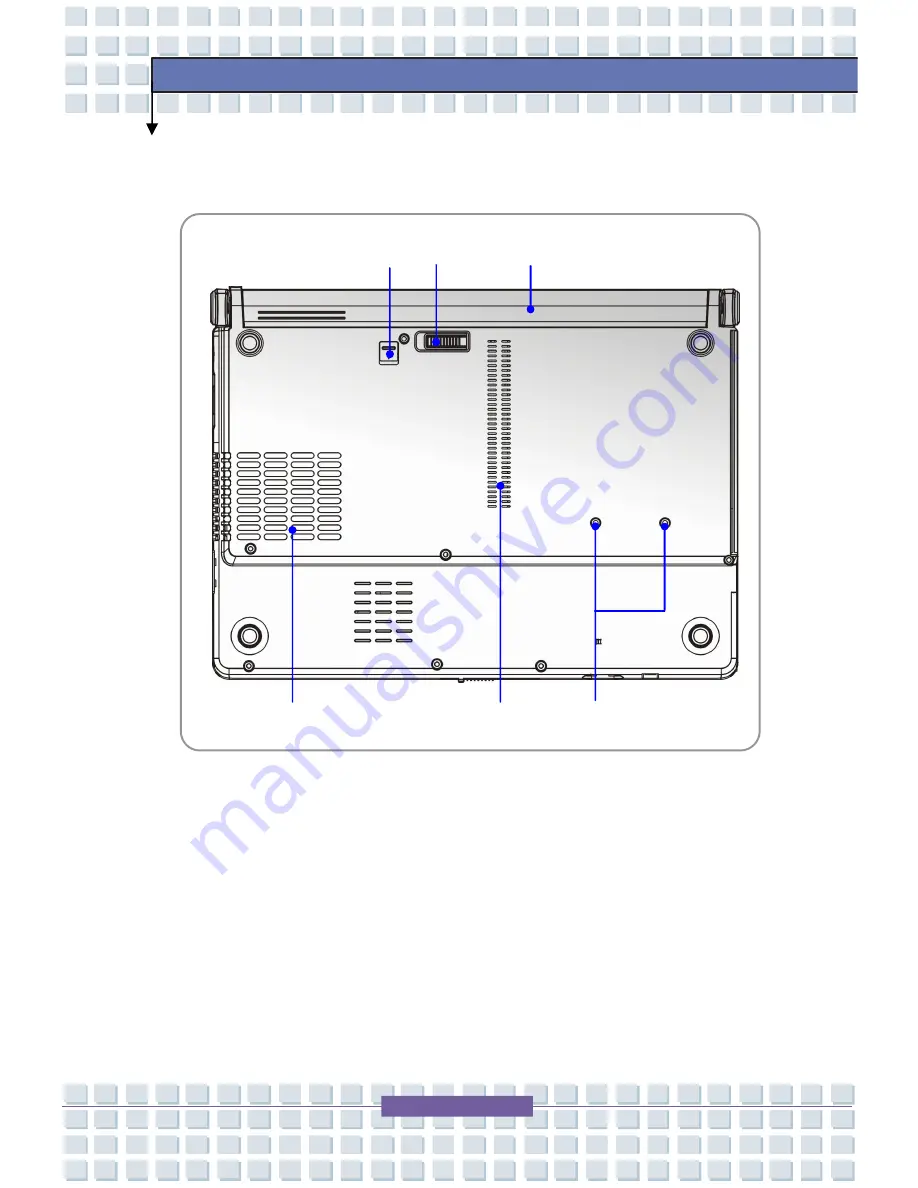
Bottom View 


1. 

Battery Lock/Unlock Button 

Battery  cannot  be  moved  when  the  button  is  positioned  on  lock  status. 

Once the button is pushed to unlock position, the battery is removable. 

2. 

Ventilator 

The ventilator is designed to cool the system. DO NOT block the ventilator 

for air circulation. 

Содержание Megabook S262

Страница 1: ...General Introductions Chapter 1 Getting Started Chapter 2 Customizing this Notebook Chapter 3 BIOS setup Chapter 4 Preface G52 N1057X8...

Страница 2: ...installation If this equipment does cause harmful interference to radio or television reception which can be determined by turning the equipment off and on the user is encouraged to try to correct the...

Страница 3: ...es with part 15 of the FCC Rules Operation is subject to the following two conditions 1 This device may not cause harmful interference 2 This device must accept any interference received including int...

Страница 4: ...innish VAROITUS Paristo voi r j ht jos se on virheellisesti asennettu Vaihda paristo ainoastaan valmistajan suosittelemaan tyyppiin H vit k ytetty paristo valmistajan ohjeiden mukaisesti French ATTENT...

Страница 5: ...e function other than a cordless type during an electrical storm There may be a remote risk of electric shock from lightning 6 Do not use the telephone function to report a gas leak in the vicinity of...

Страница 6: ...r possible use later 3 Keep this equipment away from humidity and high temperature 4 Lay this equipment on a stable surface before setting it up 5 The openings on the enclosure are used for air convec...

Страница 7: ...ing to User s Manual w The equipment was dropped and damaged w The equipment has obvious signs of breakage 11 Never pour any liquid into the opening that could damage the equipment or cause an electri...

Страница 8: ...ger te d rfen Elektro und Elektronik Altger te nicht mehr als kommunale Abf lle entsorgt werden die sich auf 13 August 2005 wirken Und der Hersteller von bedeckt Elektronik Altger te gesetzlich zur ge...

Страница 9: ...n als vervuiling Fabrikanten van dit soort producten worden verplicht om producten retour te nemen aan het eind van hun levenscyclus Srpski Po Direktivi Evropske unije EU o odba enoj ekektronskoj i el...

Страница 10: ...tato sm rnice vztahuje budou povinni odeb rat takov v robky zp t po skon en jejich ivotnosti MAGYAR Az Eur pai Uni EU 2005 augusztus 13 n hat lyba l p az elektromos s elektronikus berendez sek hullad...

Страница 11: ...ft Corporation Windows 98 ME 2000 XP are registered trademarks of Microsoft Corporation w AMI is a registered trademark of American Megatrends Inc w PCMCIA and CardBus are registered trademarks of the...

Страница 12: ...II FCC Conditions III Safety Guideline for Using Lithium Battery IV Caution on Using Modem V Optical Disc Drive Notice VI Macrovision Notice VI Safety Instructions VI WEEE Statements VIII Trademarks X...

Страница 13: ...t side View 2 12 Rear View 2 14 Bottom View 2 15 Power Management 2 17 AC Adapter 2 17 Battery Pack 2 19 Using the Battery Pack 2 22 Basic Operations 2 24 Safety and Comfort Tips 2 24 Have a Good Work...

Страница 14: ...on Devices 3 6 Express PC Card Installation 3 7 Installing the Express card 3 7 Removing the Express card 3 7 Safely Remove Hardware 3 8 BIOS Setup About BIOS Setup 4 2 When to Use BIOS Setup 4 2 How...

Страница 15: ...General Introductions Chapter 1 Getting Started Chapter 2 Customizing this Notebook Chapter 3 BIOS setup Chapter 4 Preface...

Страница 16: ...ual carefully before using this notebook Chapter 1 General Introductions includes the descriptions of all the accessories of this notebook It is recommended to check out that if you have all the acces...

Страница 17: ...yboard webcam printer external monitor IEEE 1394 devices and communication devices but also in installing and removing the PC card Chapter 4 BIOS setup provides information on BIOS Setup program and a...

Страница 18: ...ls in case you need to ship the unit in the future The package should contain the following items w Notebook w User s Manual or Quick Start Guide w All in one software DVD containing the drivers and u...

Страница 19: ...General Introductions Chapter 1 Getting Started Chapter 2 Customizing this Notebook Chapter 3 BIOS setup Chapter 4 Preface...

Страница 20: ...5nm L2 Cache 2MB FSB Speed 667MHz Smart Power Management Support Enhance Speed Step III Core Chips North Bridge Intel 945GM South Bridge Intel 82801GBM ICH 7M Memory Technology DDR II 400 533 667 MHz...

Страница 21: ...ion 2 0 Headphone Out SPDIF Out x 1 IEEE1394 x 1 Mic in x 1 RJ11 x 1 RJ45 x 1 Express Card x 1 34mm 54mm Card Reader Controller O2 OZ128 3 in 1 MMC SD MS Communication Port 56K Fax MODEM MDC AC 97 Q C...

Страница 22: ...ot keys Video Controller UMA VRAM Shared System Memory LCD 1280 x 800 WXGA CRT Support 800x600 max 32bit color 1024x768 max 32bit color 1280x800 max 32bit color 1400x1050 max 32bit color 1600x1200 max...

Страница 23: ...ousing SoundBlaster SoundBlaster compatible Not support DOS Sound Volume Adjust by volume button K B hot key SW Software BIOS Support OS Win XP Home and Professional edition USB Flash Boot Yes USB flo...

Страница 24: ...aspects of your Notebook It will help you to know more about the appearance of this Notebook before using it Top open View Press the Cover Latch to open the top cover LCD Panel The figure of top open...

Страница 25: ...tereo system and Hi Fi function supported 4 Quick Launch Buttons and Power Button Power Button To turn your Notebook power ON and OFF Quick Launch Buttons Simply click the quick launch buttons to spee...

Страница 26: ...2 IEEE 1394 The IEEE 1394 port is a high speed bus that allows you to connect high end digital devices such as the DV digital video camera 3 Audio Port Connectors Make high quality sound blaster with...

Страница 27: ...ok is accessing the hard disk drive AC Power On Glowing Blue when the AC Power is activated and blinking Blue when Notebook is getting into sleep mode Battery Status Blinking Green when the battery is...

Страница 28: ...re 2 RJ 11 Connector The Notebook provides a built in modem that allows you to connect an RJ 11 telephone line through this connector With the 56K V 90 modem you can make a dial up connection 3 RJ 45...

Страница 29: ...pin D sub VGA port allows you to connect an external monitor or other standard VGA compatible device such as a projector for a great view of the Notebook display 6 Power Connector To connect the AC ad...

Страница 30: ...cessing data and playing music movie on the Notebook 2 USB Port The USB 2 0 port allows you to connect USB interface peripheral devices such as the mouse keyboard modem portable hard disk module print...

Страница 31: ...2 13 Getting Started 4 3 in 1 Card Reader The built in card reader supports MMC multi media card SD secure digital and MS memory stick cards...

Страница 32: ...etting Started v u Rear View 1 Kensington Lock Hole This is used to lock the Notebook to location for security 2 Battery Pack Rear View To supply power to your Notebook when the AC adapter is not conn...

Страница 33: ...Unlock Button Battery cannot be moved when the button is positioned on lock status Once the button is pushed to unlock position the battery is removable 2 Ventilator The ventilator is designed to cool...

Страница 34: ...n for releasing the battery pack Press it with one hand and pull the battery pack carefully with the other 4 Battery Pack Supply power to your Notebook when the AC adapter is not connected 5 Screw Box...

Страница 35: ...s being charged immediately NOTE that the AC adapter included in the package is approved for your Notebook using other adapter model may damage the Notebook or other devices on the Notebook Connecting...

Страница 36: ...pter you should 1 Unplug the power cord from the electrical outlet first 2 Unplug the connector from the Notebook 3 Disconnect the power cord and the connector of AC adapter 4 When unplugging the powe...

Страница 37: ...you don t have to worry about the lack of battery power It s recommended to buy a battery pack from your local dealer To remove the battery pack 1 Make sure the Notebook is turned off 2 Check the Loc...

Страница 38: ...to the compartment 2 Slightly slide and press the battery pack into the right place 3 After the right side of the battery pack fitting the right track then slightly press the left side of battery pack...

Страница 39: ...2 21 Getting Started 1 Do not try to disassemble THE BATTERY PACK 2 Please follow your local laws and regulations to recycle the unused battery pack x u...

Страница 40: ...o local regulations Check with your local solid waste officials for details about recycling options or for proper disposal in your area Conserving Battery Power Efficient battery power is critical to...

Страница 41: ...system operation or shut down and turn off the system without interrupting the charging process w The battery pack uses Lithium ion battery cells that have no memory effect You do not need to discharg...

Страница 42: ...sk and chair and adjust their height to fit your posture when operating w When sitting on the chair and adjust the chair s back if available to support your back comfortably w Place you feet flat and...

Страница 43: ...injury to you Please keep the following tips in mind when operating w Change your posture frequently w Stretch and exercise you body regularly w Remember to take breaks after working for a period of t...

Страница 44: ...tebook s keyboard provides all the functions of a full sized 86 key keyboard and an additional Fn key for specific functions on the Notebook The keyboard can be divided into four categories Typewriter...

Страница 45: ...status n Num Lock Press and hold the Fn key and press this key to toggle the Num Lock on and off When this function is activated you can use the numeric keys that are embedded in the typewriter keys n...

Страница 46: ...r which are used to control the cursor movement Move the cursor left for one space Move the cursor right for one space Move the cursor up for one line Move the cursor down for one line Move to the pre...

Страница 47: ...one character to the right of the cursor and move the following text left for one space Press this key to delete one character to the left of the cursor and move the following text left for one space...

Страница 48: ...shortcut menu For more information of the two keys please refer to your Windows manual or online help n Fn Key Switch the display output mode between the LCD external monitor and Both Increase the LCD...

Страница 49: ...ol the Notebook by pointing the location of the cursor on the screen and making selection with its two buttons 1 Cursor Movement Area This pressure sensitive area of the touchpad allows you to place y...

Страница 50: ...utton to select This procedure called as point and click is the basics of operating your Notebook Unlike the traditional pointing device such as the mouse the whole touchpad can act as a left button s...

Страница 51: ...Getting Started desired location finally release the left button to finish the drag and drop operation Move the cursor by sliding your fingertip Put your wrist on the desk comfortably Using the Touch...

Страница 52: ...to swap the functions of the two buttons In addition you can change the size shape moving speed and other advanced features of the cursor on the screen To configure the touchpad you can use the stand...

Страница 53: ...nstall the operating system and software applications The hard disk drive is a non removable storage device in your computer However you can upgrade it by replacing a lager capacity hard disk drive 1...

Страница 54: ...can work both as a DVD ROM drive and a CD RW drive n DVD Dual Drive A dual format recorder allows you to record both the R RW and R RW formats n Super Multi Drive A multi format recorder allows you t...

Страница 55: ...cluding the DVD ROM drive 1 Confirm that the Notebook is turned on 2 Press the Eject Button on the drive s panel and the CD tray will slide out partially Then gently pull the tray out until fully exte...

Страница 56: ...slide out partially Then gently pull the tray out until fully extended 2 Hold the CD by its edge with your fingers and lift it up from the tray 3 Push the tray back into the drive 1 Confirm that the...

Страница 57: ...General Introductions Chapter 1 Getting Started Chapter 2 Customizing this Notebook Chapter 3 BIOS setup Chapter 4 Preface...

Страница 58: ...book Connecting the External Devices The I O input output ports on the Notebook allow you to connect peripheral devices Mouse Keyboard Printer IEEE 1394 Device Monitor Television Microphone Speakers E...

Страница 59: ...of you mouse you can manually enable the mouse by going to Start Menu Control Panel Add Hardware to add the new device Connecting the Keyboard You can connect a keyboard to your Notebook through the P...

Страница 60: ...Start Menu Control Panel Add Hardware to add the new device Connecting the Printer If your printer has a USB interface you can then use the USB port on the Notebook to connect the printer The followi...

Страница 61: ...Alternately you can change the display mode by configuring the settings in Display Properties of Windows operating system Connecting the IEEE 1394 devices The IEEE 1394 port of your Notebook is a next...

Страница 62: ...AN please ask your MIS staff or network manager for help Using the Modem The built in 56Kbps fax data modem allows you to use a telephone line to communicate with others or to dial up to connect the I...

Страница 63: ...tion for the Express Card including how to install and remove it For more information please refer to the manual of your Express Card Installing the Express Card 1 Locate the Express Card slot on your...

Страница 64: ...to your system the Safely Remove Hardware icon will appear on the taskbar Double click the icon to bring up the Safely Remove Hardware dialog box You can see all connected peripheral devices here If...

Страница 65: ...General Introductions Chapter 1 Getting Started Chapter 2 Customizing this Notebook Chapter 3 BIOS setup Chapter 4 Preface...

Страница 66: ...BIOS settings How to Run BIOS Setup To run the BIOS Setup Utility turn on the Notebook and press the Del key during the POST procedure If the message disappears before you respond and you still wish t...

Страница 67: ...menu title Press down arrow to select one item under the menu title Increase the setting value or make changes Decrease the setting value or make changes 1 Open the selected item to change setting op...

Страница 68: ...basic configuration Main menu Show System Overview information about BIOS version CPU features Memory size and setting of System Time and Date Advanced menu Configure IDE and USB settings Boot menu S...

Страница 69: ...s information about its Type and Speed The variable settings in Main menu are Share Memory System Time and System Date System Memory This item indicates the information of System Memory System Time Th...

Страница 70: ...o set the system date The date format is day month date year Day Day of the week from Sun to Sat which is determined by BIOS read only Month The month from 01 January to 12 December Date The date from...

Страница 71: ...alled in the Notebook Press Enter to bring up a window showing the detailed information of the device including the device name vendor LBA mode PIO mode and more Legacy USB Support If you want to use...

Страница 72: ...edStep technology When set to Disabled the system always operates in a conserve power mode the processor works at FSB400 or FSB533 If you want optimize the processor set this item to Enabled so that t...

Страница 73: ...nction a message box will appear on the screen as below Type the password you want up to six characters in length and press Enter The password typed now will replace any previously set password from C...

Страница 74: ...when end users try to run Setup Always A password prompt appears every time when the Notebook is powered on or when end users try to run Setup To clear a set password just press Enter when you are pro...

Страница 75: ...o show the vendor logo on the boot up screen Settings options Disabled and Enabled The default setting is Enabled 1st 2nd 3rd and 4th Boot Device The four items allow you to set the sequence of boot d...

Страница 76: ...utility Discard Changes and Exit Exit the utility without saving the changes you have made Discard Changes Abandon your changes and reload the previous configuration before running the utility Load Op...

Отзывы: