


17
Overview of Components
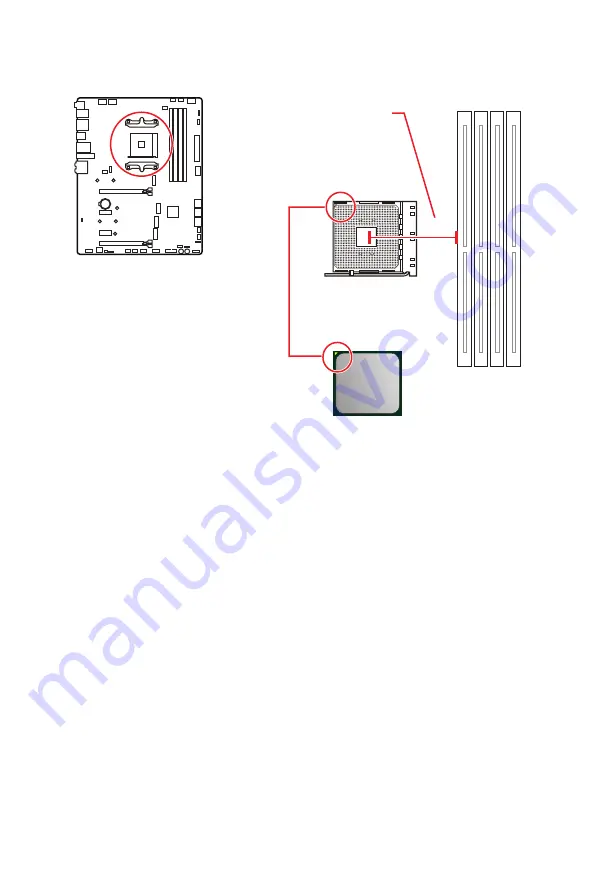
Processor Socket
Introduction to the AM4 CPU
The surface of the AM4 CPU has a
yellow triangle to assist in correctly
lining up the CPU for motherboard
placement. The yellow triangle is
the Pin 1 indicator.
53.62 mm
Distance from the center of the
CPU to the nearest DIMM slot.
⚠
Important
∙
When changing the processor, the system configuration could be cleared and reset
BIOS to default values, due to the AM4 processor’s architecture.
∙
Always unplug the power cord from the power outlet before installing or removing
the CPU.
∙
When installing a CPU, always remember to install a CPU heatsink. A CPU heatsink
is necessary to prevent overheating and maintain system stability.
∙
Confirm that the CPU heatsink has formed a tight seal with the CPU before booting
your system.
∙
Overheating can seriously damage the CPU and motherboard. Always make sure
the cooling fans work properly to protect the CPU from overheating. Be sure to apply
an even layer of thermal paste (or thermal tape) between the CPU and the heatsink to
enhance heat dissipation.
∙
If you purchased a separate CPU and heatsink/ cooler, Please refer to the
documentation in the heatsink/ cooler package for more details about installation.
∙
This motherboard is designed to support overclocking. Before attempting to
overclock, please make sure that all other system components can tolerate
overclocking. Any attempt to operate beyond product specifications is not
recommended. MSI® does not guarantee the damages or risks caused by inadequate
operation beyond product specifications.
Содержание MEG B550 UNIFY
Страница 2: ...II English Deutsch Français Русский 日本語 한국어 繁體中文 簡体中文 ...
Страница 13: ...XIII 4 3 1 2 Power On Einschalten Mettre sous tension Включение питания 通電 전원 켜기 啟動電源 开机 ...
Страница 14: ...XIV ...
Страница 120: ...NOTE ...
Страница 174: ...NOTE ...
Страница 228: ...NOTE ...
Страница 242: ...14 リアI Oパネル ヘッドフォンとマイクの接続方法 ステレオスピーカーの接続方法 7 1チャンネルスピーカーの接続方法 AUDIO INPUT AUDIO INPUT Rear Front Side Center Subwoofer ...
Страница 243: ...15 リアI Oパネル アンテナの取り付け 1 台座でアンテナを組合わせます 2 下図のように2枚のアンテナケーブルをしっかりとWiFiアンテナコネクターに固定しま す 1 2 3 アンテナをできるだけ高く置きます ...
Страница 295: ...15 후면 I O 패널 안테나 설치하기 1 안테나를 받침대에 연결합니다 2 아래 그림처럼 두개의 안테나 케이블을 WiFi 안테나 커넥터에 단단히 나사로 고정합니다 1 2 3 안테나를 가능한 높은 곳에 올려 둡니다 ...
Страница 346: ...14 背板 I O 連接耳機與麥克風插孔示意圖 連接立體聲喇叭插孔示意圖 連接 7 1 聲道喇叭插孔示意圖 AUDIO INPUT AUDIO INPUT Rear Front Side Center Subwoofer ...
Страница 347: ...15 背板 I O 安裝天線 1 將天線連接至底座上 2 將兩支天線鎖緊至 WiFi 天線接頭上 如圖所示 1 2 3 盡量將天線放置在高處 ...
Страница 398: ...14 后置 I O 面板 耳机和麦克风至音频插孔示意图 立体声喇叭至音频插孔示意图 7 1 声道喇叭至音频插孔示意图 AUDIO INPUT AUDIO INPUT Rear Front Side Center Subwoofer ...
Страница 399: ...15 后置 I O 面板 安装天线 1 将天线与底座组合在一起 2 将两根天线电缆拧紧至 WiFi 天线接口 如图所示 1 2 3 请将天线尽量放置更高 ...


